


Automate Your GitHub README with Custom SVG Metrics and GitHub Actions
Do you want your GitHub profile to update itself with your latest stats, contributions, and language usage — and actually look good doing it? This tutorial shows you how to create a fully automated GitHub profile README using GitHub Metrics with custom SVGs and GitHub Actions. What You’ll Build A SVG image with your GitHub stats (commits, PRs, languages, etc.) A README.md that displays those stats beautifully A GitHub Action that runs daily, no manual updates Fully customizable layout, colors, and metrics Step 1: Create Your Profile Repository If you don’t already have one: Replace with your GitHub username git init yourusername cd yourusername touch README.md git remote add origin git@github.com:yourusername/yourusername.git Step 2: Set Up GitHub Metrics Go to lowlighter/metrics. Create a workflow file at .github/workflows/metrics.yml and paste the following: name: Metrics on: schedule: [{cron: "0 0 * * *"}] # Runs daily workflow_dispatch: jobs: github-metrics: runs-on: ubuntu-latest steps: - uses: lowlighter/metrics@latest with: filename: general.svg token: ${{ secrets.METRICS_TOKEN }} base: header, activity, community, repositories config_timezone: America/Bogota plugin_languages: yes plugin_languages_ignored: html plugin_lines: yes plugin_followup: yes (this is an example of my configuration, adjust it to your city) Step 3: Create a Personal Access Token Go to Settings > Developer Settings > Personal Access Tokens > Tokens (classic) Generate a new token with repo and read:user permissions Save it as a secret in your profile repo underSettings > Secrets and variables > Actions Add a new secret with the name: METRICS_TOKEN Step 4: Embed the SVG in Your README  Replace yourusername with your actual GitHub handle. Step 5: Customize Your Metrics You can change everything: layout, color scheme, plugins, transparency, and more. Explore the full configuration options here:
Do you want your GitHub profile to update itself with your latest stats, contributions, and language usage — and actually look good doing it?
This tutorial shows you how to create a fully automated GitHub profile README using GitHub Metrics with custom SVGs and GitHub Actions.
What You’ll Build
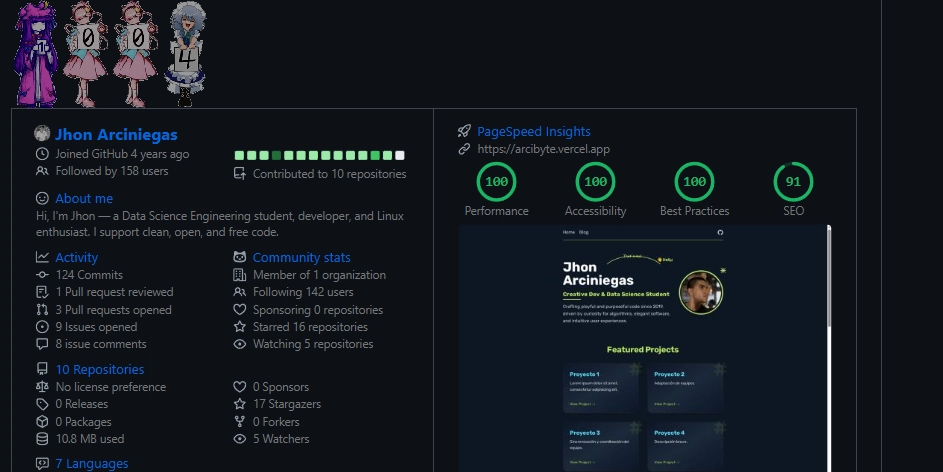
- A SVG image with your GitHub stats (commits, PRs, languages, etc.)
- A README.md that displays those stats beautifully
- A GitHub Action that runs daily, no manual updates
- Fully customizable layout, colors, and metrics
Step 1: Create Your Profile Repository
If you don’t already have one:
Replace with your GitHub username
git init yourusername
cd yourusername
touch README.md
git remote add origin git@github.com:yourusername/yourusername.git
Step 2: Set Up GitHub Metrics
Go to lowlighter/metrics.
Create a workflow file at .github/workflows/metrics.yml and paste the following:
name: Metrics
on:
  schedule: [{cron: "0 0 * * *"}] # Runs daily
  workflow_dispatch:

jobs:
  github-metrics:
    runs-on: ubuntu-latest
    steps:
      - uses: lowlighter/metrics@latest
        with:
          filename: general.svg
          token: ${{ secrets.METRICS_TOKEN }}
          base: header, activity, community, repositories
          config_timezone: America/Bogota
          plugin_languages: yes
          plugin_languages_ignored: html
          plugin_lines: yes
          plugin_followup: yes
(this is an example of my configuration, adjust it to your city)
Step 3: Create a Personal Access Token
- Go to
Settings > Developer Settings > Personal Access Tokens > Tokens (classic) - Generate a new token with
repoandread:userpermissions - Save it as a secret in your profile repo under
Settings > Secrets and variables > Actions - Add a new secret with the name:
METRICS_TOKEN
Step 4: Embed the SVG in Your README

Replace yourusername with your actual GitHub handle.
Step 5: Customize Your Metrics
You can change everything: layout, color scheme, plugins, transparency, and more.
Explore the full configuration options here: