


Tips for Creating Custom Designs in Silhouette Studio
Discover expert tips to create custom designs in Silhouette Studio. Learn how to personalize projects with tools, layers, and creative techniques.
Creating custom designs in Silhouette Studio is both an art and a science. This fun, robust tool lets users create any design they want without trouble. No matter how complex their concept may be, the software helps those ideas come to life. Still, the tool may feel a little puzzling to first-time users. That is why we have decided to provide a number of proven tips that will guide you through the custom project design process. Keep reading to find out.
Silhouette Studio Design Hacks to Increase Your Creativity
-
Learn the Basics
The key to using any software efficiently is getting the hang of how it works and what features it has. Learn about the program before you start creating stuff. There are various components in Silhouette Studio that aid with design. The design area is where you sketch and arrange your layout.
You can move items around and zoom in/out with ease. The Page Setup Panel lets users adjust their design to fit the dimensions of the paper or other material they work with. Once created, you may store and arrange your designs in the library.
-
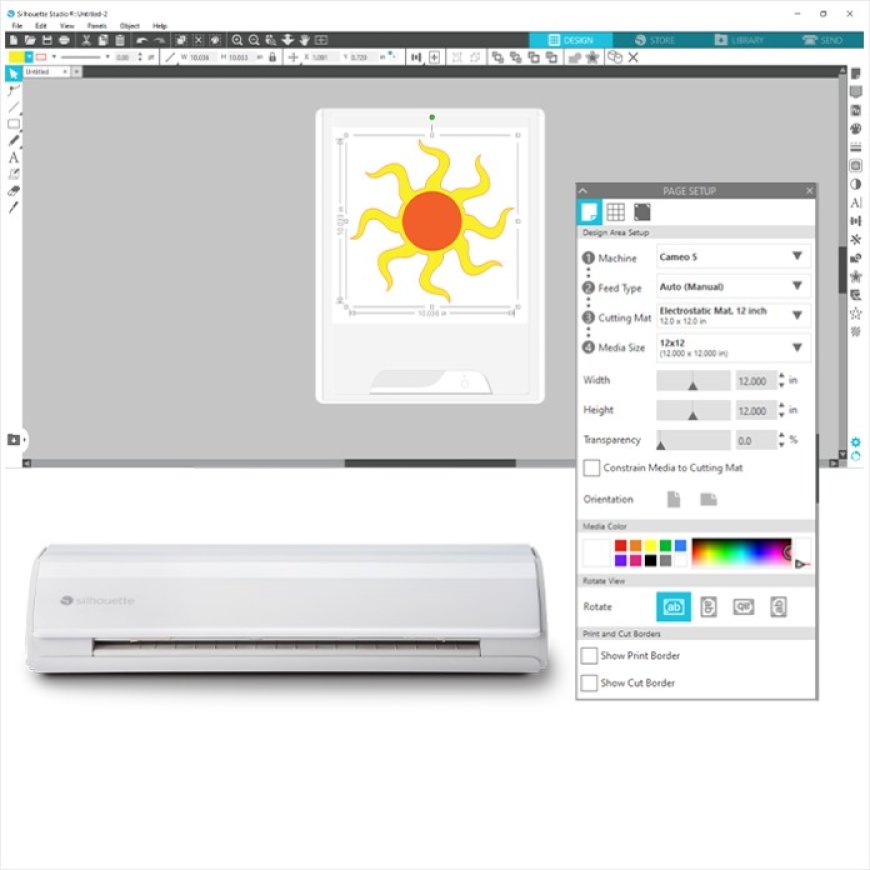
Start with a Clear Canvas Setup
Don't just start designing right away. Match the cutting material with your mat to set up your workspace properly. Open the Page Setup panel by clicking the top-right icon, and then choose the apt cutting mat size for your project. This can be 12 x 12, 12 x 24, and more.
Also, be prudent while picking the media size, such as sticker paper, vinyl, etc. Depending on your layout, you've got to tweak the orientation (portrait or landscape) as well. This guarantees that each of your designs will fit within the boundaries of your actual material. And there would be less material waste, too.
-
Utilize Layers for Better Organization
Layers can be a designer's best friend in Silhouette Studio. They help keep your project organized, especially when many design elements are involved. Grouping objects simplifies moving or changing multiple parts at once. Name your layers with simple names like 'Cut,' 'Draw,' or 'Text' to keep their particular purposes in mind.
You can even hide or lock layers you are not using to prevent any accidental changes. Plus, reorder your layers to control which parts appear on top, which is useful for layered stickers or multi-color designs.
-
Experiment With Different Texts and Fonts
Silhouette Studio allows you to do many things with words. Use computer fonts or download entirely new ones for fun styles. Join letters together with the Weld tool when they come into contact. Besides, curve words around shapes, for example, you can make the text follow a path, such as a circle.
You can add swirls and extra designs from the Glyphs panel, too. However, you must have the Designer Edition for that.
-
Understand Design Importing and Exporting
Upon opting for Silhouette Studio download and use, you will need to import and export designs constantly. The tool lets users import different file types like SVG for cutting, JPG, PNG, or BMP for tracing, and PNG or PDF for digital use or printing.
The free version does not support SVG files, though. Upgrading to the Designer Edition allows access to this feature. If you often use or purchase SVG files, this upgrade is beneficial. To export designs, you can use PNG or screenshots, while higher software versions allow saving as SVG or PDF for professional purposes.
-
Line Things Up Properly
Proper alignment is vital if you want a professional look for your designs. Align tools help you quickly and evenly position shapes, text, and images. Additionally, you can space out multiple objects evenly with a single click. Activating grid snapping causes your objects to adhere to an invisible grid, making alignment easy.
Rulers and guides help ensure all elements are lined up throughout your project. Smart guides automatically appear to aid in spacing and alignment. Also, zooming in allows for precise tweaks, ensuring everything is exactly right. Once aligned, group the elements so they remain in place when you move or resize them.
-
Use Colors to See Your Designs More Clearly
Using colors in a design can help a ton in the planning stage. This makes it easier to understand and tweak, especially when working with multiple pieces or layers. As in a multilayer sticker, using distinct colors for each component makes it easier to remember where everything is. Patterns or gradients help visualize the final product and experiment with textures or color transitions.
Colors can also help preview layering and spacing, allowing for a better element layout. Prior to submitting the project to the machine, it is helpful to plan steps by task, such as cutting parts, drawing, or scoring. A colorful version can help with team or customer review before production starts.
-
Utilize the Offset Tool for Adding Borders
Use Silhouette Studio's Offset tool to add a border or outline around text/shapes and boost your designs. It is particularly useful for stickers, decals, and layered vinyl projects. You can choose whether the border goes inside or outside the shape, and easily adjust its thickness by changing the distance.
You can also alter colors for better visualization and make multiple offsets for more depth. This tool is easy to use and gives your creations a chic appearance.
-
Create Your Own Cutting Settings
Silhouette Studio needs different cutting settings for different materials. Vinyl, cardstock, sticker paper, and fabric—all need specific settings to yield the most precise results. Before cutting a complete project, a test cut is necessary to ensure that the right blade depth, speed, and force are applied. While a shallower setting can cut thinner materials faster, a deeper blade setting and slower speed are ideal for thicker materials.
Also, save your preferred settings with a unique, clear name to make them easily findable. Check the mat type to make sure the correct mat and settings are being used. Monitor the blade wear to prevent dull cuts. By setting up and saving the perfect cutting settings, you can avoid errors and guarantee that your projects turn out amazing every time.
-
Save Often and Create Backups
It is vital to save and back up your designs regularly to keep your projects safe. Use 'Save As' to make different versions so that you can go back to earlier ideas if necessary. Store your files on USB drives, external hard drives, etc. Utilize cloud services (Google Drive, Dropbox, OneDrive, and more) as well.
If you have a Silhouette account, your designs will be saved for simplified access on other devices. Name your files smartly for easy finding. Make a habit of saving every few minutes, especially before big tasks like tracing or printing. This careful approach helps avoid losing work and assures you always have copies of your best designs.
-
Capitalize on the Silhouette Design Store
The Silhouette Design Store offers a vast selection of pre-made designs and fonts to use in various projects. With thousands of designs available, including seasonal items, quotes, shapes, and 3D projects, users can access free designs every week. Discounted design bundles provide more options for less.
Users can preview designs before purchasing and can use store credits or subscriptions for even better deals. The Design Store is a quick and enjoyable way to grow your design collection and find inspiration when you’re uncertain about what to make next.
Silhouette Studio Best Features
Here are a few Silhouette Studio features that make the tool so great:
-
User-Friendly Design Interface: The minimalist, drag-and-drop UI of Silhouette Studio makes designing easy. All tools have clear labels, with the workspace mimicking your cutting mat for precise layout planning.
-
Print and Cut Facility: Users can print their designs using a standard printer and then cut around them with the Silhouette machine. The registration marks generated by the Silhouette Studio software help bring accurate cuts.
-
Library and Cloud Sync: Store your created designs in the Silhouette Library. You can also sync them across various devices using the cloud feature to access designs on the go.
-
Trace Tool: Using this feature, you can convert bitmap images, such as JPGs or PNGs, into vector designs you can cut. Tweaking things like the threshold, low and high passes, etc., allows you to control the inclusion level of details.
-
PixScan Technology: The PixScan tech makes scanning a drawing/printed item and having the machine make precise cuts super simple. All you’ll need are a PixScan mat and a camera (your smartphone will do just fine). This is useful, especially if you have illustrations or drawings that were drawn by hand.
-
Matless Cutting Support: Silhouette machines like Cameo 4 and later come equipped with a matless cutting facility. This makes it possible to cut certain materials (for example: vinyl, HTV, etc.) straight from the roll without even needing a mat.
Final Words
Silhouette Studio gives designers endless ways to showcase their creative side. Creating custom gifts? Starting a small business? Designing for fun? This tool has got you covered! It will help bring all your designs alive. So, don't wait! Get Silhouette Studio today and utilize the tips we mentioned in this blog to create something extraordinary!


