![Best Areas in Gurgaon for Investment - PropXchange Property Listings [2025 Guide]](https://newsworldstream.com/uploads/images/202505/image_430x256_6819e634962a9.jpg)


TCP client/server with Python
Welcome to the next pikoTutorial ! The minimal TCP server A TCP server listens for incoming connections on a specified port and communicates with clients over that connection. from socket import socket, AF_INET, SOCK_STREAM from argparse import ArgumentParser # define command line interface parser = ArgumentParser() parser.add_argument('-ip', help='IP') parser.add_argument('-server_port', type=int, help='Server port') # parse command line options args = parser.parse_args() # create a TCP socket with socket(AF_INET, SOCK_STREAM) as server_socket: # bind server with a specific network address # which consists of IP and port number server_socket.bind((args.ip, args.server_port)) # start listening for requests server_socket.listen() print(f'TCP server up and listening on {args.ip}:{args.server_port}') # accept an incoming connection client_socket, client_address = server_socket.accept() print(f'Connection established with {client_address[0]}:{client_address[1]}') # receive data from the client data: bytes = client_socket.recv(1024) print(f'Received message: {data.decode()}') # send response to client client_socket.send('Message received'.encode()) The minimal TCP client A TCP client establishes a connection with a server, sends data, and receives responses. from socket import socket, AF_INET, SOCK_STREAM from argparse import ArgumentParser # define command line interface parser = ArgumentParser() parser.add_argument('-ip', help='IP') parser.add_argument('-server_port', type=int, help='Server port') # parse command line options args = parser.parse_args() # create a TCP socket with socket(AF_INET, SOCK_STREAM) as client_socket: # connect to the server client_socket.connect((args.ip, args.server_port)) # send message to the server print(f'Sending message to {args.ip}:{args.server_port}') client_socket.send('Hello from TCP client!'.encode()) # receive response from server data: bytes = client_socket.recv(1024) print(f'Received response from server: {data.decode()}') Bidirectional communication You can now create the following setup: Note for beginners: on the image above, I didn’t put any specific number of the client’s port because in the first example that number is assigned by operating system at random. If you want to know how to specify the client’s port as well, you’ll find it in the second example. Run server with the command below: python3 server.py -ip 127.0.0.1 -server_port 12345 And the client: python3 client.py -ip 127.0.0.1 -server_port 12345 You’ll see the following output in the server console: TCP server up and listening on 127.0.0.1:12345 Connection established with 127.0.0.1:36486 Received message: Hello from TCP client! And on the client side, you’ll get: Sending message to 127.0.0.1:12345 Received response from server: Message received Specifying client's port In the previous example, although we defined the server port, the client’s port was randomly assigned by the operating system. If you need to specify the client’s port, you can bind it manually before connecting to the server: from socket import socket, AF_INET, SOCK_STREAM from argparse import ArgumentParser # define command line interface parser = ArgumentParser() parser.add_argument('-ip', help='IP') parser.add_argument('-server_port', type=int, help='Server port') parser.add_argument('-client_port', type=int, help='Client port') # parse command line options args = parser.parse_args() # create a TCP socket with socket(AF_INET, SOCK_STREAM) as client_socket: # bind client to the specific address client_socket.bind((args.ip, args.client_port)) # connect to the server client_socket.connect((args.ip, args.server_port)) # send message to the server print(f'Sending message to {args.ip}:{args.server_port}') client_socket.send('Hello from TCP client!'.encode()) # receive response from server data: bytes = client_socket.recv(1024) print(f'Received response from server: {data.decode()}') If you run the above script with the following command: python3 client.py -ip 127.0.0.1 -server_port 12345 -client_port 56789 You’ll get the connection as presented on the image below: You'll see the client port number in the server's logs: TCP server up and listening on 127.0.0.1:12345 Connection established with 127.0.0.1:56789 Received message: Hello from TCP client!
Welcome to the next pikoTutorial !
The minimal TCP server
A TCP server listens for incoming connections on a specified port and communicates with clients over that connection.
from socket import socket, AF_INET, SOCK_STREAM
from argparse import ArgumentParser
# define command line interface
parser = ArgumentParser()
parser.add_argument('-ip', help='IP')
parser.add_argument('-server_port', type=int, help='Server port')
# parse command line options
args = parser.parse_args()
# create a TCP socket
with socket(AF_INET, SOCK_STREAM) as server_socket:
    # bind server with a specific network address
    # which consists of IP and port number
    server_socket.bind((args.ip, args.server_port))
    # start listening for requests
    server_socket.listen()
    print(f'TCP server up and listening on {args.ip}:{args.server_port}')
    # accept an incoming connection
    client_socket, client_address = server_socket.accept()
    print(f'Connection established with {client_address[0]}:{client_address[1]}')
    # receive data from the client
    data: bytes = client_socket.recv(1024)
    print(f'Received message: {data.decode()}')
    # send response to client
    client_socket.send('Message received'.encode())
The minimal TCP client
A TCP client establishes a connection with a server, sends data, and receives responses.
from socket import socket, AF_INET, SOCK_STREAM
from argparse import ArgumentParser
# define command line interface
parser = ArgumentParser()
parser.add_argument('-ip', help='IP')
parser.add_argument('-server_port', type=int, help='Server port')
# parse command line options
args = parser.parse_args()
# create a TCP socket
with socket(AF_INET, SOCK_STREAM) as client_socket:
    # connect to the server
    client_socket.connect((args.ip, args.server_port))
    # send message to the server
    print(f'Sending message to {args.ip}:{args.server_port}')
    client_socket.send('Hello from TCP client!'.encode())
    # receive response from server
    data: bytes = client_socket.recv(1024)
    print(f'Received response from server: {data.decode()}')
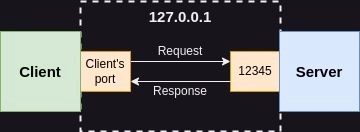
Bidirectional communication
You can now create the following setup:
Note for beginners: on the image above, I didn’t put any specific number of the client’s port because in the first example that number is assigned by operating system at random. If you want to know how to specify the client’s port as well, you’ll find it in the second example.
Run server with the command below:
python3 server.py -ip 127.0.0.1 -server_port 12345
And the client:
python3 client.py -ip 127.0.0.1 -server_port 12345
You’ll see the following output in the server console:
TCP server up and listening on 127.0.0.1:12345
Connection established with 127.0.0.1:36486
Received message: Hello from TCP client!
And on the client side, you’ll get:
Sending message to 127.0.0.1:12345
Received response from server: Message received
Specifying client's port
In the previous example, although we defined the server port, the client’s port was randomly assigned by the operating system. If you need to specify the client’s port, you can bind it manually before connecting to the server:
from socket import socket, AF_INET, SOCK_STREAM
from argparse import ArgumentParser
# define command line interface
parser = ArgumentParser()
parser.add_argument('-ip', help='IP')
parser.add_argument('-server_port', type=int, help='Server port')
parser.add_argument('-client_port', type=int, help='Client port')
# parse command line options
args = parser.parse_args()
# create a TCP socket
with socket(AF_INET, SOCK_STREAM) as client_socket:
    # bind client to the specific address
    client_socket.bind((args.ip, args.client_port))
    # connect to the server
    client_socket.connect((args.ip, args.server_port))
    # send message to the server
    print(f'Sending message to {args.ip}:{args.server_port}')
    client_socket.send('Hello from TCP client!'.encode())
    # receive response from server
    data: bytes = client_socket.recv(1024)
    print(f'Received response from server: {data.decode()}')
If you run the above script with the following command:
python3 client.py -ip 127.0.0.1 -server_port 12345 -client_port 56789
You’ll get the connection as presented on the image below:

You'll see the client port number in the server's logs:
TCP server up and listening on 127.0.0.1:12345
Connection established with 127.0.0.1:56789
Received message: Hello from TCP client!


