


Native Android Unity Profiling using Android Studio
While Unity offers robust profiling capabilities, in some cases it’s necessary to rely on Native profiling, offering more low-level information and metrics about the underlying hardware running your game. In this tutorial, we’ll see how to do that while developing on Android, using Android Studio. Preparing the build In order to run your game build through the Native Profiler, we need to ensure the right options are selected when generating your APK. On Android you can have Debuggable and Profileable APKs. The main difference is that Debuggable apps allow you to record more information, such as allocation and heap dumps, while Profileable apps offer more basic profiling tasks. On the other hand, debuggable APKs have significant overhead due to the added debugging capabilities, so for performance profiling, profileable APKs will provide more accurate readings. In Unity, development builds are debuggable. By selecting the “Development Build” toggle, Unity will add the android:debuggable attribute being set in the Manifest, as you can confirm by inspecting the APK. On the other hand, Unity release builds are neither debuggable nor profileable. If you need a profileable build, you can export your build as a Gradle Project, and then edit the Manifest to add the relevant attribute: In the Player Settings, ensure the Scripting Backend dropdown is set to IL2CPP. In addition, ensure Autoconnect Profiler, Deep Profiling Support, and Script Debugging are disabled. These options are not necessary for Android Studio native profiling and have a significant impact on performance, leading to capture results that are not representative of the actual game performance. Finally, it’s useful to include debugging symbols in order to have readable callstacks. Symbols are files that attach extra information to your executable, such as function and variable names, source code filenames, line numbers, scopes, class names and so on. To do so, ensure the relevant option is selected in the Build Settings, as shown below. Public symbols provide a table that allows converting function addresses to human-readable strings, while Debugging (Full) symbols have extra information useful for debugging, but that shouldn’t be exposed to users. Attaching the Android Studio Profiler Now that you have your APK, let’s install that on your mobile device. Then, open Android Studio to start taking a capture. If you are on Windows, you can launch the Standalone profiler in [androidstudio-installation-folder]/bin. This is not available on Mac, so you’ll need to load a project instead. From the Android Studio Launch window, select the More menu on the top-right, then “Profile or debug APK”, and navigate to your development APK. Android Studio will create a ApkProject for you, and show some general information such as the files contained within the APK. From the left menu, select the Profiler module. Then, ensure the correct device is selected in the top menu, as shown below. The Profiler will now show all debuggable and profileable running processes on that device. The one related to your open project is normally marked with an Android icon, as shown below. For each process, the Profiler will tell you if the related configuration is Debuggable or Profileable. As you can see, the Profiler offers multiple tasks, including System traces, Heap Dumps for Memory Analysis, Callstack Samples, Allocations and so on. When starting a task, you have the option to attach it to the running process as it is, or restart it in order to capture boot time and launch metrics. Not all tasks support restarting the attached process. As mentioned before, for performance profiling is recommended to have a Profileable build as it gives more accurate readings. If you want to track device resources in real-time, select the “View Live Telemetry” task. Here, you can see CPU usage (both coming from your game, and other apps running on the device), optionally inspect work done by each thread, as well as memory usage. In order to collect more in-depth data, let’s take a System Trace instead. For this task, Android Studio won’t show data in real-time. Instead, it will keep collecting it until you manually stop the recording. Let the profiler run while you play a relevant section of your game, then stop and wait until the data is parsed and the capture is being loaded. From here, you can inspect CPU activity by checking the CPU Cores and Threads sections, while you can check Memory consumption in the Process Memory section. To track energy consumption, you can inspect the Power Rails section. Each hardware piece, such as CPU, GPU, Camera, WLAN, Display, and so on are shown as a separate Power Rail. The Battery section will show the related battery charge and capacity, as well as the current for each frame. Note that these two sections trace the overall device power and battery metrics, not just the one originating from y
While Unity offers robust profiling capabilities, in some cases it’s necessary to rely on Native profiling, offering more low-level information and metrics about the underlying hardware running your game.
In this tutorial, we’ll see how to do that while developing on Android, using Android Studio.
Preparing the build
In order to run your game build through the Native Profiler, we need to ensure the right options are selected when generating your APK.
On Android you can have Debuggable and Profileable APKs. The main difference is that Debuggable apps allow you to record more information, such as allocation and heap dumps, while Profileable apps offer more basic profiling tasks. On the other hand, debuggable APKs have significant overhead due to the added debugging capabilities, so for performance profiling, profileable APKs will provide more accurate readings.
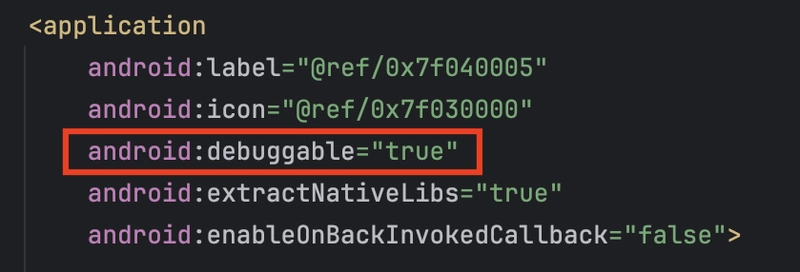
In Unity, development builds are debuggable. By selecting the “Development Build” toggle, Unity will add the android:debuggable attribute being set in the Manifest, as you can confirm by inspecting the APK.
On the other hand, Unity release builds are neither debuggable nor profileable. If you need a profileable build, you can export your build as a Gradle Project, and then edit the Manifest to add the relevant attribute:
In the Player Settings, ensure the Scripting Backend dropdown is set to IL2CPP. In addition, ensure Autoconnect Profiler, Deep Profiling Support, and Script Debugging are disabled. These options are not necessary for Android Studio native profiling and have a significant impact on performance, leading to capture results that are not representative of the actual game performance.
Finally, it’s useful to include debugging symbols in order to have readable callstacks. Symbols are files that attach extra information to your executable, such as function and variable names, source code filenames, line numbers, scopes, class names and so on. To do so, ensure the relevant option is selected in the Build Settings, as shown below.
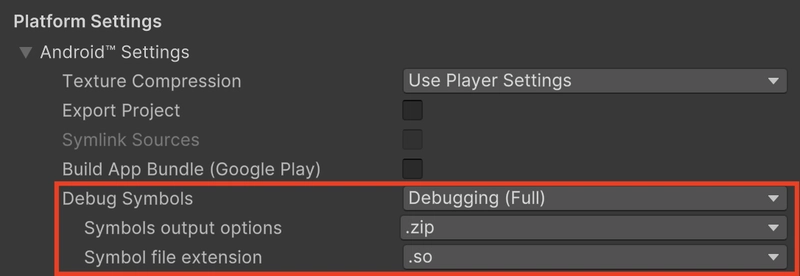
Public symbols provide a table that allows converting function addresses to human-readable strings, while Debugging (Full) symbols have extra information useful for debugging, but that shouldn’t be exposed to users.
Attaching the Android Studio Profiler
Now that you have your APK, let’s install that on your mobile device. Then, open Android Studio to start taking a capture.
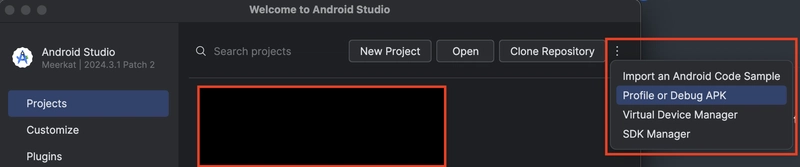
If you are on Windows, you can launch the Standalone profiler in [androidstudio-installation-folder]/bin. This is not available on Mac, so you’ll need to load a project instead.
From the Android Studio Launch window, select the More menu on the top-right, then “Profile or debug APK”, and navigate to your development APK.
Android Studio will create a ApkProject for you, and show some general information such as the files contained within the APK.
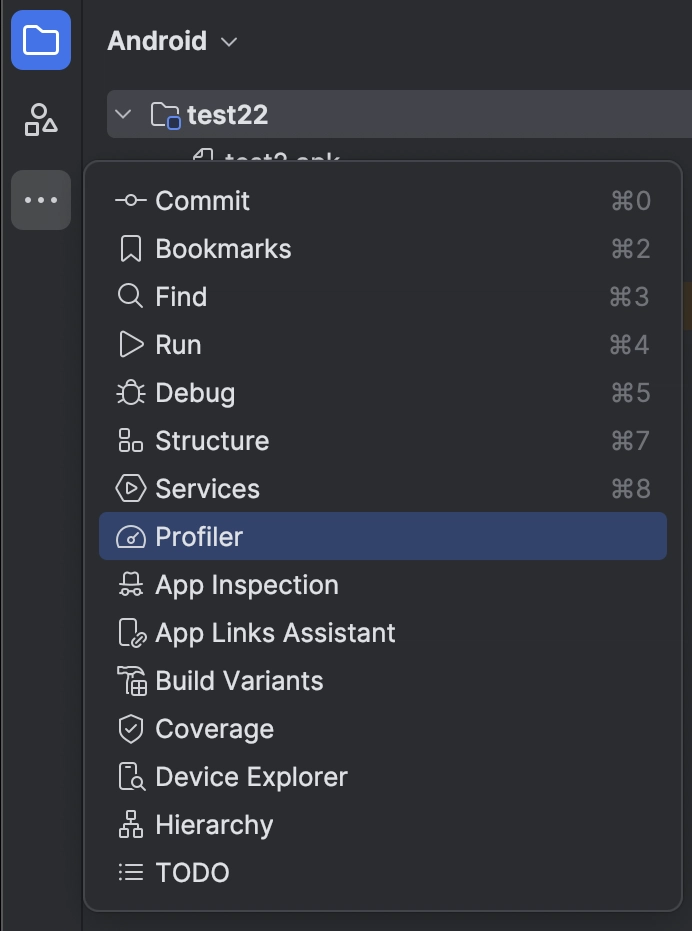
From the left menu, select the Profiler module.
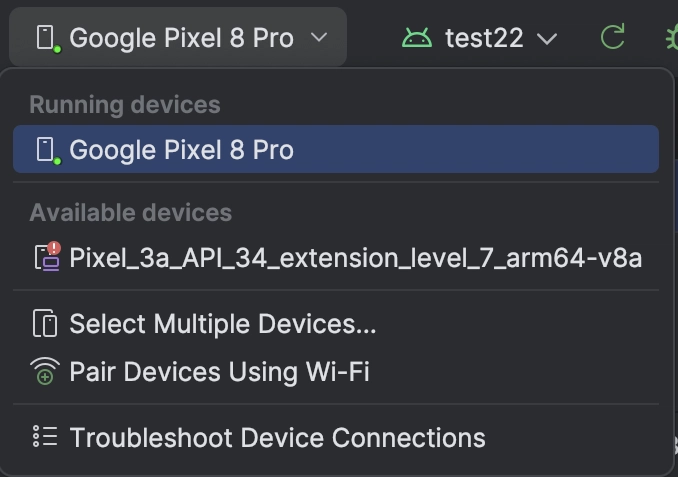
Then, ensure the correct device is selected in the top menu, as shown below.
The Profiler will now show all debuggable and profileable running processes on that device. The one related to your open project is normally marked with an Android icon, as shown below.
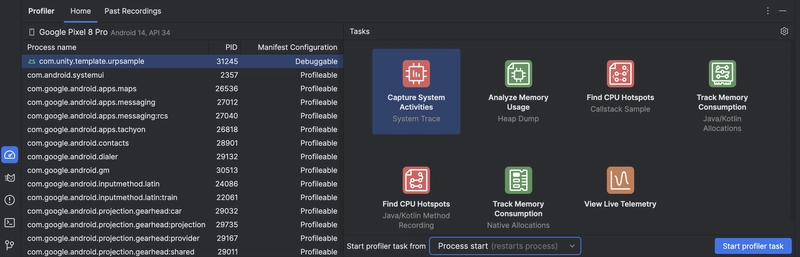
For each process, the Profiler will tell you if the related configuration is Debuggable or Profileable.
As you can see, the Profiler offers multiple tasks, including System traces, Heap Dumps for Memory Analysis, Callstack Samples, Allocations and so on.
When starting a task, you have the option to attach it to the running process as it is, or restart it in order to capture boot time and launch metrics. Not all tasks support restarting the attached process. As mentioned before, for performance profiling is recommended to have a Profileable build as it gives more accurate readings.

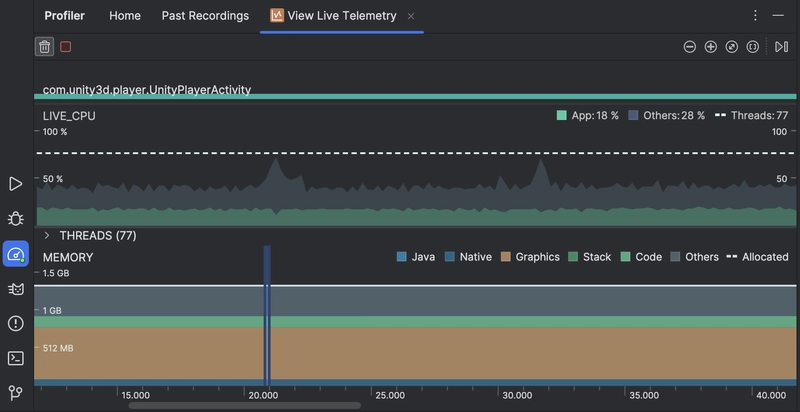
If you want to track device resources in real-time, select the “View Live Telemetry” task. Here, you can see CPU usage (both coming from your game, and other apps running on the device), optionally inspect work done by each thread, as well as memory usage.
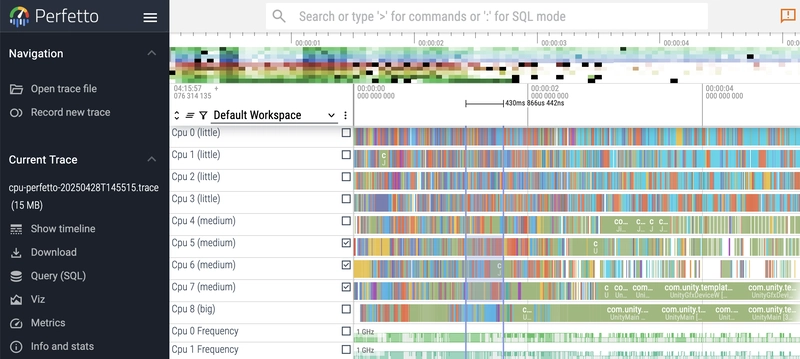
In order to collect more in-depth data, let’s take a System Trace instead. For this task, Android Studio won’t show data in real-time. Instead, it will keep collecting it until you manually stop the recording.
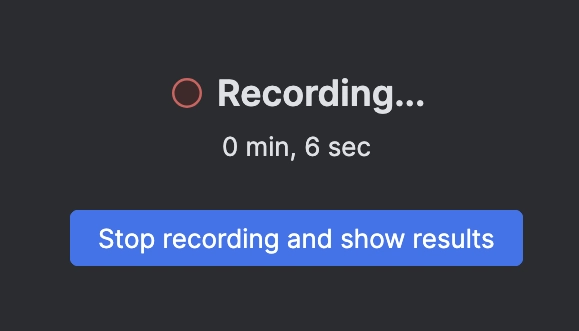
Let the profiler run while you play a relevant section of your game, then stop and wait until the data is parsed and the capture is being loaded.

From here, you can inspect CPU activity by checking the CPU Cores and Threads sections, while you can check Memory consumption in the Process Memory section.
To track energy consumption, you can inspect the Power Rails section. Each hardware piece, such as CPU, GPU, Camera, WLAN, Display, and so on are shown as a separate Power Rail. The Battery section will show the related battery charge and capacity, as well as the current for each frame. Note that these two sections trace the overall device power and battery metrics, not just the one originating from your game.
Finally, the Display section will show a few frame rendering metrics, such as janky frames taking longer than expected, leading to UI latency and unstable framerate.
Exporting Capture Trace Files
All the captures taken during a session will be saved in the Past Recordings tab of the Profiler.
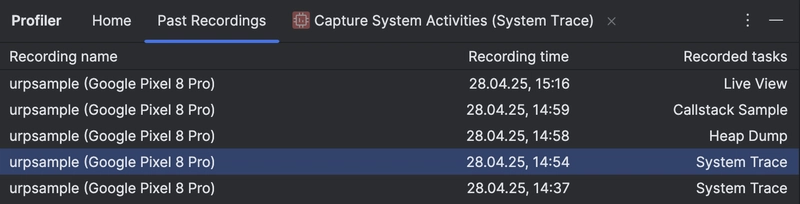
These recordings will be wiped as soon as you close Android Studio. If you want to retain the data, you can use the “Export recording” button at the bottom. The capture will then be exported as a Perfetto Trace file. You can share and re-import the trace file in Android Studio by using the related “Import Recording” button.
Alternatively, you can load it using Perfetto, a free Performance instrumentation and tracing web tool provided by Google. You can find it here