


The Ultimate Guide to Deploying a Node.js Express MongoDB Backend on Vercel
Deploying a Node.js + Express + MongoDB backend on Vercel can sometimes be tricky, especially when dealing with different folder structures. This guide provides a detailed breakdown, with a special focus on configuring the vercel.json file correctly to avoid deployment errors. Prerequisites Before we begin, make sure you have the following: Node.js installed on your local machine. MongoDB Atlas account (or any cloud MongoDB instance). GitHub/GitLab/Bitbucket account for repository hosting. Vercel account (sign up at vercel.com). Step 1: Set Up Your Express.js Project If you don’t have an existing project, create a new one: mkdir express-vercel-backend && cd express-vercel-backend npm init -y Install required dependencies: npm install express mongoose dotenv cors Create an index.js file and set up a basic Express server: const express = require("express"); const mongoose = require("mongoose"); const dotenv = require("dotenv"); const cors = require("cors"); dotenv.config(); const app = express(); app.use(express.json()); app.use(cors()); // Connect to MongoDB mongoose.connect(process.env.MONGO_URI, { useNewUrlParser: true, useUnifiedTopology: true, }) .then(() => console.log("MongoDB Connected")) .catch(err => console.log(err)); app.get("/", (req, res) => { res.send("Hello from Express!"); }); const PORT = process.env.PORT || 5000; app.listen(PORT, () => console.log(`Server running on port ${PORT}`)); Step 2: Configure MongoDB Atlas Sign up at MongoDB Atlas and create a free cluster. In the database section, click Connect > Connect your application. Copy the provided connection string and replace with your actual password. Create a .env file in your project root and add: MONGO_URI=mongodb+srv://your-username:your-password@cluster.mongodb.net/your-database-name Step 3: Understanding and Configuring vercel.json Common Deployment Errors Due to Folder Structure Different projects have different folder structures, and incorrect configurations in vercel.json can cause deployment failures. Based on the image provided, your backend folder structure is as follows: MY-APP/ ├── backend/ │ ├── controllers/ │ ├── email/ │ ├── middlewares/ │ ├── models/ │ ├── routes/ │ ├── .env │ ├── index.js │ ├── package.json │ ├── package-lock.json │ ├── vercel.json ├── frontend/ ├── README.md Updated vercel.json Configuration Based on this structure, your vercel.json should look like this: { "version": 2, // Specifies the Vercel configuration version. "builds": [ { "src": "index.js", // Defines the entry point for the backend. "use": "@vercel/node" } ], "routes": [ { "src": "/routes/(.*)", // Routes requests that start with '/routes' to index.js. "dest": "index.js" }, { "src": "/(.*)", // Routes all other requests to index.js. "dest": "index.js" } ] } Key Differences from a Basic vercel.json Configuration Basic Version Improved Version (Your Project) Routes { "src": "/(.*)", "dest": "index.js" } { "src": "/routes/(.*)", "dest": "index.js" } + { "src": "/(.*)", "dest": "index.js" } Purpose Routes all requests to index.js Routes /routes/... requests separately to ensure correct handling Folder Handling Assumes all endpoints are in index.js Supports organized project structures with /routes/ This ensures that APIs under /routes (like /routes/users or /routes/expenses) are correctly mapped to index.js in your backend. Step 4: Modify package.json for Vercel Vercel automatically detects frontend frameworks like React and Next.js, but for backend apps, we need to configure it explicitly. Modify your package.json to include a vercel-start script: "scripts": { "start": "node index.js", // Default script to run the server locally. "vercel-start": "node index.js" // Custom script for Vercel deployment. } Step 5: Deploy on Vercel 1. Install Vercel CLI npm install -g vercel 2. Login to Vercel vercel login 3. Initialize Vercel Run the following command and follow the prompts: vercel 4. Set Environment Variables Go to Vercel Dashboard > Project Settings > Environment Variables and add: MONGO_URI=mongodb+srv://your-username:your-password@cluster.mongodb.net/your-database-name Then redeploy your project: vercel --prod Step 6: Test Your Deployment Once deployed, Vercel will provide a live URL (e.g., https://express-vercel-backend.vercel.app). Test your API by visiting: https://your-vercel-url.com/ Or using Postman or curl: curl https://your-vercel-url.com/ Conclusion You have successfully deployed a Node.js Express MongoDB backend on Vercel!

Deploying a Node.js + Express + MongoDB backend on Vercel can sometimes be tricky, especially when dealing with different folder structures. This guide provides a detailed breakdown, with a special focus on configuring the vercel.json file correctly to avoid deployment errors.
Prerequisites
Before we begin, make sure you have the following:
- Node.js installed on your local machine.
- MongoDB Atlas account (or any cloud MongoDB instance).
- GitHub/GitLab/Bitbucket account for repository hosting.
- Vercel account (sign up at vercel.com).
Step 1: Set Up Your Express.js Project
If you don’t have an existing project, create a new one:
mkdir express-vercel-backend && cd express-vercel-backend
npm init -y
Install required dependencies:
npm install express mongoose dotenv cors
Create an index.js file and set up a basic Express server:
const express = require("express");
const mongoose = require("mongoose");
const dotenv = require("dotenv");
const cors = require("cors");

dotenv.config();

const app = express();
app.use(express.json());
app.use(cors());

// Connect to MongoDB
mongoose.connect(process.env.MONGO_URI, {
  useNewUrlParser: true,
  useUnifiedTopology: true,
})
.then(() => console.log("MongoDB Connected"))
.catch(err => console.log(err));

app.get("/", (req, res) => {
  res.send("Hello from Express!");
});

const PORT = process.env.PORT || 5000;
app.listen(PORT, () => console.log(`Server running on port ${PORT}`));
Step 2: Configure MongoDB Atlas
- Sign up at MongoDB Atlas and create a free cluster.
- In the database section, click Connect > Connect your application.
- Copy the provided connection string and replace
- Create a
.envfile in your project root and add:
MONGO_URI=mongodb+srv://your-username:your-password@cluster.mongodb.net/your-database-name
Step 3: Understanding and Configuring vercel.json
Common Deployment Errors Due to Folder Structure
Different projects have different folder structures, and incorrect configurations in vercel.json can cause deployment failures. Based on the image provided, your backend folder structure is as follows:
MY-APP/
├── backend/
│   ├── controllers/
│   ├── email/
│   ├── middlewares/
│   ├── models/
│   ├── routes/
│   ├── .env
│   ├── index.js
│   ├── package.json
│   ├── package-lock.json
│   ├── vercel.json
├── frontend/
├── README.md
Updated vercel.json Configuration
Based on this structure, your vercel.json should look like this:
{
  "version": 2,  // Specifies the Vercel configuration version.
  "builds": [
    {
      "src": "index.js", // Defines the entry point for the backend.
      "use": "@vercel/node"
    }
  ],
  "routes": [
    {
      "src": "/routes/(.*)", // Routes requests that start with '/routes' to index.js.
      "dest": "index.js"
    },
    {
      "src": "/(.*)", // Routes all other requests to index.js.
      "dest": "index.js"
    }
  ]
}
Key Differences from a Basic vercel.json
| Configuration | Basic Version | Improved Version (Your Project) |
|---|---|---|
| Routes | { "src": "/(.*)", "dest": "index.js" } |
{ "src": "/routes/(.*)", "dest": "index.js" } + { "src": "/(.*)", "dest": "index.js" }
|
| Purpose | Routes all requests to index.js
|
Routes /routes/... requests separately to ensure correct handling |
| Folder Handling | Assumes all endpoints are in index.js
|
Supports organized project structures with /routes/
|
This ensures that APIs under /routes (like /routes/users or /routes/expenses) are correctly mapped to index.js in your backend.
Step 4: Modify package.json for Vercel
Vercel automatically detects frontend frameworks like React and Next.js, but for backend apps, we need to configure it explicitly.
Modify your package.json to include a vercel-start script:
"scripts": {
  "start": "node index.js", // Default script to run the server locally.
  "vercel-start": "node index.js" // Custom script for Vercel deployment.
}
Step 5: Deploy on Vercel
1. Install Vercel CLI
npm install -g vercel
2. Login to Vercel
vercel login
3. Initialize Vercel
Run the following command and follow the prompts:
vercel
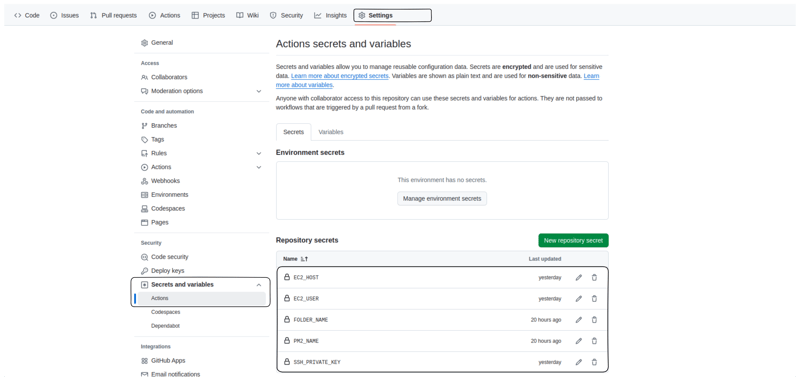
4. Set Environment Variables
Go to Vercel Dashboard > Project Settings > Environment Variables and add:
MONGO_URI=mongodb+srv://your-username:your-password@cluster.mongodb.net/your-database-name
Then redeploy your project:
vercel --prod
Step 6: Test Your Deployment
Once deployed, Vercel will provide a live URL (e.g., https://express-vercel-backend.vercel.app). Test your API by visiting:
https://your-vercel-url.com/
Or using Postman or curl:
curl https://your-vercel-url.com/
Conclusion
You have successfully deployed a Node.js Express MongoDB backend on Vercel!