


_Olekcii_Mach_Alamy.jpg?width=1280&auto=webp&quality=80&disable=upscale#)


Home Lab: Chapter 2 — Base Foundations
Howdy! Everything needs a base to be built on top of. Nothing can be done out of the blue. Take a house for example: it needs a blueprint, then we need to start building the foundation to then build on top of. This is what I'll be tackling in this part: our baseline Infrastructure, our network layer. Network This chapter focuses on the actual network setup of my homelab, specifically excluding Kubernetes' internal networks or any network layers created later. This is the network that will enable me to connect to my homelab from my desktop and host the services I desire. My network consists of two main components: Wifi Network: This is the primary network of my home, provided by my ISP's router, connecting all of my domestic devices. Due to the location of my homelab, I need to extend this network to reach my devices' location. Custom Router: I’m configuring this router to have four network zones: WAN, LAN, DMZ, and VPN. This setup gives me full control over my network and allows me to manage the traffic between them. Wifi Network As I mentioned in the previous chapter, I need to extend the network from my router to the location of my devices, while also augmenting the Wi-Fi coverage throughout the rest of the house. This was a straightforward process: plug and play. I simply connected the main unit to a power outlet, inserted an Ethernet cable from my home router into it, and placed one of the receivers near my custom router. Then, I downloaded the Devolo application for additional configuration: Enabled 5G Wi-Fi only, as all my devices can connect to this network, eliminating the need for a 2.4G network. Set the same SSID (Service Set Identifier, the name of my network) as my home network to extend coverage throughout the house. Renamed the devices for easier identification: Powerline 1 -> PL-Router Powerline 2 -> PL-Office Custom Router OPNsense was the elected OS (Operating System) for my router. With four ports on my router, I’ll utilize each physical interface for a dedicated network: Lan port 1: WAN - facilitating my router's internet connection. Lan port 2: LAN - enabling my desktop's connection to the router. Lan port 3: DMZ - hosting all my primary home services. Lan port 4: VPN - housing the VPN server. This setup achieves physical network separation, each with its own configuration. The installation is straightforward: Download ISO of OPNsense from OPNSense Website Create a bootable image on a thumb drive Boot machine from the thumb drive Follow the installation wizard Assigned the initial WAN network (PL-Office -> WAN Interface) Assigned the initial LAN network (Desktop -> LAN Interface) - this will also serve as the management interface, exposing the OPNsense web dashboard. Once installed, I accessed the OPNsense web dashboard from my desktop using the machine's IP address - later, a DNS (Domain Name System) record will be created to avoid memorizing all IP addresses. I then created additional interfaces by assigning LAN ports 3 and 4 to DMZ and VPN, respectively. WAN WAN (Wide Area Network) typically refers to the interface used for internet access. In the case of my custom router, it serves exactly that role - providing connectivity between the router (and all connected devices) and the internet. The network setup involves a direct connection between just two devices: the router and a powerline adapter. However, since the adapter operates in bridge mode and uses the same IP range as the router, it effectively allows seamless communication between the router and any device on my Wi-Fi network. LAN A LAN (Local Area Network) typically describes a network within a home or organization. It is generally private, contrasting the public WAN. Here, the LAN network will connect to a single device initially. Though considered naming this interface Management, reflecting its current purpose (connecting my desktop to the router, later accessing the DMZ), I chose LAN as it is a broader name to accommodate potential future device additions. DMZ A DMZ (Demilitarized Zone) network sits between the LAN and WAN, used to host services requiring internet access without exposing the LAN. While my homelab’s DMZ aims to host internet-accessible services, it will also allow access from the LAN, maintaining separation. Hence, I opted to create a DMZ network. Although I'll maintain LAN access from the DMZ, devices on the Wi-Fi network won’t reach the DMZ This network will host my primary home services and core homelab infrastructure. VPN A VPN (Virtual Private Network) allows secure access to private networks through public internet connections. In my setup, I'm using a Raspberry Pi as the VPN server to enable global access to my homelab, as long as I have internet connectivity - obviously. Since I'll be using only one device on this network, I only require two IP addresses - one for the Wi-Fi inte
Howdy!
Everything needs a base to be built on top of. Nothing can be done out of the blue. Take a house for example: it needs a blueprint, then we need to start building the foundation to then build on top of. This is what I'll be tackling in this part: our baseline Infrastructure, our network layer.
Network
This chapter focuses on the actual network setup of my homelab, specifically excluding Kubernetes' internal networks or any network layers created later. This is the network that will enable me to connect to my homelab from my desktop and host the services I desire. My network consists of two main components:
Wifi Network: This is the primary network of my home, provided by my ISP's router, connecting all of my domestic devices. Due to the location of my homelab, I need to extend this network to reach my devices' location.
Custom Router: I’m configuring this router to have four network zones: WAN, LAN, DMZ, and VPN. This setup gives me full control over my network and allows me to manage the traffic between them.
Wifi Network
As I mentioned in the previous chapter, I need to extend the network from my router to the location of my devices, while also augmenting the Wi-Fi coverage throughout the rest of the house.
This was a straightforward process: plug and play. I simply connected the main unit to a power outlet, inserted an Ethernet cable from my home router into it, and placed one of the receivers near my custom router. Then, I downloaded the Devolo application for additional configuration:
Enabled 5G Wi-Fi only, as all my devices can connect to this network, eliminating the need for a 2.4G network.
Set the same SSID (Service Set Identifier, the name of my network) as my home network to extend coverage throughout the house.
-
Renamed the devices for easier identification:
- Powerline 1 -> PL-Router
- Powerline 2 -> PL-Office
Custom Router
OPNsense was the elected OS (Operating System) for my router. With four ports on my router, I’ll utilize each physical interface for a dedicated network:
- Lan port 1: WAN - facilitating my router's internet connection.
- Lan port 2: LAN - enabling my desktop's connection to the router.
- Lan port 3: DMZ - hosting all my primary home services.
- Lan port 4: VPN - housing the VPN server.
This setup achieves physical network separation, each with its own configuration.
The installation is straightforward:
- Download ISO of OPNsense from OPNSense Website
- Create a bootable image on a thumb drive
- Boot machine from the thumb drive
- Follow the installation wizard
- Assigned the initial WAN network (PL-Office -> WAN Interface)
- Assigned the initial LAN network (Desktop -> LAN Interface) - this will also serve as the management interface, exposing the OPNsense web dashboard.
Once installed, I accessed the OPNsense web dashboard from my desktop using the machine's IP address - later, a DNS (Domain Name System) record will be created to avoid memorizing all IP addresses. I then created additional interfaces by assigning LAN ports 3 and 4 to DMZ and VPN, respectively.
WAN
WAN (Wide Area Network) typically refers to the interface used for internet access. In the case of my custom router, it serves exactly that role - providing connectivity between the router (and all connected devices) and the internet. The network setup involves a direct connection between just two devices: the router and a powerline adapter. However, since the adapter operates in bridge mode and uses the same IP range as the router, it effectively allows seamless communication between the router and any device on my Wi-Fi network.
LAN
A LAN (Local Area Network) typically describes a network within a home or organization. It is generally private, contrasting the public WAN. Here, the LAN network will connect to a single device initially. Though considered naming this interface Management, reflecting its current purpose (connecting my desktop to the router, later accessing the DMZ), I chose LAN as it is a broader name to accommodate potential future device additions.
DMZ
A DMZ (Demilitarized Zone) network sits between the LAN and WAN, used to host services requiring internet access without exposing the LAN. While my homelab’s DMZ aims to host internet-accessible services, it will also allow access from the LAN, maintaining separation. Hence, I opted to create a DMZ network.
Although I'll maintain LAN access from the DMZ, devices on the Wi-Fi network won’t reach the DMZ
This network will host my primary home services and core homelab infrastructure.
VPN
A VPN (Virtual Private Network) allows secure access to private networks through public internet connections. In my setup, I'm using a Raspberry Pi as the VPN server to enable global access to my homelab, as long as I have internet connectivity - obviously.
Since I'll be using only one device on this network, I only require two IP addresses - one for the Wi-Fi interface and another for the Ethernet interface, which connects to the VPN network. All other devices will access the VPN remotely, beginning with the Wi-Fi interface and then transitioning to the Ethernet interface for VPN network connections.
DNS
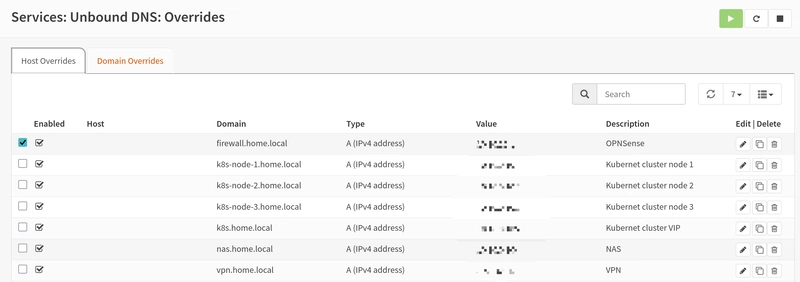
To simplify service access, I’ll create a DNS server for name resolution, allowing me to access my services by using the defined names instead of their IP addresses.
I've chosen Unbound as my DNS server because it’s easy to use and allows me to create the DNS records I need. It also works well with OPNsense, making DNS record management simpler. I'll use this DNS as the resolver for all my devices, letting me access my services by their names and resolving external domains too.
The installation is straight forward:
- Access the OPNsense web dashboard.
- Navigate to System -> Settings -> General.
- Find the DNS section and enable the DNS Resolver.
- Save changes and add DNS records.
This is what the final configuration looks like:
Connecting Networks
With all networks established, firewall configuration requires adjustment to
allow communication between the ones that I need to cross-connect:
- LAN -> DMZ
- LAN -> WAN
- VPN -> DMZ
- VPN -> WAN
- DMZ -> LAN
- DMZ -> WAN
- DMZ -> VPN
Essentially, the goal is to allow LAN connections to access the internet and DMZ for local infrastructure access. VPN will require similar configurations. Bi direcional communication must be enabled for these connections.
This configuration might be too broad but it will be enough for an initial setup. I may revisit it in configuration.
Conclusion
This concludes the foundational infrastructure setup - My Homelab's Network. I covered the various networks established, outlined requirements, and detailed configurations. While broad in scope, it serves as an excellent starting point for future enhancements.
Originally published at https://techquests.dev on April 25, 2025.


