


Building a Secure CI/CD Pipeline for a TypeScript Application Using GitHub Actions and ArgoCD
security is a continuous part of the development lifecycle rather than an afterthought. It goes beyond just securing CI/CD pipelines and extends to all aspects of development, from infrastructure to application deployment. Prerequisites Before you begin, make sure you have the following: Basic knowledge of Kubernetes manifests Familiarity with AWS EC2 service Docker installed on your local machine Why is Security Important? AI-Assisted Development: Developers are increasingly using AI assistants to write code, which can lead to security issues like hardcoded secrets, outdated packages, etc. Increasing Cyber Threats: Cyber attacks and CVEs are on the rise, making it more important than ever to integrate security from the start. Before building your pipeline, take the time to understand the application: Fork the repo, run the application, and review the codebase. Basically, try to have an idea of what is going on. For this project, we will be building a CI/CD pipeline for a React frontend application that uses TypeScript and Vite. Containerization To containerize the application, start by creating a Dockerfile in the root of your project with the following contents: # Step 1: Use an official Node.js image as the base FROM node:20-alpine AS build # Step 2: Set the working directory inside the container WORKDIR /app # Step 3: Copy package.json and package-lock.json to the container COPY package*.json ./ # Step 4: Install project dependencies RUN npm install # Step 5: Copy the rest of your application code to the container COPY . . # Step 6: Build the application using Vite RUN npm run build # Step 7: Use a lightweight web server like 'nginx' to serve the built files FROM nginx:alpine # Step 8: Copy the built files from the build stage into the nginx container image COPY --from=build /app/dist /usr/share/nginx/html # Step 9: Expose port 80 to the outside world EXPOSE 80 # Step 10: Start nginx server CMD ["nginx", "-g", "daemon off;"] Docker images are built in layers, where each command in the Dockerfile creates a new layer. These layers are cached, meaning that if a layer hasn't changed, Docker will reuse the cached version of that layer rather than rebuilding it. This significantly speeds up the build process because Docker doesn't need to repeat operations that haven't changed since the last build. It's essential to exclude files and directories that aren't needed in the Docker image, such as node_modules, which are typically reinstalled during the build process, and log files like npm-debug.log or any .log files that are generated during development. Sensitive information, such as environment files (.env), should also be ignored to prevent accidental exposure. You can ignore these files by including them in a .dockerignore file in the root of your project. node_modules npm-debug.log .git .github .gitignore README.md .vscode *.md *.log .env .env.local .env.development.local .env.test.local .env.production.local kubernetes Build the Docker image: docker build -t my-app:v1 . Run the container locally to confirm: docker run -d -p 8080:80 my-app:v1 Overview of how the CI/CD pipeline is structured Developer pushes code/raises a PR → GitHub Actions triggers → Workflow starts Workflow Jobs: Run Unit Tests : Executes the test suite using Vitest to verify code correctness. Lint Codebase: Performs static analysis with ESLint to catch syntax issues and enforce code standards. Build Application: Generates a production-ready version of the app. Create Docker Image: Packages the application into a Docker image using a multi-stage Dockerfile. Scan Docker Image: Checks the built image for security vulnerabilities using Trivy. Push to Container Registry: Uploads the image to GitHub Container Registry. Update Kubernetes Deployment: Applies the new image tag to the Kubernetes deployment configuration Kubernetes Manifest Update: Use a shell script to update the image tag in k8s/deployment.yml Commit and push the change back to the repository ArgoCD: Watches the repo for changes in the manifest Automatically deploys to Kubernetes when image tag is updated Each job only runs if the previous one is successful to ensure stability and security throughout the pipeline. Considerations Since the pipeline updates the container image tag in the Kubernetes manifest (deployment.yml) after the Docker job is successful, we need to prevent this update from re-triggering the same pipeline. We avoid the infinite loop by ignoring changes in specific paths: paths-ignore: - 'kubernetes/deployment.yaml' When executing the jobs, we want to avoid downloading dependencies repeatedly on each run. By caching the npm packages, the job skips the download process each time the CI pipeline runs steps: - name: Setup Node.js uses: actions/setup-node@v4 with: node-version: '20'
security is a continuous part of the development lifecycle rather than an afterthought. It goes beyond just securing CI/CD pipelines and extends to all aspects of development, from infrastructure to application deployment.
Prerequisites
Before you begin, make sure you have the following:
- Basic knowledge of Kubernetes manifests
- Familiarity with AWS EC2 service
- Docker installed on your local machine
Why is Security Important?
AI-Assisted Development: Developers are increasingly using AI assistants to write code, which can lead to security issues like hardcoded secrets, outdated packages, etc.
Increasing Cyber Threats: Cyber attacks and CVEs are on the rise, making it more important than ever to integrate security from the start.
Before building your pipeline, take the time to understand the application:
Fork the repo, run the application, and review the codebase. Basically, try to have an idea of what is going on.
For this project, we will be building a CI/CD pipeline for a React frontend application that uses TypeScript and Vite.
Containerization
To containerize the application, start by creating a Dockerfile in the root of your project with the following contents:
# Step 1: Use an official Node.js image as the base
FROM node:20-alpine AS build

# Step 2: Set the working directory inside the container
WORKDIR /app

# Step 3: Copy package.json and package-lock.json to the container
COPY package*.json ./

# Step 4: Install project dependencies
RUN npm install

# Step 5: Copy the rest of your application code to the container
COPY . .

# Step 6: Build the application using Vite
RUN npm run build

# Step 7: Use a lightweight web server like 'nginx' to serve the built files
FROM nginx:alpine

# Step 8: Copy the built files from the build stage into the nginx container image
COPY --from=build /app/dist /usr/share/nginx/html

# Step 9: Expose port 80 to the outside world
EXPOSE 80

# Step 10: Start nginx server
CMD ["nginx", "-g", "daemon off;"]
Docker images are built in layers, where each command in the Dockerfile creates a new layer. These layers are cached, meaning that if a layer hasn't changed, Docker will reuse the cached version of that layer rather than rebuilding it. This significantly speeds up the build process because Docker doesn't need to repeat operations that haven't changed since the last build.
It's essential to exclude files and directories that aren't needed in the Docker image, such as node_modules, which are typically reinstalled during the build process, and log files like npm-debug.log or any .log files that are generated during development. Sensitive information, such as environment files (.env), should also be ignored to prevent accidental exposure. You can ignore these files by including them in a .dockerignore file in the root of your project.
node_modules
npm-debug.log
.git
.github
.gitignore
README.md
.vscode
*.md
*.log
.env
.env.local
.env.development.local
.env.test.local
.env.production.local
kubernetes
- Build the Docker image:
docker build -t my-app:v1 . - Run the container locally to confirm:
docker run -d -p 8080:80 my-app:v1
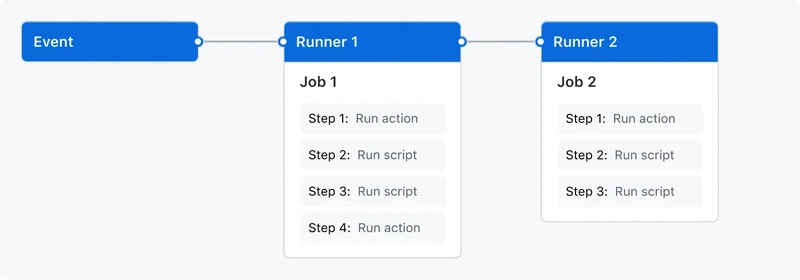
Overview of how the CI/CD pipeline is structured
Developer pushes code/raises a PR → GitHub Actions triggers → Workflow starts
Workflow Jobs:
Run Unit Tests : Executes the test suite using Vitest to verify code correctness.
Lint Codebase: Performs static analysis with ESLint to catch syntax issues and enforce code standards.
Build Application: Generates a production-ready version of the app.
Create Docker Image: Packages the application into a Docker image using a multi-stage Dockerfile.
Scan Docker Image: Checks the built image for security vulnerabilities using Trivy.
Push to Container Registry: Uploads the image to GitHub Container Registry.
Update Kubernetes Deployment: Applies the new image tag to the Kubernetes deployment configuration
-
Kubernetes Manifest Update:
- Use a shell script to update the image tag in
k8s/deployment.yml - Commit and push the change back to the repository
- Use a shell script to update the image tag in
-
ArgoCD:
- Watches the repo for changes in the manifest
- Automatically deploys to Kubernetes when image tag is updated
Each job only runs if the previous one is successful to ensure stability and security throughout the pipeline.
Considerations
Since the pipeline updates the container image tag in the Kubernetes manifest (deployment.yml) after the Docker job is successful, we need to prevent this update from re-triggering the same pipeline. We avoid the infinite loop by ignoring changes in specific paths:
paths-ignore:
  - 'kubernetes/deployment.yaml'
When executing the jobs, we want to avoid downloading dependencies repeatedly
on each run. By caching the npm packages, the job skips the download process
each time the CI pipeline runs
steps:
  - name: Setup Node.js
    uses: actions/setup-node@v4
    with:
      node-version: '20'
      cache: 'npm'
In some cases, developers may want to download from Nexus and run the build artifact locally without having to deal with Docker. By separating the build job into two: a regular build, and a Docker build. The goal is to give developers the flexibility to choose the approach that best suits their needs.
Writing the GitHub Actions CI Pipeline
In professional environments, protecting the main branch is a standard practice. Most organizations implement branch protection rules that require pull requests with code reviews before merging. It would usually trigger when a pull request is opened, edited, reopened, etc.
on:
  pull_request_target:
    types: ['opened', 'synchronize', 'reopened', 'edited']
    branches: [main]
Since this is a personal project, we’ll keep things simple. In the root directory of your project, create a .github folder. Inside it, add a subfolder named workflows. Within the workflows folder, create a YAML file: let’s call it react-typescript-prod-release.yml
Let’s begin writing your CI pipeline.
We want our pipeline to get triggered on a pull request and push to the main branch of our repository.
name: react-typescript-prod-release

on:
  push:
    branches: [ main ]
    paths-ignore:
      - 'kubernetes/deployment.yaml'
  pull_request:
    branches: [ main ]

jobs:
In a GitHub Actions workflow, all individual jobs are defined under the top-level jobs key. Each job is a separate task or phase in your pipeline.
The first job in the workflow is responsible for unit testing the application. It begins by checking out the source code using an action. Then, it sets up a Node.js environment and cache dependency to speed up the workflow by reusing previously downloaded dependencies. Once the environment is ready, it installs the project dependencies using npm ci, which ensures a clean install. Finally, it runs the test suite with npm test to validate the code.
test:
    name: Unit Testing
    runs-on: ubuntu-latest
    steps:
      - name: Checkout code
        uses: actions/checkout@v4

      - name: Setup Node.js
        uses: actions/setup-node@v4
        with:
          node-version: '20'
          cache: 'npm'

      - name: Install dependencies
        run: npm ci

      - name: Run tests
        run: npm test
The next job performs Static Code Analysis using ESLint. This step ensures that the code follows defined style guidelines and best practices. It shares a similar setup with the unit testing job: it checks out the repository, sets up Node.js with caching to improve performance, and installs the project dependencies. The main difference is in the final step, where it runs the linting command npm run lint to analyse the code for any syntax or formatting issues.
lint:
    name: Static Code Analysis
    runs-on: ubuntu-latest
    steps:
      - name: Checkout code
        uses: actions/checkout@v4

      - name: Setup Node.js
        uses: actions/setup-node@v4
        with:
          node-version: '20'
          cache: 'npm'

      - name: Install dependencies
        run: npm ci

      - name: Run ESLint
        run: npm run lint
In the Build job, the linting and testing jobs are set as dependencies (needs: [test, lint]). This ensures that the application will only be built if it passes both the tests and linting checks. The build process creates a dist folder, which contains the production-ready version of the application. It's a best practice to store these build artifacts in a reliable storage solution such as Nexus or GitHub storage. For this project, we’ll upload the artefact to GitHub’s storage.
build:
    name: Build
    runs-on: ubuntu-latest
    needs: [test, lint]
    steps:
      - name: Checkout code
        uses: actions/checkout@v4

      - name: Setup Node.js
        uses: actions/setup-node@v4
        with:
          node-version: '20'
          cache: 'npm'

      - name: Install dependencies
        run: npm ci

      - name: Build project
        run: npm run build

      - name: Upload build artifacts
        uses: actions/upload-artifact@v4
        with:
          name: build-artifacts
          path: dist/
The next step involves building, scanning, and pushing the Docker image to GitHub Container Registry. Before writing the YAML code, here are the required setup steps:
- Generate a GitHub Personal Access Token by navigating to Settings → Developer settings → Personal access tokens (classic). Create a new token with
write:packagesandread:packagespermissions and copy it. - Go to your project repository → Settings → Secrets and variables → Actions → Repository secrets, and create a secret named
TOKEN, where you’ll paste the token you just generated.
It begins by checking out the code and retrieving the build artifacts created in the previous build job. It then sets up Docker Buildx and logs into GitHub Container Registry using the secret token we created.
It then extracts metadata to generate consistent image tags using the commit SHA, branch name, and a latest tag.
Containerization is performed in two steps. First, the Docker image is built using the project’s Dockerfile. Then, the image undergoes a security scan using Trivy, which checks for vulnerabilities in the base image and application dependencies. The scan is configured to fail the pipeline if any high or critical vulnerabilities are detected, ensuring only secure images are allowed to proceed.
Once the image passes the security scan, it’s pushed to GitHub Container Registry along with its tags and metadata. Additionally, a shortened version of the commit SHA is extracted and stored as a job output to serve as a simplified image tag, useful in later deployment steps.
docker:
    name: Docker Build and Push
    runs-on: ubuntu-latest
    needs: [build]
    env:
      REGISTRY: ghcr.io
      IMAGE_NAME: ${{ github.repository }}
    outputs:
      image_tag: ${{ steps.set_output.outputs.image_tag }}
    steps:
      - name: Checkout code
        uses: actions/checkout@v4
      # Retrieve the build artifacts created in the build job
      - name: Download build artifacts
        uses: actions/download-artifact@v4
        with:
          name: build-artifacts
          path: dist/

      - name: Set up Docker Buildx
        uses: docker/setup-buildx-action@v3
        # Authenticate with GitHub Container Registry
      - name: Login to GitHub Container Registry
        uses: docker/login-action@v3
        with:
          registry: ${{ env.REGISTRY }}
          username: ${{ github.actor }}
          password: ${{ secrets.TOKEN }}
       # Generate appropriate tags and metadata for the Docker image
      - name: Extract metadata
        id: meta
        uses: docker/metadata-action@v5
        with:
          images: ${{ env.REGISTRY }}/${{ env.IMAGE_NAME }}
          tags: |
            type=sha,format=long
            type=ref,event=branch
            latest
      # Build the Docker image locally without pushing to registry
      - name: Build Docker image
        uses: docker/build-push-action@v5
        with:
          context: .
          push: false
          tags: ${{ steps.meta.outputs.tags }}
          labels: ${{ steps.meta.outputs.labels }}
          load: true
      # Scan the built image for security vulnerabilities
      - name: Trivy vulnerability scanner
        uses: aquasecurity/trivy-action@master
        with:
          image-ref: ${{ env.REGISTRY }}/${{ env.IMAGE_NAME }}:sha-${{ github.sha }}
          format: 'table'
          exit-code: '1'
          ignore-unfixed: true
          vuln-type: 'os,library'
          severity: 'CRITICAL,HIGH'
       # Push the scanned and approved image to the registry
      - name: Push Docker image
        uses: docker/build-push-action@v5
        with:
          context: .
          push: true
          tags: ${{ steps.meta.outputs.tags }}
          labels: ${{ steps.meta.outputs.labels }}
      # Create a shortened version of the commit SHA for easier reference
      - name: Set image tag output
        id: set_output
        run: echo "image_tag=$(echo ${{ github.sha }} | cut -c1-7)" >> $GITHUB_OUTPUT
Once we have a new image, using a shell script defined in the update-k8s job, the deployment.yml file will be automatically updated to use the new image.
update-k8s:
    name: Update Kubernetes Deployment
    runs-on: ubuntu-latest
    needs: [docker]
    if: github.ref == 'refs/heads/main' && github.event_name == 'push'
    steps:
      - name: Checkout code
        uses: actions/checkout@v4
        with:
          token: ${{ secrets.TOKEN }}

      - name: Setup Git config
        run: |
          git config user.name "GitHub Actions"
          git config user.email "actions@github.com"

      - name: Update Kubernetes deployment file
        env:
          IMAGE_TAG: sha-${{ github.sha }}
          GITHUB_REPOSITORY: ${{ github.repository }}
          REGISTRY: ghcr.io
        run: |
          NEW_IMAGE="${REGISTRY}/${GITHUB_REPOSITORY}:${IMAGE_TAG}"

          # Update the deployment file directly
          sed -i "s|image: ${REGISTRY}/.*|image: ${NEW_IMAGE}|g" kubernetes/deployment.yaml

          # Verify the change
          echo "Updated deployment to use image: ${NEW_IMAGE}"
          grep -A 1 "image:" kubernetes/deployment.yaml

      - name: Commit and push changes
        run: |
          git add kubernetes/deployment.yaml
          git commit -m "Update Kubernetes deployment with new image tag: ${{ needs.docker.outputs.image_tag }} [skip ci]" || echo "No changes to commit"
          git push
To test if our CI pipeline is working as expected, make changes to the codebase and push it. This should trigger the workflow.
Setting Up Kubernetes with Kind on an EC2 Instance for Continuous Delivery
The focus is on the CI, so, instead of provisioning a full AWS EKS cluster, we’ll create a lightweight Kubernetes environment using Kind (Kubernetes IN Docker) on an EC2 instance.
Steps
Step 1: Create an Ubuntu EC2 instance
- Use Ubuntu AMI
- Allocate at least 4GB of RAM for Kind to run smoothly.
Step 2: SSH into the instance
ssh -i /path/key-pair-name.pem instance-user-name@instance-IPAddress
Step 3: Switch to Root User and Update the APT Repository
sudo -i
apt update
Step 4: Install Docker
apt install docker.io -y
Step 5: Add the Ubuntu User to the Docker Group
usermod -aG docker ubuntu
Step 6:Verify Docker access
usermod -aG docker ubuntu
Step 7: On the EC2 instance, login to GitHub container registry
docker login ghcr.io
You’ll be prompted for your GitHub username and a Personal Access Token
Step 8: Install kind
# For AMD64 / x86_64
[ $(uname -m) = x86_64 ] && curl -Lo ./kind https://kind.sigs.k8s.io/dl/v0.27.0/kind-linux-amd64
# For ARM64
[ $(uname -m) = aarch64 ] && curl -Lo ./kind https://kind.sigs.k8s.io/dl/v0.27.0/kind-linux-arm64
chmod +x ./kind
mv ./kind /usr/local/bin/kind
Step 9: Create a Kubernetes Cluster
kind create cluster --name
Step 10: Install Kubectl
curl -LO "https://dl.k8s.io/release/$(curl -L -s https://dl.k8s.io/release/stable.txt)/bin/linux/amd64/kubectl"

install -o root -g root -m 0755 kubectl /usr/local/bin/kubectl
Step 11: Verify Your Kubernetes Context
kubectl config current-context
This confirms which cluster kubectl is connected to. You should see the name of the cluster you created earlier.
An extra step of verification is running:
kubectl get nodes
Step 12: Create the ArgoCD Namespace and Install the Components
kubectl create namespace argocd
kubectl apply -n argocd -f https://raw.githubusercontent.com/argoproj/argo-cd/stable/manifests/install.yaml
This sets up all the necessary ArgoCD resources inside the argocd namespace.
Step 13: Verify the ArgoCD pods
kubectl get pods -n argocd -w
The -w flag keeps the output live, so you can watch each pod's status in real time.
Wait until all pods are in the Running state before moving on. This ensures that ArgoCD has been successfully installed and is ready to use.
Step 14: Access ArgoCD from the UI
To access the ArgoCD dashboard in your browser, we’ll use kubectl port-forwarding at the service level. This approach exposes the ArgoCD server.
-
List available services in the
argocdnamespace:
kubectl get svc -n argocdThis will list available services in the
argocdnamespace. Look for the service namedargocd-serverin the list. -
Forward traffic from your EC2 instance to your local machine:
kubectl port-forward svc/argocd-server 9000:80 -n argocd --address 0.0.0.0This exposes the ArgoCD UI on port
9000.Make sure your EC2 security group allows inbound traffic on port
9000only from your IP address. -
In your browser, go to:
http://:9000 You should see the ArgoCD login page.
-
ArgoCD stores the initial admin password in a Kubernetes secret. To access it:
# lsit available secrets
kubectl get secrets -n argocd

#Edit the argocd-initial-admin-secret
kubectl edit secret argocd-initial-admin-secret -n argocd
Find the
passwordfield in the YAML that opens, it's base64-encoded. -
Copy the value of the
passwordfield and decode it:
echo| base64 --decode This will output the plain text admin password. If it ends with the EC2 instance name or extra metadata, only copy the actual password.
Useadminas the username and the decoded password to log into the ArgoCD UI.
Step 13: Deploy Application to Kubernetes Cluster
To deploy your application using ArgoCD, follow these steps:
On the ArgoCD UI, click on “Create Application.”
-
Fill out the form with the following details:
- Application Name: Choose any name you prefer.
-
Project: Select
default. - Sync Policy: Set this to “Automatic” so ArgoCD can detect changes and sync them automatically.
-
Repository URL:
Navigate to your project’s GitHub repository, click the green “Code” button, and copy the HTTPS UR
-
Path:
Specify the folder where your Kubernetes manifests are located.
For example, if your manifests are in a folder namedKubernetesat the root of your repository, enter:
Kubernetes -
Cluster URL:
Leave this as the default: it points to the local Kubernetes cluster created by
kind. -
Namespace:
You can use the
defaultnamespace unless your app is configured for a different one. Once everything is filled out, click “Create” to deploy the application.
Step 14: Fixing Private Container Registry Access in ArgoCD
Your deployment would fail with an error related to pulling the image. This is because the container image wasn’t pushed to a public Docker registry. In this case, ArgoCD is trying to pull the image from the GitHub Container Registry (GHCR), which is private by default. This means only authenticated users with the proper credentials can access it.
To resolve this, you need to configure image pull secrets.
Update your deployment.yaml to include the following field under “spec”:
imagePullSecrets:
  - name: github-container-registry
Create secret for pulling images from GitHub Container Registry on your EC2 instance
kubectl create secret docker-registry github-container-registry \
  --docker-server=ghcr.io \
  --docker-username=YOUR_GITHUB_USERNAME \
  --docker-password=YOUR_GITHUB_TOKEN \
  --docker-email=YOUR_EMAIL
Make sure to replace
YOUR_GITHUB_USERNAME,YOUR_GITHUB_TOKEN, andYOUR_EMAILwith your credentials.
Once you've created the secret, go back to ArgoCD and delete the old failed pods. ArgoCD will automatically attempt to redeploy the application, and this time, it should successfully pull the image using the newly configured credentials.
Make a change to your codebase, commit, and push. This should trigger the CI.
Step 15: Accessing Application
To access your application running on the Kubernetes cluster:
-
List the available pods to get the name of the pod running your application:
kubectl get pods -
Port forward traffic from your local machine to the pod using the pod name from the previous command. Replace
kubectl port-forward5173:80 --address=0.0.0.0
You can access the app from your browser by http://
Don’t forget to update your EC2 security group rules to allow inbound traffic on port 5173 from your IP address.


