


Building a Robust API with the MERN Stack
The MERN stack (MongoDB, Express.js, React.js, and Node.js) is a powerful combination for building modern web applications. APIs (Application Programming Interfaces) play a crucial role in connecting the frontend (React) with the backend (Node.js & Express.js) and database (MongoDB). In this blog, we’ll walk through the process of building a RESTful API using the MERN stack, covering authentication, CRUD operations, and best practices. Why Use MERN for APIs? Scalability – MongoDB’s NoSQL structure allows flexible data storage. Performance – Node.js & Express.js ensure fast API response times. JavaScript Everywhere – Single language for frontend & backend development. Setting Up the Backend Step 1: Initialize a Node.js Project Start by creating a new Node.js project: mkdir mern-api && cd mern-api npm init -y Install the required dependencies: npm install express mongoose dotenv cors bcryptjs jsonwebtoken express – Framework for building APIs mongoose – MongoDB ORM dotenv – Environment variable management cors – Cross-Origin Resource Sharing bcryptjs – Password hashing jsonwebtoken – JWT authentication Step 2: Connect to MongoDB Create a .env file and add your MongoDB URI: MONGO_URI=mongodb+srv://your_username:your_password@cluster.mongodb.net/mernapi JWT_SECRET=your_secret_key Set up the database connection in server.js: const express = require("express"); const mongoose = require("mongoose"); const dotenv = require("dotenv"); const cors = require("cors"); dotenv.config(); const app = express(); app.use(express.json()); app.use(cors()); mongoose.connect(process.env.MONGO_URI) .then(() => console.log("MongoDB Connected")) .catch(err => console.error(err)); app.listen(5000, () => console.log("Server running on port 5000")); Building the API Routes Step 3: Define a User Model Create a models/User.js file: const mongoose = require("mongoose"); const UserSchema = new mongoose.Schema({ name: String, email: { type: String, unique: true }, password: String, }, { timestamps: true }); module.exports = mongoose.model("User", UserSchema); Step 4: Implement User Authentication Create an authRoutes.js file for user registration and login: const express = require("express"); const bcrypt = require("bcryptjs"); const jwt = require("jsonwebtoken"); const User = require("../models/User"); const router = express.Router(); // User Registration router.post("/register", async (req, res) => { const { name, email, password } = req.body; const hashedPassword = await bcrypt.hash(password, 10); try { const newUser = await User.create({ name, email, password: hashedPassword }); res.status(201).json({ message: "User registered successfully", user: newUser }); } catch (error) { res.status(400).json({ message: "Error registering user" }); } }); // User Login router.post("/login", async (req, res) => { const { email, password } = req.body; const user = await User.findOne({ email }); if (!user || !(await bcrypt.compare(password, user.password))) { return res.status(400).json({ message: "Invalid credentials" }); } const token = jwt.sign({ id: user._id }, process.env.JWT_SECRET, { expiresIn: "1h" }); res.json({ message: "Login successful", token }); }); module.exports = router; Step 5: Create Protected Routes To protect routes, we need authentication middleware. Create middlewares/authMiddleware.js: const jwt = require("jsonwebtoken"); module.exports = (req, res, next) => { const token = req.header("Authorization"); if (!token) return res.status(401).json({ message: "Access Denied" }); try { const verified = jwt.verify(token, process.env.JWT_SECRET); req.user = verified; next(); } catch (error) { res.status(400).json({ message: "Invalid Token" }); } }; Use it in routes: const authMiddleware = require("../middlewares/authMiddleware"); router.get("/profile", authMiddleware, async (req, res) => { const user = await User.findById(req.user.id); res.json(user); }); Frontend Integration with React Once the API is set up, you can connect it with a React frontend using fetch or axios. Example login request: axios.post("http://localhost:5000/api/login", { email, password }) .then(res => localStorage.setItem("token", res.data.token)) .catch(err => console.error(err)); Best Practices for MERN APIs Use Environment Variables – Never expose sensitive credentials. Implement JWT Authentication – Secure user sessions. Use Try-Catch Blocks – Handle errors gracefully. Follow RESTful Principles – Use proper HTTP methods. Validate Input Data – Prevent invalid data entry. Conclusion Building APIs with MERN stack is e
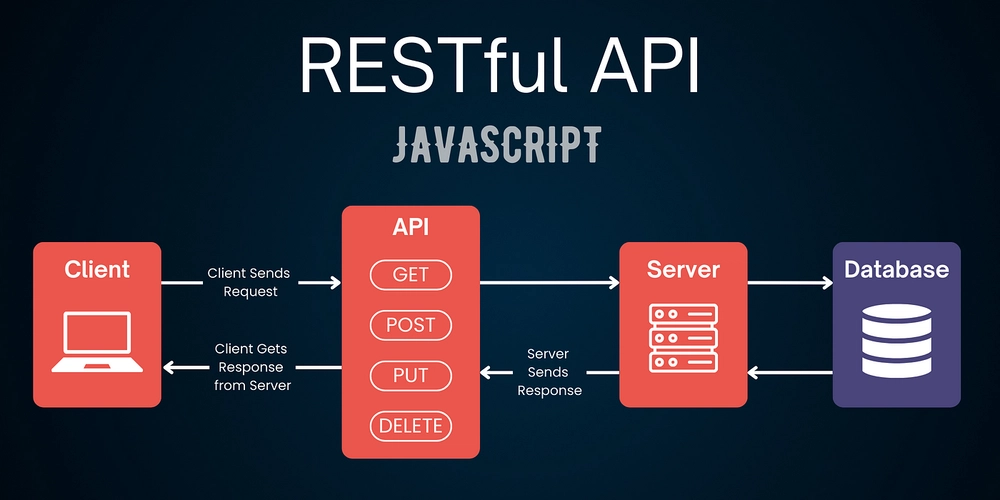
The MERN stack (MongoDB, Express.js, React.js, and Node.js) is a powerful combination for building modern web applications. APIs (Application Programming Interfaces) play a crucial role in connecting the frontend (React) with the backend (Node.js & Express.js) and database (MongoDB).
In this blog, we’ll walk through the process of building a RESTful API using the MERN stack, covering authentication, CRUD operations, and best practices.
Why Use MERN for APIs?
- Scalability – MongoDB’s NoSQL structure allows flexible data storage.
- Performance – Node.js & Express.js ensure fast API response times.
- JavaScript Everywhere – Single language for frontend & backend development.
Setting Up the Backend
Step 1: Initialize a Node.js Project
Start by creating a new Node.js project:
mkdir mern-api && cd mern-api
npm init -y
Install the required dependencies:
npm install express mongoose dotenv cors bcryptjs jsonwebtoken
- express – Framework for building APIs
- mongoose – MongoDB ORM
- dotenv – Environment variable management
- cors – Cross-Origin Resource Sharing
- bcryptjs – Password hashing
- jsonwebtoken – JWT authentication
Step 2: Connect to MongoDB
Create a .env file and add your MongoDB URI:
MONGO_URI=mongodb+srv://your_username:your_password@cluster.mongodb.net/mernapi
JWT_SECRET=your_secret_key
Set up the database connection in server.js:
const express = require("express");
const mongoose = require("mongoose");
const dotenv = require("dotenv");
const cors = require("cors");

dotenv.config();
const app = express();
app.use(express.json());
app.use(cors());

mongoose.connect(process.env.MONGO_URI)
    .then(() => console.log("MongoDB Connected"))
    .catch(err => console.error(err));

app.listen(5000, () => console.log("Server running on port 5000"));
Building the API Routes
Step 3: Define a User Model
Create a models/User.js file:
const mongoose = require("mongoose");

const UserSchema = new mongoose.Schema({
    name: String,
    email: { type: String, unique: true },
    password: String,
}, { timestamps: true });

module.exports = mongoose.model("User", UserSchema);
Step 4: Implement User Authentication
Create an authRoutes.js file for user registration and login:
const express = require("express");
const bcrypt = require("bcryptjs");
const jwt = require("jsonwebtoken");
const User = require("../models/User");

const router = express.Router();

// User Registration
router.post("/register", async (req, res) => {
    const { name, email, password } = req.body;
    const hashedPassword = await bcrypt.hash(password, 10);

    try {
        const newUser = await User.create({ name, email, password: hashedPassword });
        res.status(201).json({ message: "User registered successfully", user: newUser });
    } catch (error) {
        res.status(400).json({ message: "Error registering user" });
    }
});

// User Login
router.post("/login", async (req, res) => {
    const { email, password } = req.body;
    const user = await User.findOne({ email });

    if (!user || !(await bcrypt.compare(password, user.password))) {
        return res.status(400).json({ message: "Invalid credentials" });
    }

    const token = jwt.sign({ id: user._id }, process.env.JWT_SECRET, { expiresIn: "1h" });
    res.json({ message: "Login successful", token });
});

module.exports = router;
Step 5: Create Protected Routes
To protect routes, we need authentication middleware.
Create middlewares/authMiddleware.js:
const jwt = require("jsonwebtoken");

module.exports = (req, res, next) => {
    const token = req.header("Authorization");
    if (!token) return res.status(401).json({ message: "Access Denied" });

    try {
        const verified = jwt.verify(token, process.env.JWT_SECRET);
        req.user = verified;
        next();
    } catch (error) {
        res.status(400).json({ message: "Invalid Token" });
    }
};
Use it in routes:
const authMiddleware = require("../middlewares/authMiddleware");

router.get("/profile", authMiddleware, async (req, res) => {
    const user = await User.findById(req.user.id);
    res.json(user);
});
Frontend Integration with React
Once the API is set up, you can connect it with a React frontend using fetch or axios.
Example login request:
axios.post("http://localhost:5000/api/login", { email, password })
    .then(res => localStorage.setItem("token", res.data.token))
    .catch(err => console.error(err));
Best Practices for MERN APIs
- Use Environment Variables – Never expose sensitive credentials.
- Implement JWT Authentication – Secure user sessions.
- Use Try-Catch Blocks – Handle errors gracefully.
- Follow RESTful Principles – Use proper HTTP methods.
- Validate Input Data – Prevent invalid data entry.
Conclusion
Building APIs with MERN stack is efficient and scalable. By using Express.js for the backend, MongoDB for data storage, and React for frontend interaction, you can create powerful full-stack applications.
Want to take your MERN API further? Consider adding role-based access, image uploads, and third-party authentication.