


鸿蒙NEXT实战教程:音乐播放器
上次写过一次鸿蒙的音乐项目,不过是基于api9,最近幽蓝君把它完善优化,并适配到api 12,也就是最新的鸿蒙NEXT版本,供大家参考。 最近有友友反馈分享的代码过期了,幽蓝君今天进行了更新,有遗漏的大家可以私信。 先来看这次音乐播放器项目的效果图: 下面为大家详解一下这个项目。 探索发现 这是个简单的音乐列表页,从全局看,有导航栏说明要用Navigation组件,当然也可以自定义,导航栏部分还有个切换开关,可以使用menu实现:相关代码如下: @Builder NavigationMenu(){ Row({space:10}){ Text('探索') .fontColor(Color.Black) .fontSize(15) Row() .width(1) .height(18) .backgroundColor(Color.Gray) Text('推荐') .fontColor(Color.Gray) .fontSize(15) } .width('100%') .justifyContent(FlexAlign.Center) .height(50) .alignItems(VerticalAlign.Center) } Navigation(){ //内容部分 } .titleMode(NavigationTitleMode.Mini) .hideBackButton(true) .width('100%') .height('100%') .backgroundColor('rgba(245, 245, 245, 1)') .menus(this.NavigationMenu()) 然后,内容部分显然使用List组件实现,可以看到它可以分为3部分,分别是搜索框、今日热歌和歌单遨游指南。前两个部分都比较简单,歌单遨游指南是可以左右滑动的,所以我使用网格组件Grid实现,设置rowsTemplate属性可以使Grid水平方向滑动,相关代码如下: ListItemGroup({header:this.SectionHeader('歌单遨游指南',false)}){ ListItem(){ Grid(){ ForEach(this.albumList,(item:Album,index)=>{ GridItem(){ Column(){ Image(item.cover) .width(150) .height(150) Text(item.title) .fontColor(Color.Black) .fontSize(15) .fontWeight(FontWeight.Bold) .margin({top:5}) .maxLines(2) } .alignItems(HorizontalAlign.Center) .width(150) .height(200) } }) } .width('100%') .rowsTemplate('1fr 1fr') .rowsGap(12) .columnsGap(10) .padding({left:12}) .margin({top:5}) .scrollBarWidth(0) } .height(400) } 播放音乐页面 这个页面看起来很复杂,其实并不难。这里幽蓝君想说的是,布局无非三种方式,横向、竖向和层叠,其他的布局方式都由这三种衍生而来。 所以对于这个界面,只要把它拆分开来就会发现其实很容易: 有一点难度的地方就是中间的图片是旋转的,我们给他设置一个动态的角度,使用定时器控制图片旋转,代码如下: Image($rawfile(this.musicList[this.currentIndex].cover)) .width(this.screenWidth - 50) .height(this.screenWidth - 50) .borderRadius((this.screenWidth - 50)/2) .objectFit(ImageFit.Fill) .rotate({ x: 0, y: 0, z: 1, angle: this.value*360 }) this.timer = setInterval(() => { // 保留2位小数 this.value = this.value + 0.005 }, 30); 还有一个地方要说一下,点击列表按钮会弹出一个音乐列表,这里使用bindsheet实现,难倒不难,就是有很多友友不知道这个东西: 相关代码如下: Column(){ } .bindSheet($$this.showList, this.listPage(), { height: 40 + (58 + 5)*this.musicList.length, backgroundColor: Color.White, showClose:false, }) @Builder listPage(){ Column(){ Divider() .width('100%') .height(0.8) .backgroundColor('rgb(226,226,226)') List({space:0}){ ForEach(this.musicList,(item:Music,index)=>{ ListItem(){ Row(){ Column(){ Text(item.name) .fontColor('#222628') .fontSize(16) } .alignItems(HorizontalAlign.Start) if(this.currentIndex == index && this.isPlay){ Image($r('app.media.list_pause')) .width(28) .height(28) .onClick(()=>{ this.playOrPause() }) }else{ Image($r('app.media.list_play')) .width(28) .height(28) .onClick(()=>{ this.playSong(index) }) } } .alignItems(VerticalAlign.Center) .justifyContent(FlexAlign.SpaceBetween) .width('100%') .height(62) } }) } .divider({strokeWidth:0.5,color:'rgb(236,236,236)'}) .padding({left:20,right:20}) } .expandSafeArea([SafeAreaType.SYSTEM],[SafeAreaEdge.BOTTOM]) .alignItems(HorizontalAlign.Start) .width('100%') .backgroundColor(Color.White) .borderRadius({topLeft:20,topRight:20}) .shadow({ radius: 30, color: 'rgba(230,230,230,0.7)', offsetX: 0, offsetY: -20 }) } 播放音乐 这个项目中使用本地音乐文件,所以跟大家分享下播放本地的音频文件。首先把文件放到rawfile文件夹中,播放音乐的代码如下: // 创建avPlayer实例对象 let avPlayer: media.AVPlayer = await media.createAVPlayer(); // 创建状态机变化回调函数 this.setAVPlayerCallback(avPlayer); // 通过UIAbilityContext的resourceManager成员的getRawFd接口获取媒体资源播放地址 // 返回类型为{fd,offset,length},fd为HAP包fd地址,offset为媒体资源偏移量,length为播放长度 let context = getContext(this) as common.UIAbilityContext; let fileDescriptor = await context.resourceManager.getRawFd(this.musicList[this.currentIndex].url); let avFileDescriptor:

上次写过一次鸿蒙的音乐项目,不过是基于api9,最近幽蓝君把它完善优化,并适配到api 12,也就是最新的鸿蒙NEXT版本,供大家参考。
最近有友友反馈分享的代码过期了,幽蓝君今天进行了更新,有遗漏的大家可以私信。
先来看这次音乐播放器项目的效果图:
下面为大家详解一下这个项目。
探索发现
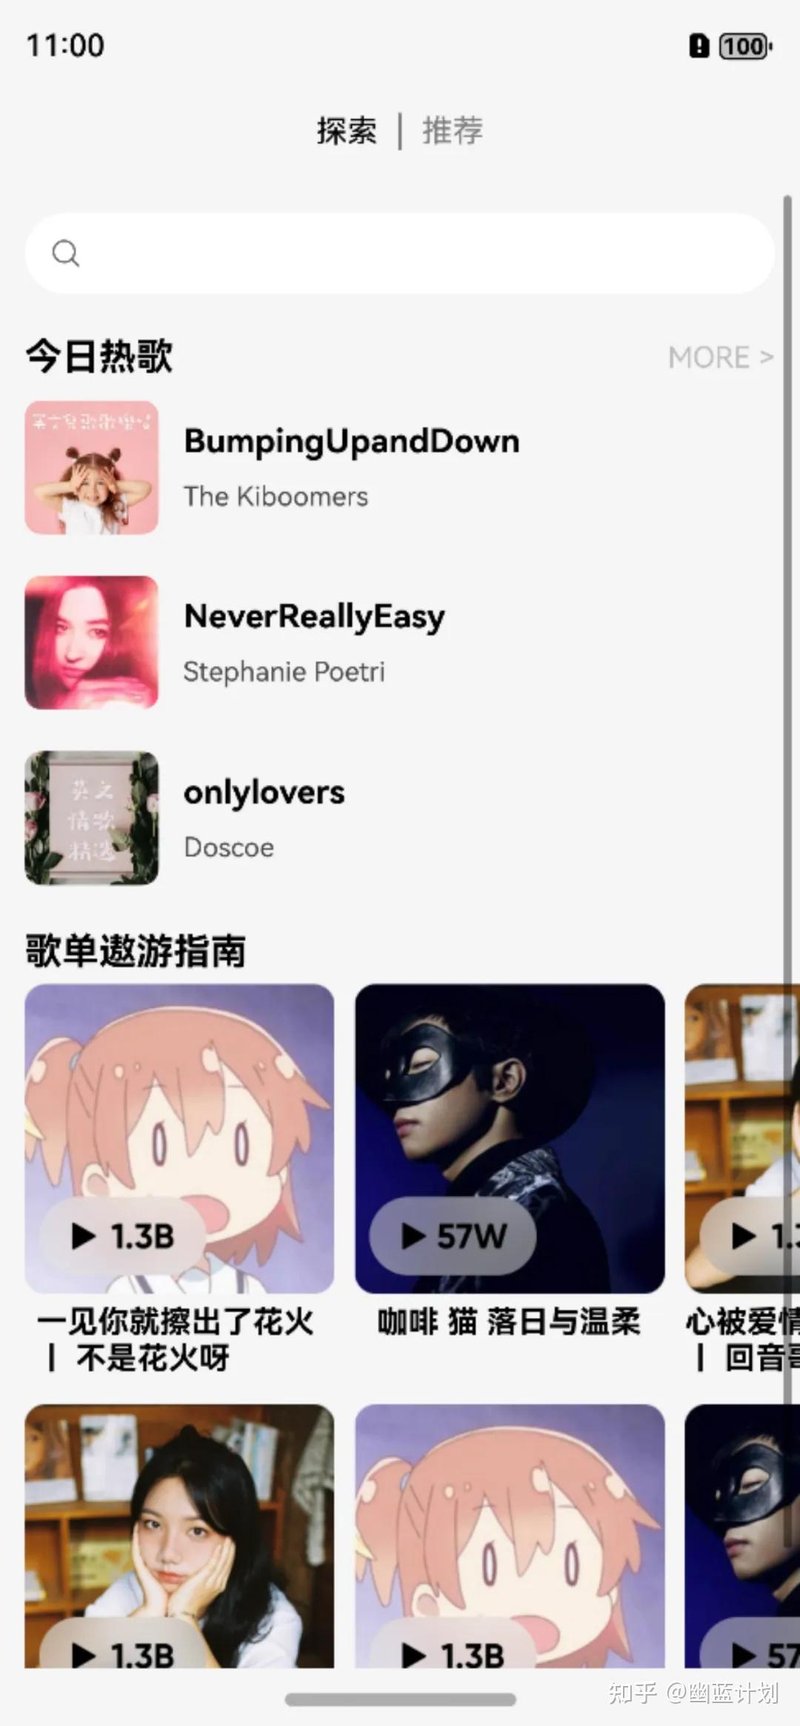
这是个简单的音乐列表页,从全局看,有导航栏说明要用Navigation组件,当然也可以自定义,导航栏部分还有个切换开关,可以使用menu实现:相关代码如下:
@Builder NavigationMenu(){
    Row({space:10}){
      Text('探索')
        .fontColor(Color.Black)
        .fontSize(15)
      Row()
        .width(1)
        .height(18)
        .backgroundColor(Color.Gray)
      Text('推荐')
        .fontColor(Color.Gray)
        .fontSize(15)
    }
    .width('100%')
    .justifyContent(FlexAlign.Center)
    .height(50)
    .alignItems(VerticalAlign.Center)
  }

 Navigation(){

  //内容部分
  }
  .titleMode(NavigationTitleMode.Mini)
  .hideBackButton(true)
  .width('100%')
  .height('100%')
  .backgroundColor('rgba(245, 245, 245, 1)')
  .menus(this.NavigationMenu())
然后,内容部分显然使用List组件实现,可以看到它可以分为3部分,分别是搜索框、今日热歌和歌单遨游指南。前两个部分都比较简单,歌单遨游指南是可以左右滑动的,所以我使用网格组件Grid实现,设置rowsTemplate属性可以使Grid水平方向滑动,相关代码如下:
ListItemGroup({header:this.SectionHeader('歌单遨游指南',false)}){
          ListItem(){
            Grid(){
              ForEach(this.albumList,(item:Album,index)=>{
                GridItem(){
                  Column(){
                    Image(item.cover)
                      .width(150)
                      .height(150)
                    Text(item.title)
                      .fontColor(Color.Black)
                      .fontSize(15)
                      .fontWeight(FontWeight.Bold)
                      .margin({top:5})
                      .maxLines(2)
                  }
                  .alignItems(HorizontalAlign.Center)
                  .width(150)
                  .height(200)
                }
              })
            }
            .width('100%')
            .rowsTemplate('1fr 1fr')
            .rowsGap(12)
            .columnsGap(10)
            .padding({left:12})
            .margin({top:5})
            .scrollBarWidth(0)

          }
          .height(400)
        }
播放音乐页面

这个页面看起来很复杂,其实并不难。这里幽蓝君想说的是,布局无非三种方式,横向、竖向和层叠,其他的布局方式都由这三种衍生而来。
所以对于这个界面,只要把它拆分开来就会发现其实很容易:

有一点难度的地方就是中间的图片是旋转的,我们给他设置一个动态的角度,使用定时器控制图片旋转,代码如下:
Image($rawfile(this.musicList[this.currentIndex].cover))
              .width(this.screenWidth - 50)
              .height(this.screenWidth - 50)
              .borderRadius((this.screenWidth - 50)/2)
              .objectFit(ImageFit.Fill)
              .rotate({ x: 0, y: 0, z: 1, angle: this.value*360 })


 this.timer = setInterval(() => {
      // 保留2位小数
      this.value = this.value + 0.005

    }, 30);
还有一个地方要说一下,点击列表按钮会弹出一个音乐列表,这里使用bindsheet实现,难倒不难,就是有很多友友不知道这个东西:

相关代码如下:
Column(){

}
.bindSheet($$this.showList, this.listPage(), {
    height: 40 + (58 + 5)*this.musicList.length,
    backgroundColor: Color.White,
    showClose:false,
})


@Builder listPage(){
      Column(){
        Divider()
          .width('100%')
          .height(0.8)
          .backgroundColor('rgb(226,226,226)')
        List({space:0}){
          ForEach(this.musicList,(item:Music,index)=>{
            ListItem(){
              Row(){
                Column(){
                  Text(item.name)
                    .fontColor('#222628')
                    .fontSize(16)
                }
                .alignItems(HorizontalAlign.Start)

                if(this.currentIndex == index && this.isPlay){
                  Image($r('app.media.list_pause'))
                    .width(28)
                    .height(28)
                    .onClick(()=>{
                      this.playOrPause()
                    })
                }else{
                  Image($r('app.media.list_play'))
                    .width(28)
                    .height(28)
                    .onClick(()=>{
                      this.playSong(index)
                    })
                }
              }
              .alignItems(VerticalAlign.Center)
              .justifyContent(FlexAlign.SpaceBetween)
              .width('100%')
              .height(62)
            }
          })
        }
        .divider({strokeWidth:0.5,color:'rgb(236,236,236)'})
        .padding({left:20,right:20})
      }
      .expandSafeArea([SafeAreaType.SYSTEM],[SafeAreaEdge.BOTTOM])
      .alignItems(HorizontalAlign.Start)
      .width('100%')
      .backgroundColor(Color.White)
      .borderRadius({topLeft:20,topRight:20})
      .shadow({ radius: 30, color: 'rgba(230,230,230,0.7)', offsetX: 0, offsetY: -20 })
  }
播放音乐
这个项目中使用本地音乐文件,所以跟大家分享下播放本地的音频文件。首先把文件放到rawfile文件夹中,播放音乐的代码如下:
// 创建avPlayer实例对象
    let avPlayer: media.AVPlayer = await media.createAVPlayer();
    // 创建状态机变化回调函数
    this.setAVPlayerCallback(avPlayer);
    // 通过UIAbilityContext的resourceManager成员的getRawFd接口获取媒体资源播放地址
    // 返回类型为{fd,offset,length},fd为HAP包fd地址,offset为媒体资源偏移量,length为播放长度
    let context = getContext(this) as common.UIAbilityContext;
    let fileDescriptor = await context.resourceManager.getRawFd(this.musicList[this.currentIndex].url);
    let avFileDescriptor: media.AVFileDescriptor =
      { fd: fileDescriptor.fd, offset: fileDescriptor.offset, length: fileDescriptor.length };
    this.isSeek = false; // 支持seek操作
    // 为fdSrc赋值触发initialized状态机上报
    avPlayer.fdSrc = avFileDescriptor;
    this.avPlayer = avPlayer


![How to perform a mathematical optimization with tight dependence between objectives and variables? [closed]](https://cdn.sstatic.net/Sites/softwareengineering/Img/apple-touch-icon@2.png?v=1ef7363febba)


