


![In year 2025, shall I stick with low-level programming, or switch to a relatively high-level environment? [closed]](https://cdn.sstatic.net/Sites/workplace/Img/apple-touch-icon@2.png?v=d39b333f5c58)


Track Your Finanace
This is a submission for the KendoReact Free Components Challenge. What I Built I use nothing but the free tier of KendoReact, I whipped up a tool that’s equal parts functional and fun—think of it as a digital piggy bank with a personality. Here’s what it does: A) Displays all your transactions in a sortable, paginated Grid—because who doesn’t love a good table? B) Shows a ProgressBar to visualize how much of your income you’ve spent (spoiler: probably too much coffee). C) Lets you add new transactions with a form powered by Input and DropDownList—no accounting degree required. D) Includes Notification pop-ups to cheer you on or gently nudge you when you mess up. E) Wraps everything in sleek Card components, because I’m fancy like that. This isn’t just about tracking money—it’s about doing it with style, all while sticking to KendoReact’s free components. I used 13 of them to keep this lean, mean, and budget-friendly (pun intended). Demo : Code screenshots: a) Transaction Grid: Sorting action in full swing! b) Budget Overview: That ProgressBar telling me I need to chill on the expenses. c) Add Transaction: Form magic with dropdowns and buttons. KendoReact Experience Diving into KendoReact’s free components was like finding a coupon for free pizza—unexpectedly delightful and oh-so-satisfying. I leveraged 13 free components to bring this finance tracker to life, and they made my developer heart skip a beat. Here’s how I put them to work: 1.. Grid & GridColumn: The backbone of my transaction list—sortable, paginated, and packed with data. I threw in columns for ID, type, category, amount, and date, with a custom action column for deleting entries. 2.. Input: Handles the amount field in the form—simple, clean, and ready for numbers (no funny business allowed). 3.. DropDownList: Powers the type and category selectors. It’s so smooth, I almost forgot the dark days of writing tags by hand. 4.. Button & ButtonGroup: Buttons galore—delete transactions, submit the form, reset it. The ButtonGroup keeps “Add” and “Reset” cozy together like best buds. 5.. Notification & NotificationGroup: Pops up success messages (“Transaction added!”), errors (“Fix that input!”), and warnings (“Bye-bye, transaction!”). They slide in from the bottom-right like a cheeky sidekick. 6.. ProgressBar: Shows expenses as a percentage of income—green for “you’re good,” red for “time to rethink life choices.” 7.. Card, CardHeader, CardTitle, CardBody: Structures the UI into neat sections—overview, transactions, and form. It’s like a digital filing cabinet, but prettier. KendoReact’s free tier gave me everything I needed to build this without begging for a budget increase. The components are intuitive—less debugging, more coffee-sipping. ⭐The default theme (@progress/kendo-theme-default) made it look polished out of the box, and the docs? Chef’s kiss. I spent more time dreaming up features than wrestling with setup. I might just tattoo a Grid on my arm (kidding… maybe). AIm to Impress I faced and resoled:
This is a submission for the KendoReact Free Components Challenge.
What I Built
I use nothing but the free tier of KendoReact, I whipped up a tool that’s equal parts functional and fun—think of it as a digital piggy bank with a personality.
Here’s what it does:
A) Displays all your transactions in a sortable, paginated Grid—because who doesn’t love a good table?
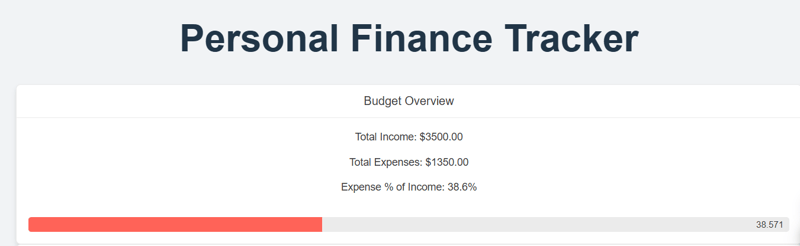
B) Shows a ProgressBar to visualize how much of your income you’ve spent (spoiler: probably too much coffee).
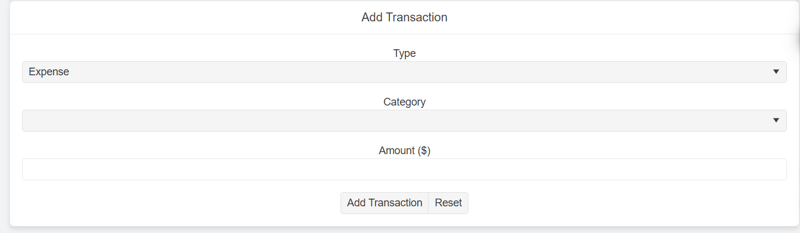
C) Lets you add new transactions with a form powered by Input and DropDownList—no accounting degree required.
D) Includes Notification pop-ups to cheer you on or gently nudge you when you mess up.
E) Wraps everything in sleek Card components, because I’m fancy like that.
This isn’t just about tracking money—it’s about doing it with style, all while sticking to KendoReact’s free components.
I used 13 of them to keep this lean, mean, and budget-friendly (pun intended).
Demo : Code
screenshots:
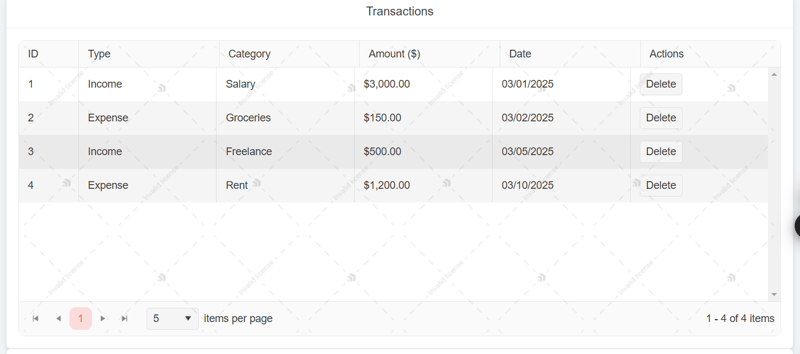
a) Transaction Grid: Sorting action in full swing!
b) Budget Overview: That ProgressBar telling me I need to chill on the expenses.
c) Add Transaction: Form magic with dropdowns and buttons.
KendoReact Experience
Diving into KendoReact’s free components was like finding a coupon for free pizza—unexpectedly delightful and oh-so-satisfying.
I leveraged 13 free components to bring this finance tracker to life, and they made my developer heart skip a beat. Here’s how I put them to work:
1.. Grid & GridColumn: The backbone of my transaction list—sortable, paginated, and packed with data. I threw in columns for ID, type, category, amount, and date, with a custom action column for deleting entries.
2.. Input: Handles the amount field in the form—simple, clean, and ready for numbers (no funny business allowed).
3.. DropDownList: Powers the type and category selectors. It’s so smooth, I almost forgot the dark days of writing tags by hand.
4.. Button & ButtonGroup: Buttons galore—delete transactions, submit the form, reset it. The ButtonGroup keeps “Add” and “Reset” cozy together like best buds.
5.. Notification & NotificationGroup: Pops up success messages (“Transaction added!”), errors (“Fix that input!”), and warnings (“Bye-bye, transaction!”). They slide in from the bottom-right like a cheeky sidekick.
6.. ProgressBar: Shows expenses as a percentage of income—green for “you’re good,” red for “time to rethink life choices.”
7.. Card, CardHeader, CardTitle, CardBody: Structures the UI into neat sections—overview, transactions, and form. It’s like a digital filing cabinet, but prettier.
KendoReact’s free tier gave me everything I needed to build this without begging for a budget increase.
The components are intuitive—less debugging, more coffee-sipping.
⭐The default theme (@progress/kendo-theme-default) made it look polished out of the box, and the docs? Chef’s kiss.
I spent more time dreaming up features than wrestling with setup. I might just tattoo a Grid on my arm (kidding… maybe).
AIm to Impress
I faced and resoled: