


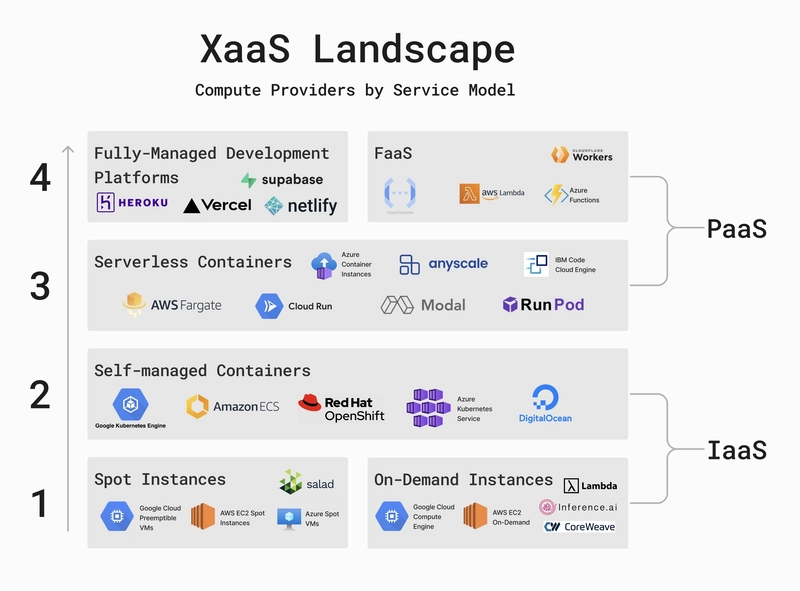


The Yoga of Image Generation – Part 2
In the first part of this series on image generation, we explored how to set up a simple Text-to-Image workflow using Stable Diffusion and ComfyUI, running it locally. We also introduced embeddings to enhance prompts and adjust image styles. However, we found that embeddings alone were not sufficient for our specific use case: generating accurate yoga poses. Simple Image-to-Image Workflow Let’s now take it a step further and provide an image alongside the text prompts to serve as a base for the generation process. Here is the workflow in ComfyUI: I use an image of myself and combine it with a prompt specifying that the output image should depict a woman wearing blue yoga pants instead. This image is converted into the latent space and used in the generation process instead of starting from a fully noisy latent image. I apply only 55% denoising. We can see that the output image resembles the input image. The pose is identical, the subject is now a woman, but the surroundings are similar, and she is not wearing blue pants. Of course, I can tweak the prompt and change the generation seed. I can also adjust the denoising percentage. Here is the result with a 70% value: The image quality is better, and the pants are more blue, but the pose has changed slightly: her head is tilted down, and her left hand is not in the same position. There’s a trade-off between pose accuracy and the creative freedom given to the model. ControlNets Rather than injecting the entire input image into the generation process, it’s more efficient to transfer only specific characteristics. That’s where Control Networks (or ControlNets) come in. ControlNets are additional neural networks that extract features from an image and inject them directly into the latent space and the generation process. Control methods specialize in detecting different types of image features, such as: Structural: pose, edge detection, segmentation, depth Texture & Detail: scribbles/sketches, stylization from edges Content & Layout: bounding boxes, inpainting masks Abstract & Style: color maps, textural fields Most ControlNets work with preprocessors that extract specific features from input images. Here are some examples: Here’s our workflow updated to include a Depth ControlNet: I’ve reverted to an empty latent image so we can focus only on the depth features detected by the preprocessor and injected into the latent space by the ControlNet. The main parameters to tune are the strength of the ControlNet (here, 50%) and when it is applied during the generation (here, throughout the entire process). By tweaking these settings, you can adjust how much the ControlNet influences the final image and, once again, find the best balance between control and creativity. I can still apply an embedding to achieve a specific style—for example, a comic style: There is even an OpenPose ControlNet, specifically trained to detect and apply human poses, but unfortunately, it is not accurate enough for yoga poses. Advanced Image-to-Image Workflow Now that we’re extracting only certain features, we can use more abstract images as inputs—focusing on the pose and letting Stable Diffusion handle the rest. After multiple tests, I decided to combine two ControlNets: one for Edge Detection (Canny Edge, 40% strength) and one for Depth (30% strength). Here’s the resulting workflow: Watch this video to see the process in action with two fine-tuned SDXL models: Juggernaut XL Cheyenne, specialized in comic and graphic novel styles Neat! I can now control the pose using ControlNets and influence the rest of the image with prompts and embeddings. I just need to change the input image in the workflow to generate an entire series. Here are a few examples using image-compare mode: This is super convenient since my use case involves generating sequences—or even full yoga classes. But how can I ensure that the woman in each pose remains the same? How do I maintain visual identity and consistency across the sequence of images? We’ll cover that in the final part of this series. So stay tuned—and check out my YouTube tutorials as well.

In the first part of this series on image generation, we explored how to set up a simple Text-to-Image workflow using Stable Diffusion and ComfyUI, running it locally. We also introduced embeddings to enhance prompts and adjust image styles. However, we found that embeddings alone were not sufficient for our specific use case: generating accurate yoga poses.
Simple Image-to-Image Workflow
Let’s now take it a step further and provide an image alongside the text prompts to serve as a base for the generation process.
Here is the workflow in ComfyUI:

I use an image of myself and combine it with a prompt specifying that the output image should depict a woman wearing blue yoga pants instead.

This image is converted into the latent space and used in the generation process instead of starting from a fully noisy latent image. I apply only 55% denoising.

We can see that the output image resembles the input image. The pose is identical, the subject is now a woman, but the surroundings are similar, and she is not wearing blue pants.

Of course, I can tweak the prompt and change the generation seed. I can also adjust the denoising percentage. Here is the result with a 70% value:

The image quality is better, and the pants are more blue, but the pose has changed slightly: her head is tilted down, and her left hand is not in the same position. There’s a trade-off between pose accuracy and the creative freedom given to the model.
ControlNets
Rather than injecting the entire input image into the generation process, it’s more efficient to transfer only specific characteristics. That’s where Control Networks (or ControlNets) come in.
ControlNets are additional neural networks that extract features from an image and inject them directly into the latent space and the generation process.
Control methods specialize in detecting different types of image features, such as:
- Structural: pose, edge detection, segmentation, depth
- Texture & Detail: scribbles/sketches, stylization from edges
- Content & Layout: bounding boxes, inpainting masks
- Abstract & Style: color maps, textural fields
Most ControlNets work with preprocessors that extract specific features from input images. Here are some examples:

Here’s our workflow updated to include a Depth ControlNet:

I’ve reverted to an empty latent image so we can focus only on the depth features detected by the preprocessor and injected into the latent space by the ControlNet.
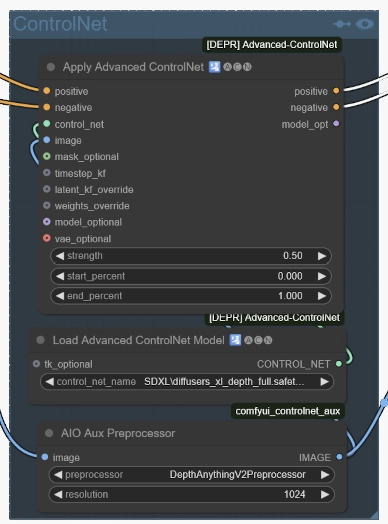
The main parameters to tune are the strength of the ControlNet (here, 50%) and when it is applied during the generation (here, throughout the entire process). By tweaking these settings, you can adjust how much the ControlNet influences the final image and, once again, find the best balance between control and creativity.
I can still apply an embedding to achieve a specific style—for example, a comic style:

There is even an OpenPose ControlNet, specifically trained to detect and apply human poses, but unfortunately, it is not accurate enough for yoga poses.
Advanced Image-to-Image Workflow
Now that we’re extracting only certain features, we can use more abstract images as inputs—focusing on the pose and letting Stable Diffusion handle the rest.

After multiple tests, I decided to combine two ControlNets: one for Edge Detection (Canny Edge, 40% strength) and one for Depth (30% strength).
Here’s the resulting workflow:

Watch this video to see the process in action with two fine-tuned SDXL models:
- Juggernaut XL
- Cheyenne, specialized in comic and graphic novel styles

Neat! I can now control the pose using ControlNets and influence the rest of the image with prompts and embeddings.
I just need to change the input image in the workflow to generate an entire series. Here are a few examples using image-compare mode:


This is super convenient since my use case involves generating sequences—or even full yoga classes. But how can I ensure that the woman in each pose remains the same? How do I maintain visual identity and consistency across the sequence of images?
We’ll cover that in the final part of this series. So stay tuned—and check out my YouTube tutorials as well.


