The Adventures of Blink S3e4: Setting Up Cloud Collaboration with Git
Hey friends, and welcome back to the Adventures of Blink! If you find this post valuable, please let me know with an emoji, or a comment, or even a like on the Youtube channel - so I know to make more content like this. And don't forget to follow the blog and the channel so that you don't miss upcoming episodes! I really appreciate it! For today's adventure, we're picking up where we left off last week - we learned to use git to store our source code and even learned to make branches so that we could make risky changes safely. But up to this point, we've only used git in isolation: the repository lives on our system and isn't shared with anyone else. Sure, we've learned to use these things, but we haven't really seen the powerful collaboration capabilities that git unlocks. In order to do that, we have to put our repository somewhere that others can use it, too: in the cloud! ☁️☁️☁️ We're going to use GitHub and GitLab as examples. Setting up a GitHub Repository It's pretty easy to create a repository in GitHub once you've set up your account: You have to name the repository something that's unique to your account. If you're creating it for use in a "GitHub Organization" (which is commonly used when your code needs to be owned by a company), the name has to be unique within that organization. Public vs Private in the Cloud Public repositories are visible to anyone on the internet. You as the owner are responsible for all changes to the code, either directly (by approving when someone sends you a request for a change) or indirectly (by adding someone as a 'collaborator' on the project). Private repositories work the same way, except they're not visible at all to anyone unless they're added as a collaborator. Connecting a local git repo to your cloud repo The situation with our Season 3 repo is a little different from the frequent flow of setting up a git repository. Usually when you're planning to use a cloud repository, it's easiest to start by creating the cloud repo first and then cloning it to your local machine. But we've been working locally and we want to send our local work into the cloud. It's not any more difficult, it's just... different. Here's how: First, you'll want to grab the URI for your cloud repository as you see below: GitHub: GitLab: Next, you'll need to tell your local git to create a REMOTE. Remotes are named connections from the local repository to a copy stored elsewhere. git remote add origin This git command creates a remote found at the location and names the remote connection 'origin'. You can of course change that name to anything you like, but 'origin' is usually the default name that git uses. It's really rare that you'd have multiple remotes for a single repository, but it's totally possible. If I wanted to sync the Season3 repository with both GitHub and GitLab, I could do this: git remote add gh git remote add gl Now you can push code using git push, like this: git push gl main git push gh main This will push the 'main' branch to each remote. You can of course adjust this to push other branches as you're working - any and all branches are eligible. Attack of the Clones What we just did above was to connect existing code to a repository we created in the cloud tool. But what if we're starting from scratch? What's the easiest way? Well... you'll still create your repository on the website, just like we did above. But instead of adding remotes, we're going to clone our project onto our local machine. Copy the URI just like we did above, but this time go to your terminal and run git clone This will create a local copy of the repository in a folder using the project's name at whatever current folder your terminal is pointing to. Wrapping up Being able to share our code is a basic fundamental skill - and philosophically speaking, it's a critical part of the concept of Open Source! Today we compared and contrasted two different places that we can make our code public. Who won? You decide! See you next time!
Hey friends, and welcome back to the Adventures of Blink! If you find this post valuable, please let me know with an emoji, or a comment, or even a like on the Youtube channel - so I know to make more content like this. And don't forget to follow the blog and the channel so that you don't miss upcoming episodes! I really appreciate it!
For today's adventure, we're picking up where we left off last week - we learned to use git to store our source code and even learned to make branches so that we could make risky changes safely.
But up to this point, we've only used git in isolation: the repository lives on our system and isn't shared with anyone else. Sure, we've learned to use these things, but we haven't really seen the powerful collaboration capabilities that git unlocks. In order to do that, we have to put our repository somewhere that others can use it, too: in the cloud! ☁️☁️☁️ We're going to use GitHub and GitLab as examples.
Setting up a GitHub Repository
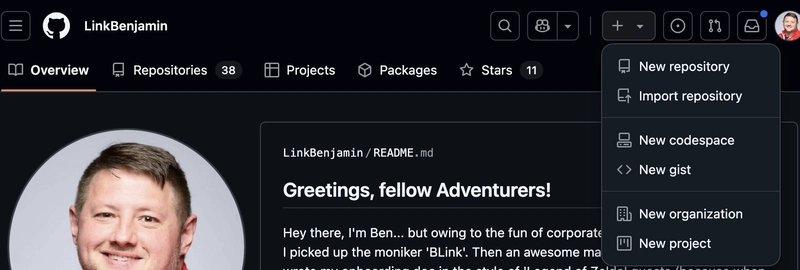
It's pretty easy to create a repository in GitHub once you've set up your account:

You have to name the repository something that's unique to your account. If you're creating it for use in a "GitHub Organization" (which is commonly used when your code needs to be owned by a company), the name has to be unique within that organization.
Public vs Private in the Cloud
Public repositories are visible to anyone on the internet. You as the owner are responsible for all changes to the code, either directly (by approving when someone sends you a request for a change) or indirectly (by adding someone as a 'collaborator' on the project).
Private repositories work the same way, except they're not visible at all to anyone unless they're added as a collaborator.
Connecting a local git repo to your cloud repo
The situation with our Season 3 repo is a little different from the frequent flow of setting up a git repository. Usually when you're planning to use a cloud repository, it's easiest to start by creating the cloud repo first and then cloning it to your local machine. But we've been working locally and we want to send our local work into the cloud. It's not any more difficult, it's just... different. Here's how:
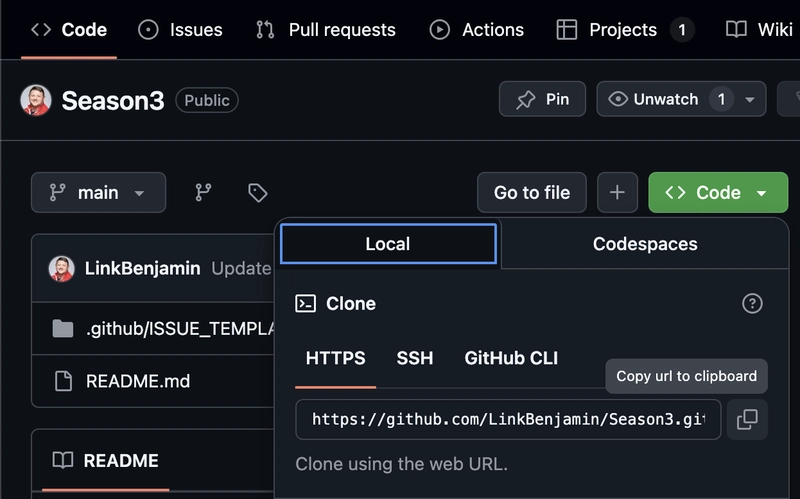
First, you'll want to grab the URI for your cloud repository as you see below:
Next, you'll need to tell your local git to create a REMOTE. Remotes are named connections from the local repository to a copy stored elsewhere.
git remote add origin
This git command creates a remote found at the location and names the remote connection 'origin'. You can of course change that name to anything you like, but 'origin' is usually the default name that git uses.
It's really rare that you'd have multiple remotes for a single repository, but it's totally possible. If I wanted to sync the Season3 repository with both GitHub and GitLab, I could do this:
git remote add gh
git remote add gl
Now you can push code using git push, like this:
git push gl main
git push gh main
This will push the 'main' branch to each remote. You can of course adjust this to push other branches as you're working - any and all branches are eligible.
Attack of the Clones
What we just did above was to connect existing code to a repository we created in the cloud tool. But what if we're starting from scratch? What's the easiest way?
Well... you'll still create your repository on the website, just like we did above. But instead of adding remotes, we're going to clone our project onto our local machine. Copy the URI just like we did above, but this time go to your terminal and run
git clone
This will create a local copy of the repository in a folder using the project's name at whatever current folder your terminal is pointing to.
Wrapping up
Being able to share our code is a basic fundamental skill - and philosophically speaking, it's a critical part of the concept of Open Source! Today we compared and contrasted two different places that we can make our code public. Who won? You decide! See you next time!


