


Realistic Snake twists using just 2 images? Possible!
Online, there's a plethora of Snake game tutorials. Most focus on chasing a cluster of squares representing the snake behind another square, symbolizing loot. Better projects distinguish the head from the body by coloring the first square differently, while chasing an apple. The more professional projects come closest to the ideals of classic snake games, where the snake looks like a snake and moves realistically. Such projects utilize sprites, a set of images placed at direction-change points, to give the snake smooth structure and simulate its movement. But... Can a Snake game be created using only 2 images for the head and body while meeting all the functional attributes? Let's explore together. What's (Not) included in the Article? The entire step-by-step process with code won't be found here, so if you want to see the result straight away, at the end of the article you'll find a link to the repository. However, I'll provide you with unique tips and tricks that can help you in creating your own game. Playground Let's begin with the playground. We can create it using a simple CSS Grid or with HTML Canvas. Both options are valid and each has its advantages. Canvas provides absolute control over rendering and animation pixel by pixel. CSS Grid provides efficient and straightforward implementation. So, if you want smooth snake movement, use Canvas. Snake If we used sprites, we’d need to create a set of images for every segment of the snake in each possible position. That requires at least some drawing skills, which can be a major obstacle. That’s why we’ll aim for a simple model that even a complete graphic illiterate like me can manage. At first glance, it might seem the snake must be made of at least three parts: the head, the body, and the tail. I naturally started building the game with these three segments. The first model was really just a simple sketch: I drew the snake in the direction of its initial position. I split it into 3 separate images and thought I just needed to rotate them based on the current movement direction. And that’s when the problem appeared. The snake turned into squares at the points where it changed direction: So a new strategy was needed. To achieve a natural, curved shape at the bend, the body of the snake had to be rounded on both sides. But we must not forget that our game field is a square grid. If we just made the snake's body into a perfect circle, the snake would look like a tapeworm: That’s why I got the idea to make one side extend past the grid and use an ellipse instead of a circle. That could nicely connect the snake segments and naturally round the turns: Here, the solution begins to take shape, the snake’s body is rounded on both sides, so we no longer need a separate tail segment. In the final version, we’ll change its color, add a decorative stripe, tweak the head a little, and suddenly… voilà! The snake is drawn. All it took was one head and one ellipse: I drew the snake using the free online editor pixilart.com Let's start coding Each snake segment is just an instance of either the head or body image. We place these segments into the GameBoard grid using absolutely positioned HTML elements and rotate them based on the current direction (0°, 90°, 180°, 270°). 1. Segment Placement Each segment contains: Grid coordinates (x, y) Movement direction (up, down, left, right) Type: head or body We can represent this in TypeScript like so: interface SnakeSegment { x: number y: number direction: 'up' | 'down' | 'left' | 'right' type: 'head' | 'body' } 2. Z-Index & Overlapping To create the "overlapping" effect where segments slightly layer over each other we use: position: absolute Slight pixel offset via transform: translate(...) or tweaking top/left z-index based on order - head highest, last body segment lowest Example CSS: .segment { position: absolute; width: 32px; height: 32px; } .head { z-index: 100; } .body { z-index: var(--segment-order); } 3. Segment Rotation To rotate each segment based on its direction, we use a utility function: function getRotation(direction: 'up' | 'right' | 'down' | 'left') { switch (direction) { case 'up': return 'rotate(0deg)' case 'right': return 'rotate(90deg)' case 'down': return 'rotate(180deg)' case 'left': return 'rotate(270deg)' } } Storing Turn Points When the snake turns, we must remember where the change happened so that each segment turns when it reaches that same point. We'll implement a FIFO queue of turn points: interface TurnPoint { x: number y: number newDirection: 'up' | 'right' | 'down' | 'left' } Each segment checks against these TurnPoints. If it matches its current (x, y), it changes direction accordingly. Once the last segment passes a turn point, we remove it from the queue. The implementation of core

Online, there's a plethora of Snake game tutorials. Most focus on chasing a cluster of squares representing the snake behind another square, symbolizing loot. Better projects distinguish the head from the body by coloring the first square differently, while chasing an apple. The more professional projects come closest to the ideals of classic snake games, where the snake looks like a snake and moves realistically. Such projects utilize sprites, a set of images placed at direction-change points, to give the snake smooth structure and simulate its movement.
But... Can a Snake game be created using only 2 images for the head and body while meeting all the functional attributes? Let's explore together.
What's (Not) included in the Article?
The entire step-by-step process with code won't be found here, so if you want to see the result straight away, at the end of the article you'll find a link to the repository.
However, I'll provide you with unique tips and tricks that can help you in creating your own game.
Playground
Let's begin with the playground. We can create it using a simple CSS Grid or with HTML Canvas.
Both options are valid and each has its advantages.
Canvas provides absolute control over rendering and animation pixel by pixel.
CSS Grid provides efficient and straightforward implementation.
So, if you want smooth snake movement, use Canvas.
Snake
If we used sprites, we’d need to create a set of images for every segment of the snake in each possible position. That requires at least some drawing skills, which can be a major obstacle. That’s why we’ll aim for a simple model that even a complete graphic illiterate like me can manage.
At first glance, it might seem the snake must be made of at least three parts: the head, the body, and the tail. I naturally started building the game with these three segments. The first model was really just a simple sketch:
I drew the snake in the direction of its initial position. I split it into 3 separate images and thought I just needed to rotate them based on the current movement direction. And that’s when the problem appeared. The snake turned into squares at the points where it changed direction:
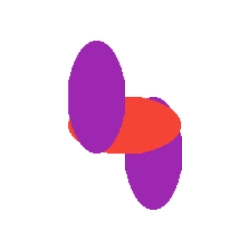
So a new strategy was needed. To achieve a natural, curved shape at the bend, the body of the snake had to be rounded on both sides. But we must not forget that our game field is a square grid. If we just made the snake's body into a perfect circle, the snake would look like a tapeworm:

That’s why I got the idea to make one side extend past the grid and use an ellipse instead of a circle. That could nicely connect the snake segments and naturally round the turns:

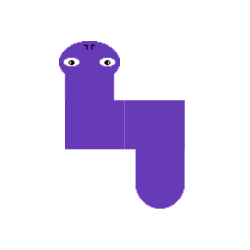
Here, the solution begins to take shape, the snake’s body is rounded on both sides, so we no longer need a separate tail segment.
In the final version, we’ll change its color, add a decorative stripe, tweak the head a little, and suddenly… voilà!
The snake is drawn. All it took was one head and one ellipse:

I drew the snake using the free online editor pixilart.com
Let's start coding
Each snake segment is just an instance of either the head or body image.
We place these segments into the GameBoard grid using absolutely positioned HTML elements and rotate them based on the current direction (0°, 90°, 180°, 270°).
1. Segment Placement
Each segment contains:
- Grid coordinates (x, y)
- Movement direction (
up,down,left,right) - Type:
headorbody
We can represent this in TypeScript like so:
interface SnakeSegment {
  x: number
  y: number
  direction: 'up' | 'down' | 'left' | 'right'
  type: 'head' | 'body'
}
2. Z-Index & Overlapping
To create the "overlapping" effect where segments slightly layer over each other we use:
-
position: absolute - Slight pixel offset via
transform: translate(...)or tweakingtop/left -
z-indexbased on order - head highest, last body segment lowest
Example CSS:
.segment {
  position: absolute;
  width: 32px;
  height: 32px;
}

.head {
  z-index: 100;
}

.body {
  z-index: var(--segment-order);
}
3. Segment Rotation
To rotate each segment based on its direction, we use a utility function:
function getRotation(direction: 'up' | 'right' | 'down' | 'left') {
  switch (direction) {
    case 'up': return 'rotate(0deg)'
    case 'right': return 'rotate(90deg)'
    case 'down': return 'rotate(180deg)'
    case 'left': return 'rotate(270deg)'
  }
}
Storing Turn Points
When the snake turns, we must remember where the change happened so that each segment turns when it reaches that same point.
We'll implement a FIFO queue of turn points:
interface TurnPoint {
  x: number
  y: number
  newDirection: 'up' | 'right' | 'down' | 'left'
}
Each segment checks against these TurnPoints. If it matches its current (x, y), it changes direction accordingly.
Once the last segment passes a turn point, we remove it from the queue.
The implementation of core game logic such as collisions, movement, and snake control is the same as in any other snake game, so we won’t go into detail here.
Conclusion
I hope you’ll enjoy this unique little snake and that you'll ride many happy pixels with it!
As promised, you can find the full project here.
You can also play the game online right away here.
If there’s interest, I’ll gladly prepare a follow-up with a more detailed explanation.
Wishing everyone lots of success in coding! :)