


Mac Dev Environment Automation: From Reset to Ready in 5 Minutes
For the past few months, I've been struggling with limited disk space on my laptop. Deleting cache files helped temporarily, but the relief didn't last long. Eventually, I couldn't install any new software. Resetting my laptop became the only practical option. I hesitated because I was worried about reinstalling all the development tools I needed. After I began using Neovim, I've installed so many packages and tools that I couldn't even remember them all. My tech lead, Pablo, built his own installer to set up his development environment. Inspired by his idea, I decided to create my own dev setup tool that would allow me to configure my development environment anywhere in minutes. Thanks to Homebrew, I had manually installed most of my software, and I realized I could automate the installation of all these tools through Homebrew. I just needed to document what I required. Additionally, I maintain dotfiles and zsh configurations. This part was easily solved by cloning my dotfile repository and creating symbolic links. In this post, I'll introduce how my setup tool works, sharing some of the code (though not all of it). For reference, this tool is built specifically for my MacBook M1 2020 running zsh. Preview How it works UI Instead of using a TUI (Terminal User Interface) framework, I built a simple UI from scratch. For this, I relied on just two helpful libraries: "github.com/fatih/color": Color text "github.com/mattn/go-tty": Input keys from console func RenderItem(name string, disabled bool) { installedPen := color.New(color.FgHiGreen).PrintFunc() notInstalledPen := color.New(color.FgRed).PrintFunc() softwareNamePen := color.New(color.FgWhite).PrintFunc() softwareNamePen(name) if disabled { installedPen(" - Installed") } else { notInstalledPen(" - Not Installed") } } Color helps distinguish between different types of text at a glance - especially for status indicators like installed/not installed. The lightweight color library provided exactly what I needed without unnecessary complexity. For moving around the terminal, I went with ANSI escape sequences. They let me position the cursor precisely and update specific parts of the text as needed. type SelectItem struct { Name string Render func(name string, disabled bool) Run func() GetDisabled func() bool Disabled bool } func (si *SelectItem) UpdateDisabled() { if si.GetDisabled != nil { si.Disabled = si.GetDisabled() } } func ShowCursor() { fmt.Print("\033[?25h") } func HideCursor() { fmt.Print("\033[?25l") } func ClearConsole() { cmd := exec.Command("clear") cmd.Stdout = os.Stdout cmd.Run() } func MoveCursor(x, relativeY int) { if relativeY = itemLength-1 { break } eraseCurrentCursor() currentIndex++ drawCurrentCursor() case 'k', 'K', 'l', 'L': if currentIndex
For the past few months, I've been struggling with limited disk space on my laptop. Deleting cache files helped temporarily, but the relief didn't last long. Eventually, I couldn't install any new software.
Resetting my laptop became the only practical option. I hesitated because I was worried about reinstalling all the development tools I needed. After I began using Neovim, I've installed so many packages and tools that I couldn't even remember them all.
My tech lead, Pablo, built his own installer to set up his development environment. Inspired by his idea, I decided to create my own dev setup tool that would allow me to configure my development environment anywhere in minutes.
Thanks to Homebrew, I had manually installed most of my software, and I realized I could automate the installation of all these tools through Homebrew. I just needed to document what I required.
Additionally, I maintain dotfiles and zsh configurations. This part was easily solved by cloning my dotfile repository and creating symbolic links.
In this post, I'll introduce how my setup tool works, sharing some of the code (though not all of it).
For reference, this tool is built specifically for my MacBook M1 2020 running zsh.
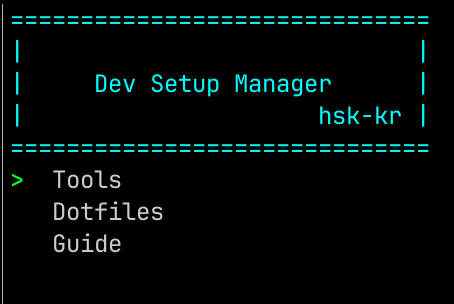
Preview
How it works
- UI
Instead of using a TUI (Terminal User Interface) framework, I built a simple UI from scratch. For this, I relied on just two helpful libraries:
- "github.com/fatih/color": Color text
- "github.com/mattn/go-tty": Input keys from console
func RenderItem(name string, disabled bool) {
    installedPen := color.New(color.FgHiGreen).PrintFunc()
    notInstalledPen := color.New(color.FgRed).PrintFunc()
    softwareNamePen := color.New(color.FgWhite).PrintFunc()

    softwareNamePen(name)
    if disabled {
        installedPen(" - Installed")
    } else {
        notInstalledPen(" - Not Installed")
    }
}
Color helps distinguish between different types of text at a glance - especially for status indicators like installed/not installed. The lightweight color library provided exactly what I needed without unnecessary complexity.
For moving around the terminal, I went with ANSI escape sequences. They let me position the cursor precisely and update specific parts of the text as needed.
type SelectItem struct {
    Name        string
    Render      func(name string, disabled bool)
    Run         func()
    GetDisabled func() bool
    Disabled    bool
}

func (si *SelectItem) UpdateDisabled() {
    if si.GetDisabled != nil {
        si.Disabled = si.GetDisabled()
    }
}

func ShowCursor() {
    fmt.Print("\033[?25h")
}

func HideCursor() {
    fmt.Print("\033[?25l")
}

func ClearConsole() {
    cmd := exec.Command("clear")
    cmd.Stdout = os.Stdout
    cmd.Run()
}

func MoveCursor(x, relativeY int) {
    if relativeY < 0 {
        fmt.Printf("\033[%dA\033[%dG", -relativeY, x)
    } else {
        fmt.Printf("\033[%dB\033[%dG", relativeY, x)
    }
}

/*
Display items and returns the name of the item
If user presses esc, it returns empty string with an error
*/
func Select(items []SelectItem) (string, error) {
    print := color.New(color.FgWhite).PrintfFunc()
    cursor := color.New(color.FgGreen).Add(color.Bold).PrintFunc()
    itemLength := len(items)
    currentIndex := 0

    for _, item := range items {
        print("   ")

        if item.Render != nil {
            item.Render(item.Name, item.Disabled)
        } else {
            print(item.Name)
        }

        print("\n")
    }

    eraseCurrentCursor := func() {
        MoveCursor(1, -itemLength+currentIndex)
        cursor(" ")
        MoveCursor(1, -(-itemLength + currentIndex))
    }

    drawCurrentCursor := func() {
        MoveCursor(1, -itemLength+currentIndex)
        cursor(">")
        MoveCursor(1, -(-itemLength + currentIndex))
    }

    drawCurrentCursor()

    t, err := tty.Open()
    if err != nil {
        panic(err)
    }
    defer t.Close()

    for {
        r, _ := t.ReadRune()

        switch r {
        case '\x1b':
            return "", errors.New("Escape")
        case 'j', 'J', 'h', 'H':
            if currentIndex >= itemLength-1 {
                break
            }
            eraseCurrentCursor()
            currentIndex++
            drawCurrentCursor()
        case 'k', 'K', 'l', 'L':
            if currentIndex <= 0 {
                break
            }
            eraseCurrentCursor()
            currentIndex--
            drawCurrentCursor()
        }

        if (r == '\r' || r == '\n') && !items[currentIndex].Disabled {
            break
        }
    }

    return items[currentIndex].Name, nil
}
The Select function prints items and reads the key input and moves cursors.
If the escape key is entered, it returns the Escape error and,
if the enter key is entered, it returns the name of the selected item.
This simple UI is enough to achieve my goal - anyway making it pretty is not my goal so.
I was thinking of reimplementing the UI using bubble tea library, which my tech lead recommended to me and it has rich features, easy to use, and just awesome.
If you're planning to build a terminal based app, I highly recommend bubble tea.
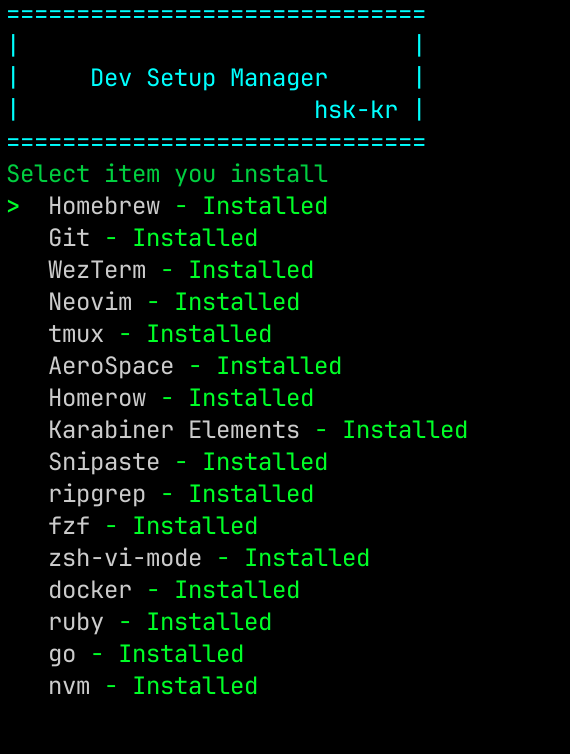
- Tools
You can install tools by placing the cursor next to the item you want and pressing the enter key.
If the item is already installed, nothing happens when you select it.
I implemented three types of functions to check if a tool exists or not:
func ExistBrewPackage(packageName string) bool {
    _, err := exec.Command("brew", "list", packageName).Output()

    if err != nil {
        return false
    }

    return true
}

func ExistApplication(appName string) bool {
    ls := exec.Command("ls", "/Applications")
    grep := exec.Command("grep", appName)

    pipe, err := ls.StdoutPipe()
    defer pipe.Close()

    if err != nil {
        panic(err)
    }

    grep.Stdin = pipe

    err = ls.Start()

    if err != nil {
        panic(err)
    }

    output, err := grep.Output()

    if err != nil {
        return false
    }

    return len(string(output)) >= len(appName)
}

func ExecCommand(command string, args ...string) {
    cmd := exec.Command(command, args...)
    cmd.Stdout = os.Stdout
    cmd.Stderr = os.Stdout

    if err := cmd.Start(); err != nil {
        panic(err)
    }

    if err := cmd.Wait(); err != nil {
        panic(err)
    }
}
- ExistBrewPackage: Checks for tools that don't have a command and only exist as a brew package
- ExistApplication: Verifies applications that aren't available as commands or brew packages, but exist inside the Applications directory
- ExecCommand: Simply runs a command and reports whether there was an error or not
// ...
    case "Git":
        return ExistBrewPackage("git"), nil
    case "WezTerm":
        return ExistApplication("WezTerm.app"), nil
    case "Neovim":
        return ExistCommand("nvim"), nil
// ...
These functions are used to check for existing software and install new tools.
For installing tools, I rely completely on Homebrew, which simplifies the process tremendously.
As for Homebrew itself, I could have made the installation command interactive, but instead I chose to provide instructions for manual installation. Since Homebrew is easy to install with a single terminal command, I left it as a manual step while ensuring all other tools can be automatically installed using Homebrew once it's in place.
// ...
    case "fzf":
        ExecCommand("brew", "install", "fzf")
    case "zsh-vi-mode":
        ExecCommand("brew", "install", "zsh-vi-mode")
        AddZshSource("source $(brew --prefix)/opt/zsh-vi-mode/share/zsh-vi-mode/zsh-vi-mode.plugin.zsh")
        WarningMessage("Run source ~/.zshrc to use zsh-vi-mode without reopening the terminal.")
    case "docker":
        ExecCommand("brew", "install", "docker")
    case "ruby":
        ExecCommand("brew", "install", "ruby")
// ...
I implemented the AddZshSource function to add necessary source lines to complete the installation.
These source lines are added to the ~/dev-setup-manager/devsh file, which is then imported from ~/.zshrc.
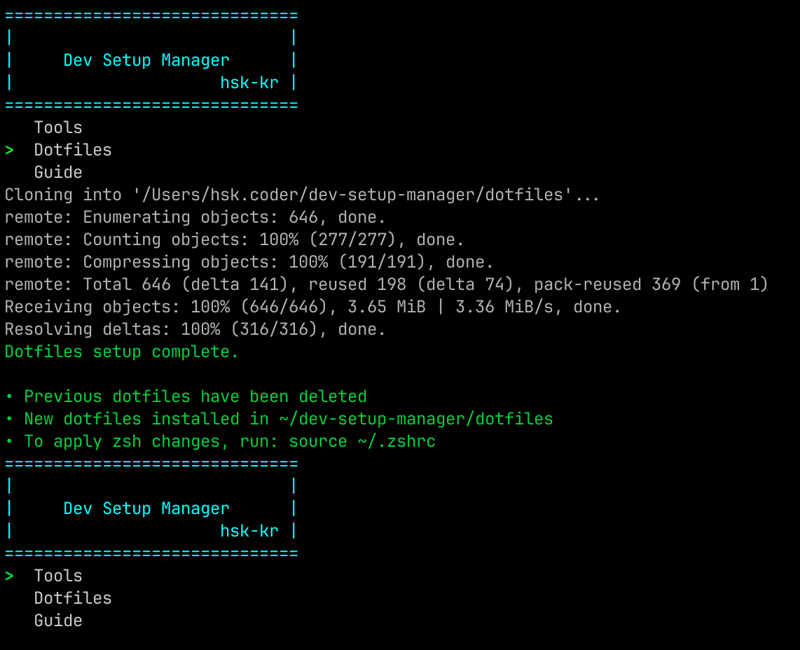
- Dotfiles
Dotfiles are configuration files that customize your system and applications. They're called "dotfiles" because they typically start with a dot (.) in Unix-like systems, making them hidden files.
My dotfiles are stored in a GitHub repository, and I use symbolic links to connect them to their expected locations in the system. This approach allows me to:
- Version control my configurations
- Easily sync settings across multiple machines
- Quickly set up a new environment with my preferred settings
Here's how I set up my dotfiles using the dev setup manager:
// ...
    ExecCommand("mkdir", "-p", devSetupManagerHomePath)

    if exist, _ := existFile(devSetupManagerDotfilesPath); exist {
        ExecCommand("rm", "-rf", devSetupManagerDotfilesPath)
    }

    ExecCommand("git", "clone", "git@github.com:hsk-kr/dotfiles.git", devSetupManagerDotfilesPath)

    ExecCommand("mkdir", "-p", configDirPath)

    copyItems := []string{
        "aerospace",
        "devdeck",
        "karabiner",
        "nvim",
        "tmux",
        "zsh",
    }

    for _, copyItem := range copyItems {
        ExecCommand("ln", "-sfn", fmt.Sprintf("%s/%s", devSetupManagerDotfilesPath, copyItem), fmt.Sprintf("%s/%s", configDirPath, copyItem))
    }

    ExecCommand("ln", "-sfn", fmt.Sprintf("%s/%s", devSetupManagerDotfilesPath, "scripts"), fmt.Sprintf("%s/%s", homePath, "scripts"))

    AddZshSource(fmt.Sprintf("source %s/%s", configDirPath, "zsh/zshrc"))
// ...
The process works as follows:
- Delete existing dotfiles (if present)
- Clone the dotfiles from my GitHub repository
- Create symbolic links to connect them to the expected system locations
- Add a source line to
.zshrcto import my custom zsh configuration
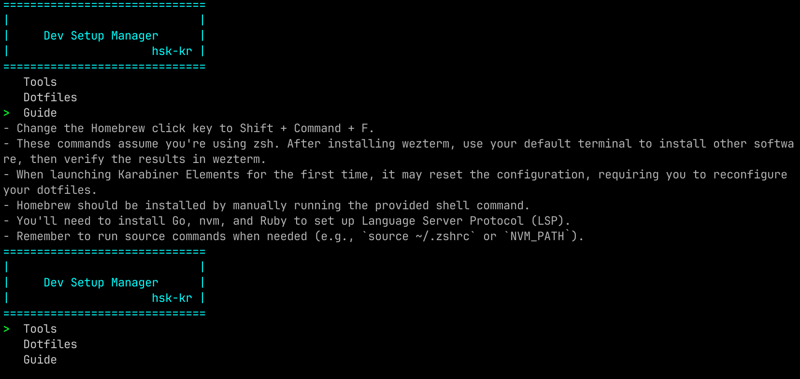
- Guide
There were some things I needed to do to set up my development environment that had to be handled manually, such as Apple configurations and ensuring the correct installation order. This section is a set of notes related to these manual setup steps.
Deployment
After completing the development, I thought the tool was ready to use even though I hadn't tested everything. However, when I reset my computer, I realized I had forgotten to compile the code.
To solve this problem, I quickly set up a GitHub Actions workflow to automatically build the code and release the compiled program whenever needed.
name: Build and Release

on:
  workflow_dispatch:
    inputs:
      version:
        description: "Version number"
        required: true
        default: "v0.1.0"

jobs:
  build-and-release:
    runs-on: ubuntu-latest

    steps:
      - name: Checkout code
        uses: actions/checkout@v4
        with:
          ref: main

      - name: Setup Go
        uses: actions/setup-go@v5
        with:
          go-version: '1.24'

      - name: Build for macOS (M1)
        run: GOOS=darwin GOARCH=arm64 go build -o dev-setup-manager main.go

      - name: Upload binaries as artifacts
        uses: actions/upload-artifact@v4
        with:
          name: binaries
          path: |
            dev-setup-manager

      - name: Create a Release
        uses: ncipollo/release-action@v1
        with:
          artifacts: "dev-setup-manager"
          tag: ${{ inputs.version }}
The code compiles to target the darwin arm64 architecture, specifically for my M1 MacBook 2020.
Wrap Up
I had to make some minor adjustments, but it worked perfectly. As a result, I managed to set up my development environment within 5 minutes. Since my dotfiles and zsh configurations are shared, I can configure my development environment on any Mac-based computer in no time. I can reset my laptop anytime to clear disk space - though laptop setup, software installation, and Apple configuration still need to be handled manually. This is a minor inconvenience, but it doesn't take much time thanks to the Apple ecosystem.
I'm very satisfied with the results, and I hope you find this helpful or get some inspiration from it.
Thanks,
Happy Coding!


