


Host Your Website or Blog from Your Android Device
Have you ever imagined hosting a website or blog straight from your Android phone? It might sound like a tech experiment, but with the right tools, it is completely possible! This guide will show you how to turn your Android device into a fully functional web server using Termux (a powerful terminal emulator) and Pinggy (a tunneling service that provides a public URL for your server). What You’ll Need An Android device Termux (a Linux terminal emulator for Android) A stable internet connection Step 1: Install Termux Termux is an Android app that provides a Linux terminal environment without requiring root access. It enables you to install packages, run servers, and perform various tasks. Download Termux from F-Droid . Alternatively, download the Termux APK directly from GitHub. Step 2: Install Necessary Packages Before we start hosting a website, we need to install a web server and SSH client on Termux. Run the following commands to update the package list and install the required tools: pkg update && pkg upgrade pkg install openssh pkg install nodejs-lts After installation, verify the versions using: node --version npm --version Step 3: Start the Web Server Let’s create a simple HTML webpage: echo "Hello World!" > index.html You can edit this page using: nano index.html Now, start a lightweight HTTP server using Node.js: npx http-server & This command will start the server in the background, running on port 8080 by default. To stop it, bring it to the foreground using fg and press Ctrl + C. Step 4: Expose Your Server Publicly with Pinggy By default, your server is accessible only on your local network. To make it available online, use Pinggy: ssh -p 443 -R0:localhost:8080 a.pinggy.io This command generates a public URL, like: https://your-server.a.pinggy.link Now, you can access your website from anywhere! Tip: If you get a different port than 8080 in the output, update the command accordingly. Step 5: Monitor and Share Your Website With Pinggy running, you can see live visitor statistics directly in the terminal. This feature is useful for monitoring traffic and analyzing incoming requests. Bonus: Use Your Own Domain If you want a custom domain like www.mywebsite.com, you can configure it with Pinggy’s Pro Plan: Sign up for Pinggy Pro and access the Custom Domains section. Add your domain and configure the provided CNAME record in your domain’s DNS settings. Validate and issue an SSL certificate from the Pinggy dashboard. Use the following command with your Pinggy token: ssh -p 443 -R0:localhost:8080 @a.pinggy.io Now your website is accessible via your own domain! Conclusion Hosting a website from an Android device is easier than you might think. With Termux, a Node.js HTTP server, and Pinggy, you can turn your phone into a web server and share your content globally. Whether you're testing a web project, hosting a personal blog, or experimenting with mobile servers, this setup provides an innovative and flexible way to go live.
Have you ever imagined hosting a website or blog straight from your Android phone? It might sound like a tech experiment, but with the right tools, it is completely possible! This guide will show you how to turn your Android device into a fully functional web server using Termux (a powerful terminal emulator) and Pinggy (a tunneling service that provides a public URL for your server).
What You’ll Need
- An Android device
- Termux (a Linux terminal emulator for Android)
- A stable internet connection
Step 1: Install Termux
Termux is an Android app that provides a Linux terminal environment without requiring root access. It enables you to install packages, run servers, and perform various tasks.
Step 2: Install Necessary Packages
Before we start hosting a website, we need to install a web server and SSH client on Termux. Run the following commands to update the package list and install the required tools:
pkg update && pkg upgrade
pkg install openssh
pkg install nodejs-lts
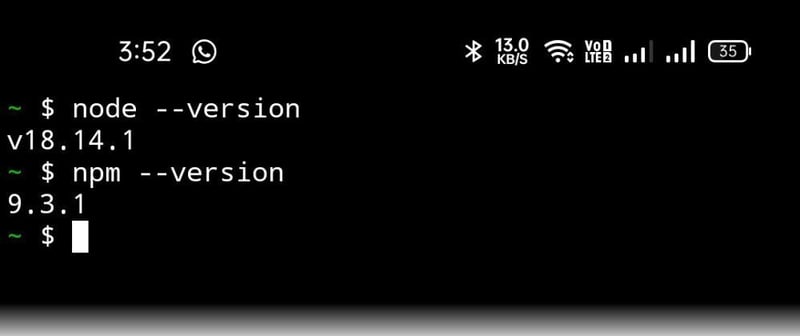
After installation, verify the versions using:
node --version
npm --version
Step 3: Start the Web Server
Let’s create a simple HTML webpage:
echo "Hello World!
" > index.html
You can edit this page using:
nano index.html
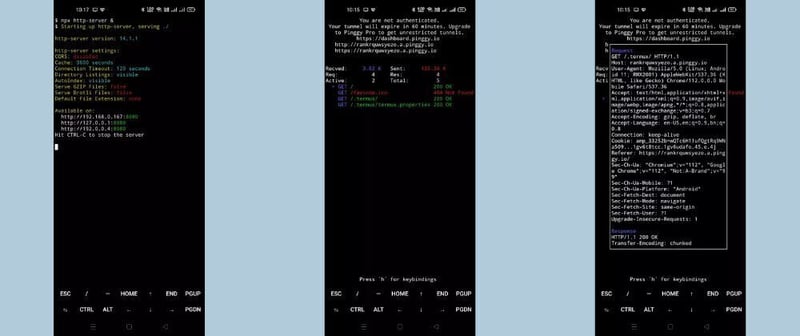
Now, start a lightweight HTTP server using Node.js:
npx http-server &
This command will start the server in the background, running on port 8080 by default. To stop it, bring it to the foreground using fg and press Ctrl + C.
Step 4: Expose Your Server Publicly with Pinggy
By default, your server is accessible only on your local network. To make it available online, use Pinggy:
ssh -p 443 -R0:localhost:8080 a.pinggy.io
This command generates a public URL, like:
https://your-server.a.pinggy.link
Now, you can access your website from anywhere!
Tip: If you get a different port than
8080in the output, update the command accordingly.
Step 5: Monitor and Share Your Website
With Pinggy running, you can see live visitor statistics directly in the terminal. This feature is useful for monitoring traffic and analyzing incoming requests.
Bonus: Use Your Own Domain
If you want a custom domain like www.mywebsite.com, you can configure it with Pinggy’s Pro Plan:
- Sign up for Pinggy Pro and access the Custom Domains section.
- Add your domain and configure the provided CNAME record in your domain’s DNS settings.
- Validate and issue an SSL certificate from the Pinggy dashboard.
- Use the following command with your Pinggy token:
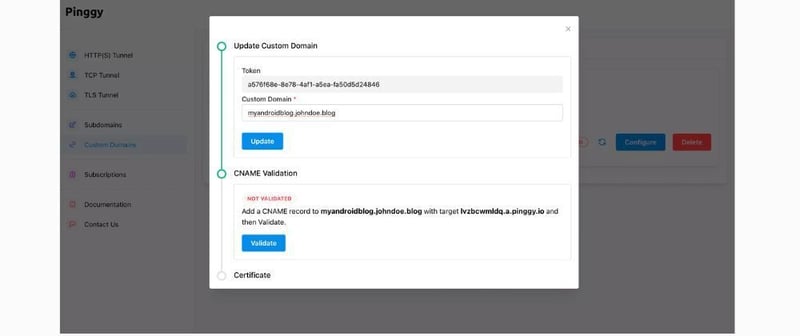
ssh -p 443 -R0:localhost:8080 @a.pinggy.io
Now your website is accessible via your own domain!
Conclusion
Hosting a website from an Android device is easier than you might think. With Termux, a Node.js HTTP server, and Pinggy, you can turn your phone into a web server and share your content globally. Whether you're testing a web project, hosting a personal blog, or experimenting with mobile servers, this setup provides an innovative and flexible way to go live.