


Day 11/ 30 Days of Linux Mastery: Setting Up a Local Repository Using RHEL 9 ISO
Table of Contents Introduction Why Repositories Matter Core dnf Repo Commands Real-World Scenario: Creating a Repo Conclusion Let's Connect Introduction Welcome back to Day 11 of our Linux journey! Over here, we are learning by doing every single day. Many Red Hat systems run in places where there's no internet access. Whether you are on a server in a secure data center or working in a lab, you may find yourself needing to install packages like Apache, Vim, or Python, but without online repositories mainly because of security. In this article, you will learn how to turn a RHEL 9 ISO file into a full offline repository using dnf. You can also use yum. Why Repositories Matter Let's imagine you are in a secure environment with no internet, and you need to install some software like Apache, Python or even Vim. You run the dnf install command, but there is an error because it does not know where to find that software package. If you troubleshoot this or ask any experienced engineer, they will ask you if you have a repo where it can fetch the software package. Now that repo or repositories are organized collection of software which dnf or (yum on older systems) installs packages from. These repos can be: Online (hosted by Red Hat) On your internal company servers Or offline like a DVD or ISO file you downloaded Since we do not have access to the internet in this case, we want to do this offline. We are going to create a local repo to solve this case scenario. That’s where the RHEL ISO comes in, it is packed with all the default software. Core dnf Repo Commands Command Purpose mount -o loop Mount an ISO like a virtual DVD mkdir Create a mount point vim or nano Edit .repo files dnf clean all Clear previous DNF cache dnf repolist List enabled repositories dnf install Install a package using configured repos ls List files to verify ISO contents Real-World Scenario: Creating a Repo You are managing a Red Hat server inside a secure network, no internet access. You have downloaded the RHEL 9 ISO from Red Hat’s website. You are asked to download the Apache web server for a Cloud project. Now let’s turn it into a working repo. 1. Mount the RHEL ISO # First, locate where the ISO you downloaded is in your system. Let's say it’s in; /Downloads/rhel-9.5-aarch64-dvd.iso # create a folder to mount it into mkdir /mnt/macrhel9 # Now mount the ISO in the new folder. mount -o loop Downloads/rhel-9.5-aarch64-dvd.iso /mnt/macrhel9/ # This mounts the ISO like a DVD. -o loop tells Linux to treat the ISO like a virtual DVD. # Let's check that it mounted ls /mnt/rhel9 # You should see folders like BaseOS/, AppStream/, and others. 2. Create the Repo File We will create a .repo file to tell dnf to look inside the ISO folders. vim /etc/yum.repos.d/rhel9-local.repo # Once inside vim, Press i to enter insert mode and paste this inside [macrhel9-baseos] name=Mac RHEL 9 BaseOS baseurl=file:///mnt/macrhel9/BaseOS/ enabled=1 gpgcheck=0 [macrhel9-appstream] name=Mac RHEL 9 AppStream baseurl=file:///mnt/macrhel9/AppStream/ enabled=1 gpgcheck=0 # now press Esc key and type :wq! to save and exit 3. Clean and Verify Repos Clear any old cache or old repo data, and check if your new repo is listed dnf clean all dnf repolist # This should be your output macrhel9-appstream Mac RHEL 9 AppStream macrhel9-baseos Mac RHEL 9 BaseOS # Success! You have mounted your ISO, and your system now knows where to fetch software packages 4. Install a Package (We are doing this with no Internet Access!) We are going to install and remove Apache locally with no internet access. dnf install httpd -y # check it dnf list httpd # Check the rightmost column, it should say the package is coming from macrhel9-appstream. # Remove the package. dnf remove httpd -y Please Note: Run this as an admin with privileges or use sudo command with every prompt. Make sure you downloaded the dvd.iso not boot.iso. Conclusion Setting up a local repo using a RHEL ISO is a critical skill for both real-world Linux system administration. This article simply guides you on how to mount and use ISO files, write and manage .repo files and how to work completely offline with no internet access. This is one of the most repeatable tasks you will use on Red Hat systems in secured environments. If this is helpful to you, feel free to bookmark, comment, like and follow me for Day 12! Let's Connect! If you want to connect or share your journey, feel free to reach out on LinkedIn. I am always happy to learn and build with others in the tech space. #30DaysLinuxChallenge #Redhat#RHCSA #RHCE #CloudWhistler #Linux #Rhel #Ansible #Vim #CloudComputing #DevOps #LinuxAutomation #IaC #SysAdmin#CloudEngineer

Table of Contents
- Introduction
- Why Repositories Matter
- Core
dnfRepo Commands - Real-World Scenario: Creating a Repo
- Conclusion
- Let's Connect
Introduction
Welcome back to Day 11 of our Linux journey! Over here, we are learning by doing every single day.
Many Red Hat systems run in places where there's no internet access. Whether you are on a server in a secure data center or working in a lab, you may find yourself needing to install packages like Apache, Vim, or Python, but without online repositories mainly because of security.
In this article, you will learn how to turn a RHEL 9 ISO file into a full offline repository using dnf. You can also use yum.
Why Repositories Matter
Let's imagine you are in a secure environment with no internet, and you need to install some software like Apache, Python or even Vim. You run the dnf install command, but there is an error because it does not know where to find that software package. If you troubleshoot this or ask any experienced engineer, they will ask you if you have a repo where it can fetch the software package.
Now that repo or repositories are organized collection of software which dnf or (yum on older systems) installs packages from.
These repos can be:
- Online (hosted by Red Hat)
- On your internal company servers
- Or offline like a DVD or ISO file you downloaded
Since we do not have access to the internet in this case, we want to do this offline. We are going to create a local repo to solve this case scenario. That’s where the RHEL ISO comes in, it is packed with all the default software.
Core dnf Repo Commands
| Command | Purpose |
|---|---|
mount -o loop |
Mount an ISO like a virtual DVD |
mkdir |
Create a mount point |
vim or nano
|
Edit .repo files |
dnf clean all |
Clear previous DNF cache |
dnf repolist |
List enabled repositories |
dnf install |
Install a package using configured repos |
ls |
List files to verify ISO contents |
Real-World Scenario: Creating a Repo
You are managing a Red Hat server inside a secure network, no internet access. You have downloaded the RHEL 9 ISO from Red Hat’s website. You are asked to download the Apache web server for a Cloud project.
Now let’s turn it into a working repo.
1. Mount the RHEL ISO
# First, locate where the ISO you downloaded is in your system. Let's say it’s in;

/Downloads/rhel-9.5-aarch64-dvd.iso

# create a folder to mount it into
mkdir /mnt/macrhel9

# Now mount the ISO in the new folder.
mount -o loop Downloads/rhel-9.5-aarch64-dvd.iso /mnt/macrhel9/

# This mounts the ISO like a DVD. -o loop tells Linux to treat the ISO like a virtual DVD.

# Let's check that it mounted

ls /mnt/rhel9

# You should see folders like BaseOS/, AppStream/, and others.
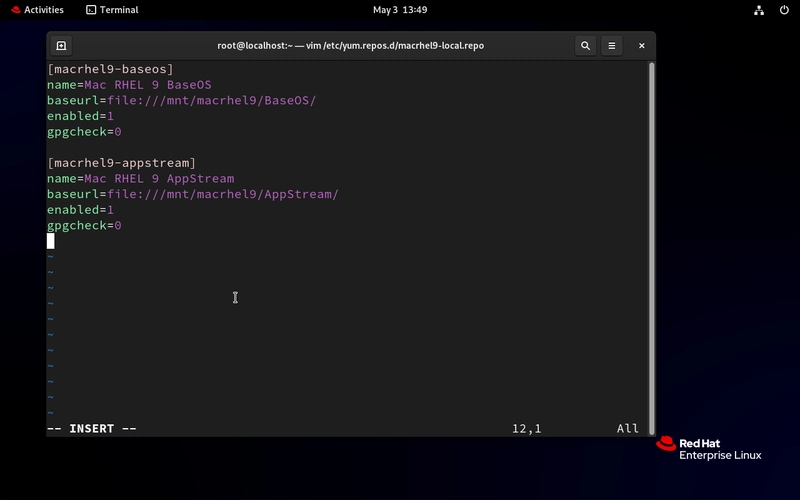
2. Create the Repo File
We will create a .repo file to tell dnf to look inside the ISO folders.
vim /etc/yum.repos.d/rhel9-local.repo

# Once inside vim, Press i to enter insert mode and paste this inside

[macrhel9-baseos]
name=Mac RHEL 9 BaseOS
baseurl=file:///mnt/macrhel9/BaseOS/
enabled=1
gpgcheck=0

[macrhel9-appstream]
name=Mac RHEL 9 AppStream
baseurl=file:///mnt/macrhel9/AppStream/
enabled=1
gpgcheck=0


# now press Esc key and type :wq! to save and exit

3. Clean and Verify Repos
Clear any old cache or old repo data, and check if your new repo is listed
dnf clean all
dnf repolist


# This should be your output

macrhel9-appstream                Mac RHEL 9 AppStream
macrhel9-baseos                   Mac RHEL 9 BaseOS

# Success! You have mounted your ISO, and your system now knows where to fetch software packages


4. Install a Package (We are doing this with no Internet Access!)
We are going to install and remove Apache locally with no internet access.
dnf install httpd -y

# check it

dnf list httpd

# Check the rightmost column, it should say the package is coming from macrhel9-appstream.

# Remove the package.
dnf remove httpd -y


Please Note:
- Run this as an admin with privileges or use sudo command with every prompt.
- Make sure you downloaded the dvd.iso not boot.iso.
Conclusion
Setting up a local repo using a RHEL ISO is a critical skill for both real-world Linux system administration. This article simply guides you on how to mount and use ISO files, write and manage .repo files and how to work completely offline with no internet access.
This is one of the most repeatable tasks you will use on Red Hat systems in secured environments.
If this is helpful to you, feel free to bookmark, comment, like and follow me for Day 12!
Let's Connect!
If you want to connect or share your journey, feel free to reach out on LinkedIn.
I am always happy to learn and build with others in the tech space.
#30DaysLinuxChallenge #Redhat#RHCSA #RHCE #CloudWhistler #Linux #Rhel #Ansible #Vim #CloudComputing #DevOps #LinuxAutomation #IaC #SysAdmin#CloudEngineer