


Creating a Pixel Art Generator with Export Option: A Step-by-Step Guide
Pixel art is a timeless form of digital art that has captivated creators and gamers alike for decades. Whether you're designing sprites for a game or just having fun, a pixel art generator can be a fantastic tool to bring your ideas to life. In this blog, I’ll walk you through the process of building a Pixel Art Generator with an Export Option that allows you to draw pixel art and export it as a PNG file. I’ve already built the app, and you can try it out here: Pixel Art Generator. Below, I’ll explain the structure and functionality of the app in detail, leaving placeholders for the code. You can fill in the blanks with the provided HTML, CSS, and JavaScript code. What Does the Pixel Art Generator Do? The Pixel Art Generator is a web-based tool that allows users to: Draw pixel art on a customizable grid (16×16, 32×32, or 64×64). Choose colors using a color picker. Use tools like Fill, Erase, and Clear to refine their artwork. Export the final artwork as a PNG file. The app is built using HTML, CSS, and JavaScript, making it lightweight and easy to use. Structure of the App The app consists of three main components: HTML: Defines the structure of the app. CSS: Styles the app to make it visually appealing. JavaScript: Handles the logic for drawing, filling, erasing, and exporting. Let’s break down each component. 1. HTML Structure The HTML file sets up the basic structure of the app, including the canvas, control panel, and buttons. Here’s the outline: Pixel Art Studio Pixel Art Studio 16×16 32×32 64×64 Fill Erase Clear Export PNG Explanation: The section includes meta tags for responsiveness and links to the CSS file. The contains a container with a title, control panel, and canvas wrapper. The control panel includes a dropdown for grid size, a color picker, and buttons for tools like Fill, Erase, Clear, and Export PNG. The canvas is where the pixel art is drawn. 2. CSS Styling The CSS file styles the app to make it visually appealing and user-friendly. Here’s the outline: :root { --primary: #6c5ce7; --secondary: #a29bfe; --accent: #00cec9; --dark: #2d3436; --danger: #e17055; } * { margin: 0; padding: 0; box-sizing: border-box; font-family: 'Poppins', sans-serif; } body { background: linear-gradient(45deg, #2d3436, #636e72); min-height: 100vh; display: flex; justify-content: center; align-items: center; padding: 20px; } .container { background: rgba(255, 255, 255, 0.95); border-radius: 15px; padding: 20px; box-shadow: 0 10px 30px rgba(0, 0, 0, 0.2); width: 100%; max-width: 800px; } h1 { text-align: center; color: var(--dark); margin-bottom: 15px; font-size: 2em; font-weight: 700; background: linear-gradient(45deg, var(--primary), var(--accent)); -webkit-background-clip: text; -webkit-text-fill-color: transparent; } .control-panel { display: flex; flex-wrap: wrap; gap: 10px; padding: 15px; background: rgba(223, 230, 233, 0.6); border-radius: 10px; margin-bottom: 15px; justify-content: center; } .custom-select { padding: 8px 12px; border: none; border-radius: 8px; background: white; box-shadow: 0 2px 10px rgba(0, 0, 0, 0.1); cursor: pointer; transition: all 0.2s ease; } .custom-select:hover { transform: translateY(-2px); box-shadow: 0 4px 15px rgba(0, 0, 0, 0.15); } .color-input { width: 40px; height: 40px; border: none; padding: 0; cursor: pointer; border-radius: 50%; box-shadow: 0 2px 10px rgba(0, 0, 0, 0.1); transition: transform 0.2s ease; } .color-input:hover { transform: scale(1.1); } .tool-button { padding: 8px 15px; border: none; border-radius: 8px; background: var(--primary); color: white; font-size: 0.9em; font-weight: 600; cursor: pointer; box-shadow: 0 2px 10px rgba(0, 0, 0, 0.1); transition: all 0.2s ease; } .tool-button:hover { transform: translateY(-2px); background: var(--secondary); } .tool-button.active { background: var(--accent); transform: scale(0.95); } .tool-button.danger { background: var(--danger); } .tool-button.danger:hover { background: #e55039; } .export-button { padding: 8px 15px; border: none; border-radius: 8px; background: linear-gradient(45deg, var(--primary), var(--secondary)); color: white; font-weight: 600; cursor: pointer; box-shadow: 0 2px 10px rgba(0, 0, 0, 0.1); transition: all 0.2s ease; } .export-button:hover { transform: translateY(-2px); background: linear-gradient(45deg, var(--secondary), var(--primary
Pixel art is a timeless form of digital art that has captivated creators and gamers alike for decades. Whether you're designing sprites for a game or just having fun, a pixel art generator can be a fantastic tool to bring your ideas to life. In this blog, I’ll walk you through the process of building a Pixel Art Generator with an Export Option that allows you to draw pixel art and export it as a PNG file. I’ve already built the app, and you can try it out here: Pixel Art Generator.
Below, I’ll explain the structure and functionality of the app in detail, leaving placeholders for the code. You can fill in the blanks with the provided HTML, CSS, and JavaScript code.
What Does the Pixel Art Generator Do?
The Pixel Art Generator is a web-based tool that allows users to:
- Draw pixel art on a customizable grid (16×16, 32×32, or 64×64).
- Choose colors using a color picker.
- Use tools like Fill, Erase, and Clear to refine their artwork.
- Export the final artwork as a PNG file.
The app is built using HTML, CSS, and JavaScript, making it lightweight and easy to use.
Structure of the App
The app consists of three main components:
- HTML: Defines the structure of the app.
- CSS: Styles the app to make it visually appealing.
- JavaScript: Handles the logic for drawing, filling, erasing, and exporting.
Let’s break down each component.
1. HTML Structure
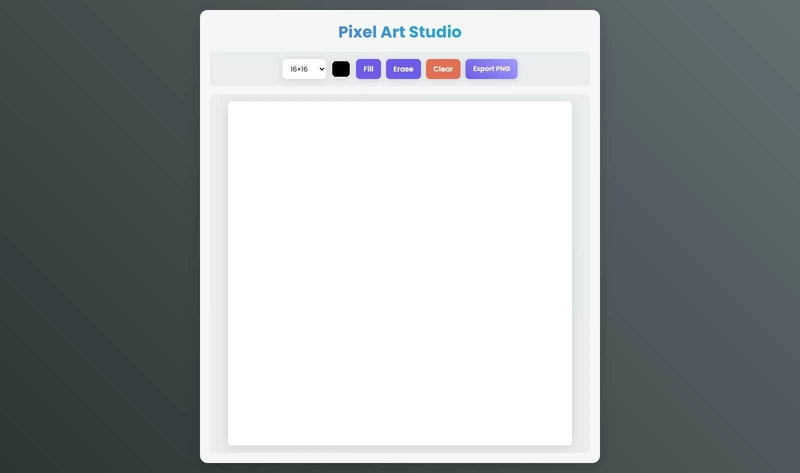
The HTML file sets up the basic structure of the app, including the canvas, control panel, and buttons. Here’s the outline:
 lang="en">

     charset="UTF-8">
     name="viewport" content="width=device-width, initial-scale=1.0">
    </span>Pixel Art Studio<span class="nt">
     rel="stylesheet" href="styles.css">


     class="container">
        Pixel Art Studio

         class="control-panel">
             id="gridSize" class="custom-select">
                 value="16">16×16
                 value="32">32×32
                 value="64">64×64


             type="color" id="colorPicker" value="#000000" class="color-input">

             id="fillTool" class="tool-button">Fill
             id="eraseTool" class="tool-button">Erase
             id="clearBtn" class="tool-button danger">Clear
             id="exportPNG" class="export-button">Export PNG