


![From fast food worker to cybersecurity engineer with Tae'lur Alexis [Podcast #169]](https://cdn.hashnode.com/res/hashnode/image/upload/v1745242807605/8a6cf71c-144f-4c91-9532-62d7c92c0f65.png?#)


AWS-Cloud Networking (Peering VPCs)
What is VPC Peering and its key features? VPC VPC Peering is a network connection between two Virtual Private Clouds (VPCs). It allows traffic to be routed privately between VPCs using private IP addresses. Can be used between VPCs in the same AWS account or different AWS accounts. No need for VPNs, gateways, or public internet—it's a private network link. Supports both intra-region and inter-region peering. Key Features Private Communication: Secure communication using private IPs without going over the internet. Low Latency & High Bandwidth: Faster and more efficient data transfer between VPCs. Cost-Effective: No data transfer over the internet = lower costs. Improved Security: Data doesn’t leave the AWS backbone; no public exposure. Easier Resource Sharing: Access services (like databases, EC2 instances, etc.) across VPCs. Simple Setup: No complex setup like VPN tunnels or firewall rules. Cross-Account Support: Collaborate with other AWS accounts easily and securely. Scalability: Connect multiple VPCs for a larger architecture (hub-and-spoke model). Create your VPCs Now we create our first vpc(s) named my-vpc-1 and my-vpc-2 and add tags by the name of firstVpc and secondVpc add IPv4 CIDR 10.0.0.0./16 and 12.0.0.0/26 respectively. Note: The IPv4 of the vpc(s) must be different from each othes otherwise it is not connected(peering connection is not build between them). Although a by default vpc is also available in our account. The both vpcs are shown in our second pic. Create and attach subnets to the VPC(s) To create new subnet click on the top right corner button create subnet Now selecct the vpc in which you want to create the subnet and add your vpc name IPv4 address shown in the pic: Now create 4 vpc(s) in your account associated with vpc-1 and vpc-2 named: vpc-1-pub, vpc-1-pri, vpc-2-pub, vpc-2-pri and associated with vpc1 and vpc2 The total 4 subnets are shown in our account. Create Internet Gateways and attach it to the vpc(s) Click on the internet gateway in the VPC and click on the Create internet gateway button and add name of the internet gateway [intenet-1]...... And Click on the Create button Now Click on Action button and attach the IGW with your VPC1 Now Create an other IGW named [internet-2] and attach it with the vpc-2. Go to Route Tables Now this time is go to the routtables when you go the route tables options which is under the VPC portion We have already Routables connection just rename and ues it. If the Routables are not availabe the create it first and ues it. Associate these routables with the vpc(s) Select the first route table name 1vpc and go to the Subnet accociation option and select the Edit subnet association, the window is change and select the vpc-1 public subnet and associate it. As same as the first association associate the second one vpc2 public subnet Attach the accessebl ports Go to the route tables select yor Route table and go to the ROUTES option and click on edits routs add changes like access connections internet gateway and save it. For verify this whole process go to the VPC and select ane on=f them and check the Recourse Map of this: the connection of the whole circuit is shown in the figure: Create VPC Peering Connection Go to the VPC and Click on the peering connection and create connection: How to Check if VPCs are Connected:
What is VPC Peering and its key features?
VPC
- VPC Peering is a network connection between two Virtual Private Clouds (VPCs).
- It allows traffic to be routed privately between VPCs using private IP addresses.
- Can be used between VPCs in the same AWS account or different AWS accounts.
- No need for VPNs, gateways, or public internet—it's a private network link.
- Supports both intra-region and inter-region peering. Key Features
- Private Communication: Secure communication using private IPs without going over the internet.
- Low Latency & High Bandwidth: Faster and more efficient data transfer between VPCs.
- Cost-Effective: No data transfer over the internet = lower costs.
- Improved Security: Data doesn’t leave the AWS backbone; no public exposure.
- Easier Resource Sharing: Access services (like databases, EC2 instances, etc.) across VPCs.
- Simple Setup: No complex setup like VPN tunnels or firewall rules.
- Cross-Account Support: Collaborate with other AWS accounts easily and securely.
- Scalability: Connect multiple VPCs for a larger architecture (hub-and-spoke model).
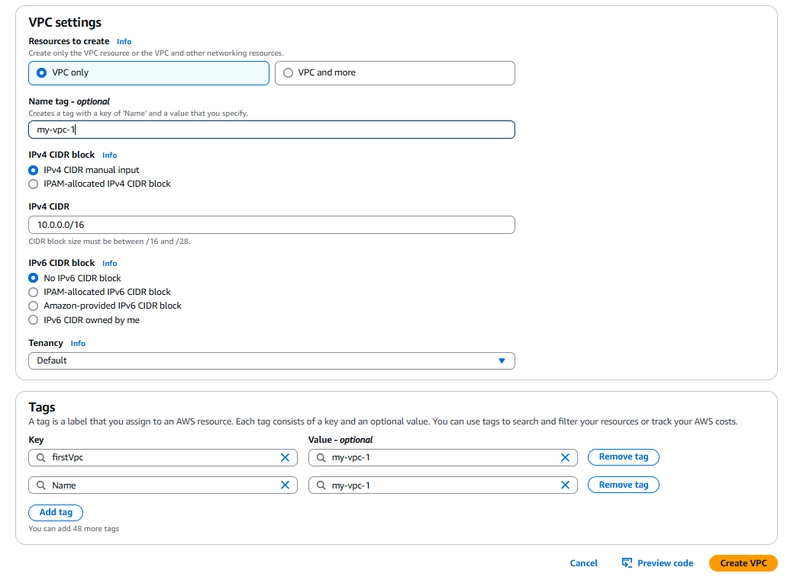
Create your VPCs
Now we create our first vpc(s) named my-vpc-1 and my-vpc-2
and add tags by the name of firstVpc and secondVpc
add IPv4 CIDR 10.0.0.0./16 and 12.0.0.0/26 respectively.
Note: The IPv4 of the vpc(s) must be different from each othes otherwise it is not connected(peering connection is not build between them).
Although a by default vpc is also available in our account.
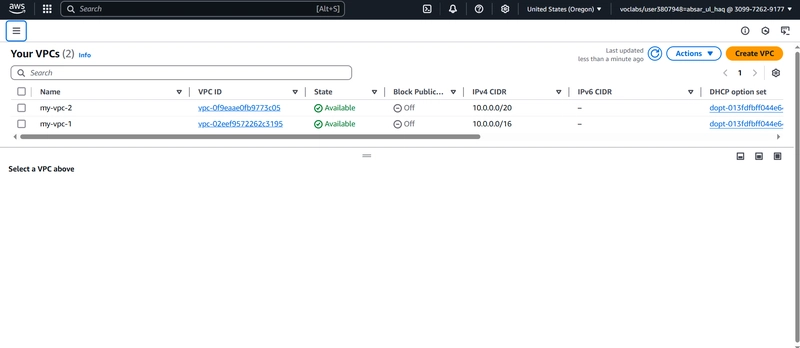
The both vpcs are shown in our second pic.
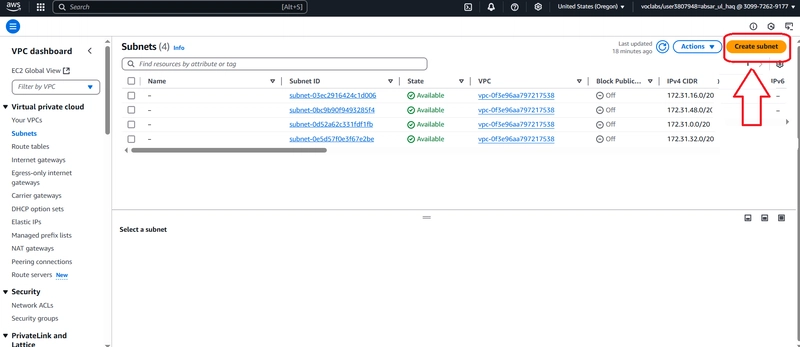
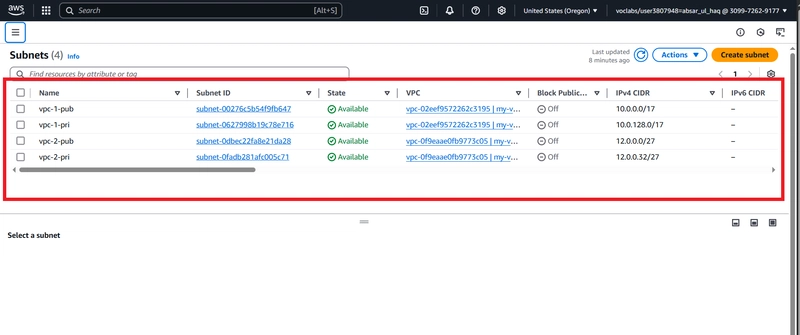
Create and attach subnets to the VPC(s)
To create new subnet click on the top right corner button create subnet
Now selecct the vpc in which you want to create the subnet and add your vpc name IPv4 address shown in the pic:
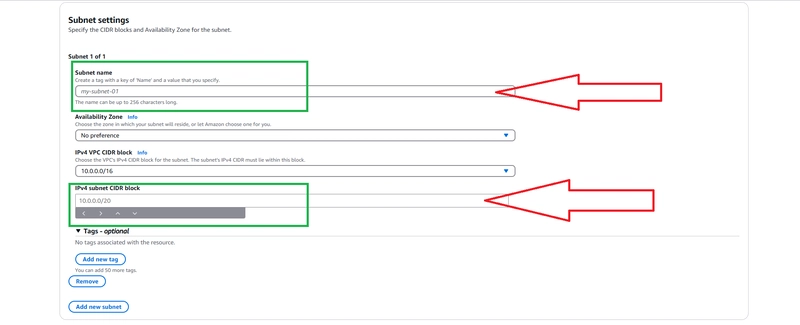
Now create 4 vpc(s) in your account associated with vpc-1 and vpc-2
named: vpc-1-pub, vpc-1-pri, vpc-2-pub, vpc-2-pri
and associated with vpc1 and vpc2
The total 4 subnets are shown in our account.
Create Internet Gateways and attach it to the vpc(s)
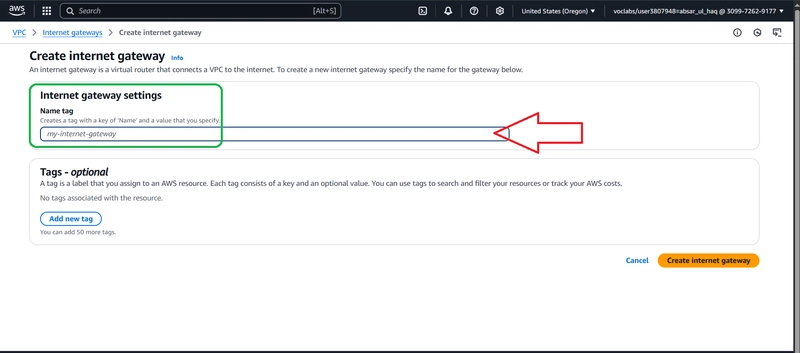
Click on the internet gateway in the VPC and click on the Create internet gateway button
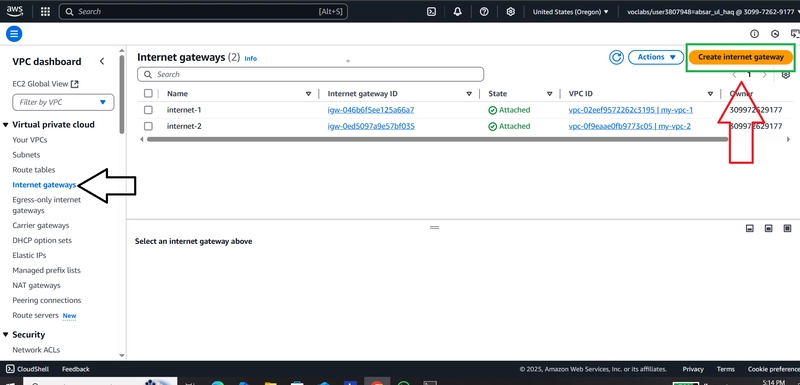
and add name of the internet gateway [intenet-1]...... And Click on the Create button
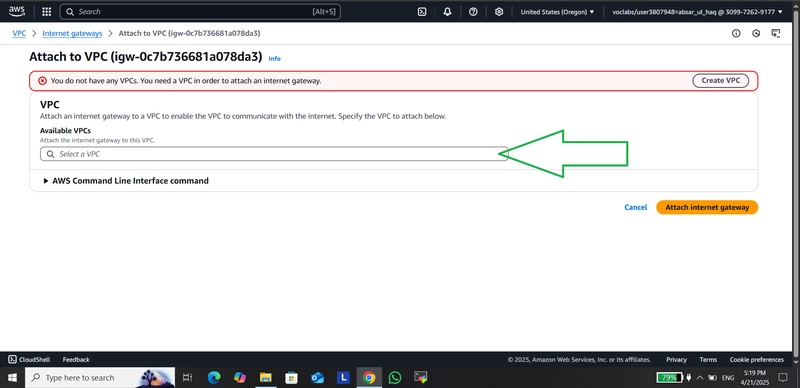
Now Click on Action button and attach the IGW with your VPC1
Now Create an other IGW named [internet-2] and attach it with the vpc-2.
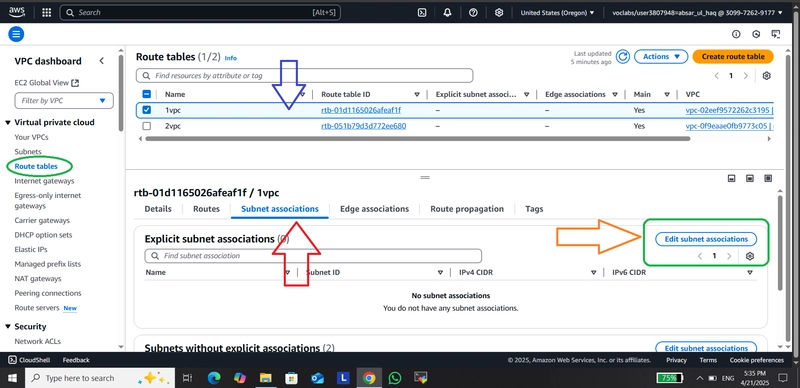
Go to Route Tables
Now this time is go to the routtables when you go the route tables options which is under the VPC portion We have already Routables connection just rename and ues it. If the Routables are not availabe the create it first and ues it.
Associate these routables with the vpc(s)
Select the first route table name 1vpc and go to the Subnet accociation option and select the Edit subnet association, the window is change and select the vpc-1 public subnet and associate it.
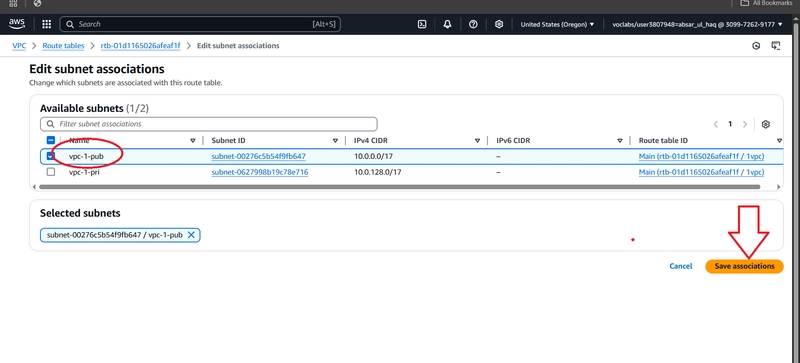
As same as the first association associate the second one vpc2 public subnet
Attach the accessebl ports
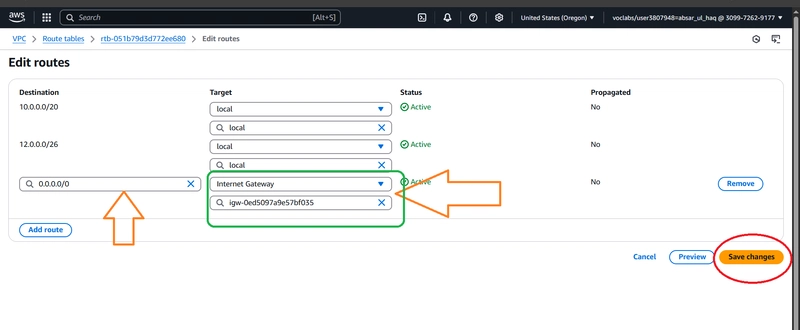
- Go to the route tables select yor Route table and go to the ROUTES option and click on edits routs
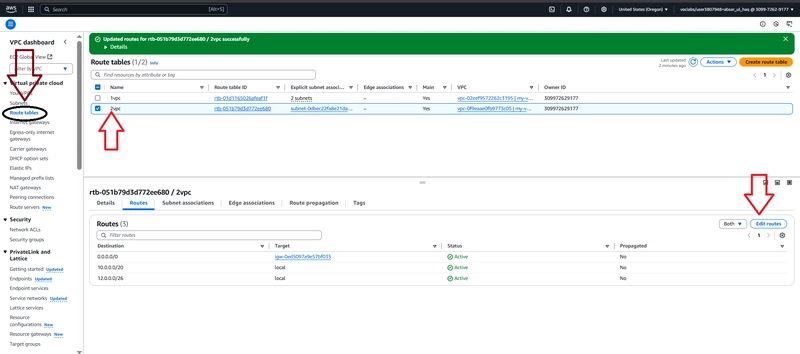
- add changes like access connections internet gateway and save it.
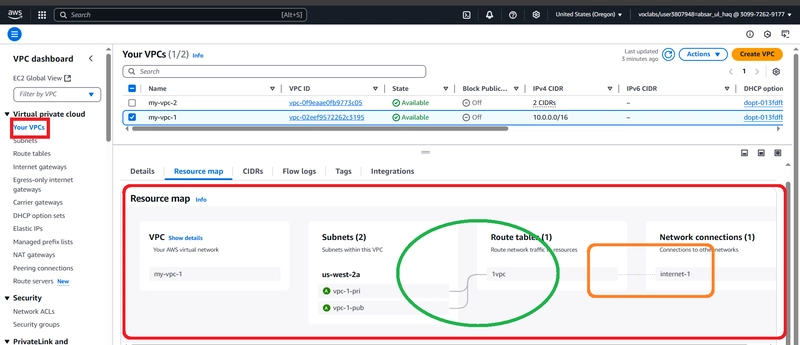
- For verify this whole process go to the VPC and select ane on=f them and check the Recourse Map of this: the connection of the whole circuit is shown in the figure:
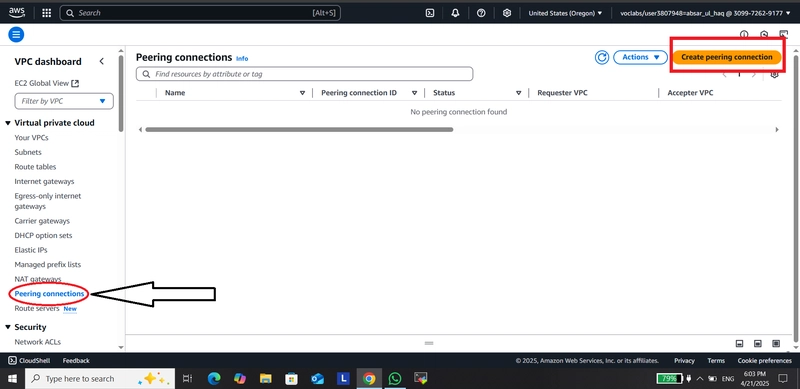
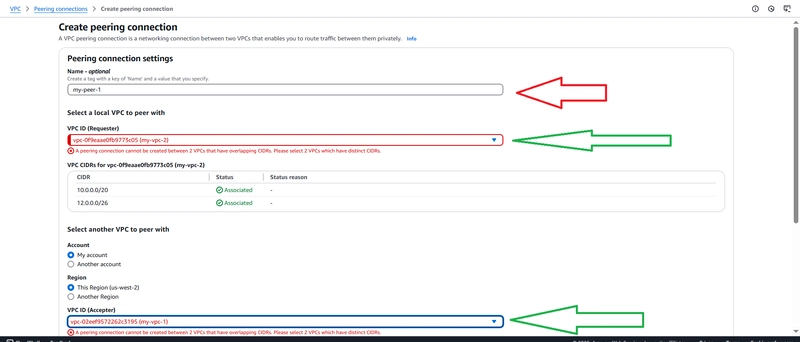
Create VPC Peering Connection
Go to the VPC and Click on the peering connection and create connection:
How to Check if VPCs are Connected:


