


Authentication using NestJS and JWT
Authentication is a fundamental pillar in web application development. I’ll explain how to handle authentication in an API built with NestJS, using JWT (JSON Web Tokens) to securely and efficiently protect our routes. What is Authentication? Authentication is the process of verifying that someone is who they claim to be. In web applications, this typically involves providing a username and password. If the credentials are correct, access to protected resources is granted. Why use JWT? JWT (JSON Web Token) is an open standard that allows information to be securely transmitted between two parties. In an API, it’s commonly used to issue a "pass" (token) to the user upon login, which can then be used to authorize future requests. Main advantages of using JWT: Decoupled Authentication: The server doesn’t need to store sessions in memory. Scalability: Perfect for distributed systems or microservices. Security: Tokens are signed and can carry securely encoded data. How to Implement Authentication in NestJS? 1. Install Necessary Dependencies First, install the required packages: npm install @nestjs/jwt @nestjs/passport passport passport-local bcryptjs npm install --save-dev @types/passport-local 2. Create the Authentication Module Generate an AuthModule, along with its service AuthService and controller AuthController: nest generate module auth nest generate service auth nest generate controller auth 3. Authentication Logic The AuthService will validate users and generate tokens: @Injectable() export class AuthService { constructor( private usersService: UsersService, private jwtService: JwtService, ) {} async validateUser(username: string, password: string): Promise { const user = await this.usersService.findOneByUsername(username); if (user && bcrypt.compareSync(password, user.password)) { const { password, ...result } = user; return result; } return null; } async login(user: any) { const payload = { username: user.username, sub: user.id }; return { access_token: this.jwtService.sign(payload), }; } } 4. Create the Login DTO We create a DTO (Data Transfer Object) to structure the login request: export class LoginDto { username: string; password: string; } This ensures the API always receives well-formed data during login. 5. Implement the JWT Strategy Passport requires a strategy to validate tokens. Here’s the JwtStrategy: @Injectable() export class JwtStrategy extends PassportStrategy(Strategy) { constructor() { super({ jwtFromRequest: ExtractJwt.fromAuthHeaderAsBearerToken(), secretOrKey: process.env.JWT_SECRET, }); } async validate(payload: any) { return { userId: payload.sub, username: payload.username }; } } 6. Protect Routes We protect routes using guards: @UseGuards(JwtAuthGuard) @Get('profile') getProfile(@Request() req) { return req.user; } The JwtAuthGuard automatically checks if a valid token is present before granting access. Full Authentication Flow The user sends a username and password to /auth/login. The server validates the credentials. If valid, the server returns a JWT. The client stores the token (e.g., in LocalStorage). For every protected request, the client sends the token in the Authorization header. The backend validates the token before processing the request. Best Practices Encrypt passwords using strong hashing algorithms like bcrypt. Protect your secrets used for signing JWTs (use environment variables). Set short expiration times for access tokens. Implement refresh tokens if you need longer user sessions. Conclusion Authentication with NestJS and JWT provides a modern, secure, and scalable way to protect your APIs. By combining Passport.js with NestJS, we can handle users, sessions, and permissions in a clean and efficient manner.
Authentication is a fundamental pillar in web application development. I’ll explain how to handle authentication in an API built with NestJS, using JWT (JSON Web Tokens) to securely and efficiently protect our routes.
What is Authentication?
Authentication is the process of verifying that someone is who they claim to be. In web applications, this typically involves providing a username and password. If the credentials are correct, access to protected resources is granted.
Why use JWT?
JWT (JSON Web Token) is an open standard that allows information to be securely transmitted between two parties. In an API, it’s commonly used to issue a "pass" (token) to the user upon login, which can then be used to authorize future requests.
Main advantages of using JWT:
- Decoupled Authentication: The server doesn’t need to store sessions in memory.
- Scalability: Perfect for distributed systems or microservices.
- Security: Tokens are signed and can carry securely encoded data.
How to Implement Authentication in NestJS?
1. Install Necessary Dependencies
First, install the required packages:
npm install @nestjs/jwt @nestjs/passport passport passport-local bcryptjs
npm install --save-dev @types/passport-local
2. Create the Authentication Module
Generate an AuthModule, along with its service AuthService and controller AuthController:
nest generate module auth
nest generate service auth
nest generate controller auth
3. Authentication Logic
The AuthService will validate users and generate tokens:
@Injectable()
export class AuthService {
  constructor(
    private usersService: UsersService,
    private jwtService: JwtService,
  ) {}

  async validateUser(username: string, password: string): Promise {
    const user = await this.usersService.findOneByUsername(username);
    if (user && bcrypt.compareSync(password, user.password)) {
      const { password, ...result } = user;
      return result;
    }
    return null;
  }

  async login(user: any) {
    const payload = { username: user.username, sub: user.id };
    return {
      access_token: this.jwtService.sign(payload),
    };
  }
}
4. Create the Login DTO
We create a DTO (Data Transfer Object) to structure the login request:
export class LoginDto {
  username: string;
  password: string;
}
This ensures the API always receives well-formed data during login.
5. Implement the JWT Strategy
Passport requires a strategy to validate tokens. Here’s the JwtStrategy:
@Injectable()
export class JwtStrategy extends PassportStrategy(Strategy) {
  constructor() {
    super({
      jwtFromRequest: ExtractJwt.fromAuthHeaderAsBearerToken(),
      secretOrKey: process.env.JWT_SECRET,
    });
  }

  async validate(payload: any) {
    return { userId: payload.sub, username: payload.username };
  }
}
6. Protect Routes
We protect routes using guards:
@UseGuards(JwtAuthGuard)
@Get('profile')
getProfile(@Request() req) {
  return req.user;
}
The JwtAuthGuard automatically checks if a valid token is present before granting access.
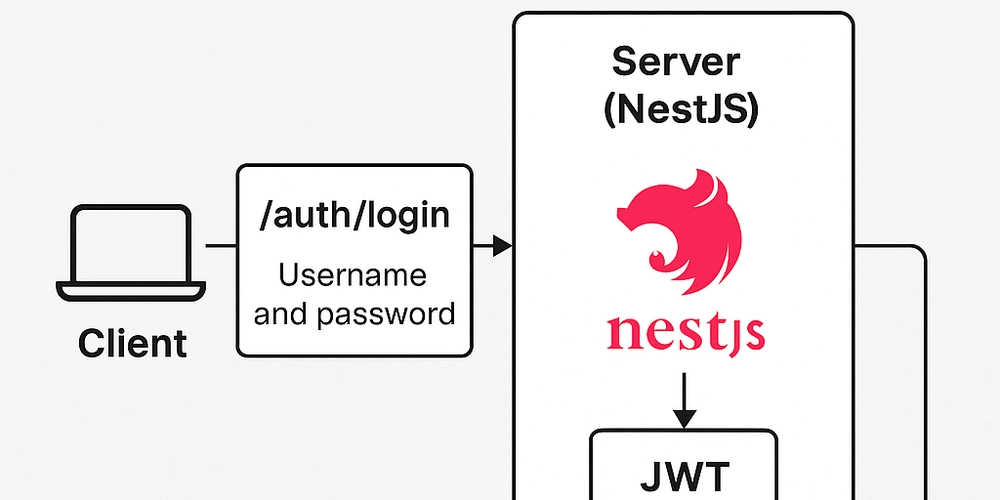
Full Authentication Flow
- The user sends a username and password to
/auth/login. - The server validates the credentials.
- If valid, the server returns a JWT.
- The client stores the token (e.g., in LocalStorage).
- For every protected request, the client sends the token in the Authorization header.
- The backend validates the token before processing the request.
Best Practices
- Encrypt passwords using strong hashing algorithms like bcrypt.
- Protect your secrets used for signing JWTs (use environment variables).
- Set short expiration times for access tokens.
- Implement refresh tokens if you need longer user sessions.
Conclusion
Authentication with NestJS and JWT provides a modern, secure, and scalable way to protect your APIs. By combining Passport.js with NestJS, we can handle users, sessions, and permissions in a clean and efficient manner.