How to use docker exec to interact with running containers
Written by Paul Akinyemi✏️ Docker’s exec command lets you run shell commands directly inside your running containers without forcing you to restart them. It's useful when you want to debug an error, adjust settings, or quickly peek into a container's environment. This makes your development workflow smoother, saving you from unnecessary downtime. Docker containers have changed how we deploy apps by making it possible to deploy across multiple architectures with a one-fits-all approach. With Docker, you can deploy anything, including CLI tools, across different environments without needing to worry about any differences in the underlying infrastructure. When you run containers, you might need to interact with them to troubleshoot, run additional commands, or modify configurations in real-time. In this article, you’ll learn how to interact with running Docker containers with the exec command. Getting started with docker exec Before exploring the command, you’ll need a running container, so let’s get you started. First, if you don’t already have Docker installed, you should download and set it up; you’ll need it to execute the commands. Once you’re all set up, execute this command to run the Ubuntu container via the official image: docker run -d --name my_ubuntu_container ubuntu sleep infinity What’s going on here? d — Runs the container in the background (detached mode) --name my_ubuntu_container — Assigns the container a name for references ubuntu— Specifies the Ubuntu image (Docker will pull it if it’s unavailable locally) sleep infinity — Keeps the container running indefinitely: You can verify the container is running with the ps command like this: docker ps The ps command lists all running containers. If the container runs, it should appear in the list with your assigned name: Now that you’re set up with Docker and have a running container, you can interact with it using the exec command. The Docker exec command Docker ships with the exec command, which allows you to execute commands in running containers without restarting them. The exec command is useful when you want to start an interactive shell, inspect logs, modify files, or perform various other tasks. The general syntax for the docker exec command is: docker exec [OPTIONS] CONTAINER COMMAND [ARG...] Here are the options you can set with the exec command: Option Function Description -d, --detach Run in background Runs the command in detached mode --detach-keys string Override detach keys Sets a custom key sequence for detaching a container -e, --env list Set environment variables Passes environment variables to the command --env-file list Load env file Loads environment variables from a specified file -i, --interactive Keep input open Keeps standard input open for interaction --privileged Grant extended privileges Provides additional permissions for running commands -t, --tty Allocate pseudo-TTY Provides an interactive shell interface -u, --user string Run as specific user Executes the command as a specified user -w, --workdir string Set working directory Sets the working directory inside the container You’ll follow up the specified option with the command and arguments you’re executing in the container. Let’s execute a command to list all the files in the container’s directory: docker exec my_ubuntu_container ls -l The command should output the files and directories in long format like this: In this case, I’ve used the container ID to reference the container; it works like using the container name. You can add the -it flag to run an interactive shell inside the container: docker exec -it my_container /bin/bash This command opens a Bash shell running in the container. Now, you can run commands directly without the exec command: You can exit the interactive mode with the exit command that ships with the operating system. By default, docker exec executes commands as the root user inside the container. You can specify a different user with the -u option. First, you need to create a new user in the container’s OS. Execute this command to create a new user named paul: docker exec my_ubuntu_container useradd -m paul Now, you can specify the user before the commands to execute commands for a user: docker exec -u paul my_ubuntu_container whoami This command should output the username of the user like this: You can pass environment variables and read existing environment variables with the -e option: docker exec -e MY_VAR=Hello my_ubuntu_container printenv MY_VAR Executing this command should output “Hello” since it’s the value for the MY_VAR environment variable. You’ll likely need to run commands in detached mode (in the background). That’s where the -d option is handy: docker exec -d my_ubuntu_container touch /tmp/detached_file This command

Written by Paul Akinyemi✏️
Docker’s exec command lets you run shell commands directly inside your running containers without forcing you to restart them. It's useful when you want to debug an error, adjust settings, or quickly peek into a container's environment. This makes your development workflow smoother, saving you from unnecessary downtime.
Docker containers have changed how we deploy apps by making it possible to deploy across multiple architectures with a one-fits-all approach. With Docker, you can deploy anything, including CLI tools, across different environments without needing to worry about any differences in the underlying infrastructure.
When you run containers, you might need to interact with them to troubleshoot, run additional commands, or modify configurations in real-time. In this article, you’ll learn how to interact with running Docker containers with the exec command.
Getting started with docker exec
Before exploring the command, you’ll need a running container, so let’s get you started. First, if you don’t already have Docker installed, you should download and set it up; you’ll need it to execute the commands.
Once you’re all set up, execute this command to run the Ubuntu container via the official image:
docker run -d --name my_ubuntu_container ubuntu sleep infinity
What’s going on here?
-
d— Runs the container in the background (detached mode) -
--name my_ubuntu_container— Assigns the container a name for references -
ubuntu— Specifies the Ubuntu image (Docker will pull it if it’s unavailable locally) -
sleep infinity— Keeps the container running indefinitely:
 You can verify the container is running with the
 ps command like this:
docker ps
The ps command lists all running containers. If the container runs, it should appear in the list with your assigned name:  Now that you’re set up with Docker and have a running container, you can interact with it using the
 exec command.
The Docker exec command
Docker ships with the exec command, which allows you to execute commands in running containers without restarting them. The exec command is useful when you want to start an interactive shell, inspect logs, modify files, or perform various other tasks.
The general syntax for the docker exec command is:
docker exec [OPTIONS] CONTAINER COMMAND [ARG...]
Here are the options you can set with the exec command:
| Option | Function | Description |
|---|---|---|
| -d, --detach | Run in background | Runs the command in detached mode |
| --detach-keys string | Override detach keys | Sets a custom key sequence for detaching a container |
| -e, --env list | Set environment variables | Passes environment variables to the command |
| --env-file list | Load env file | Loads environment variables from a specified file |
| -i, --interactive | Keep input open | Keeps standard input open for interaction |
| --privileged | Grant extended privileges | Provides additional permissions for running commands |
| -t, --tty | Allocate pseudo-TTY | Provides an interactive shell interface |
| -u, --user string | Run as specific user | Executes the command as a specified user |
| -w, --workdir string | Set working directory | Sets the working directory inside the container |
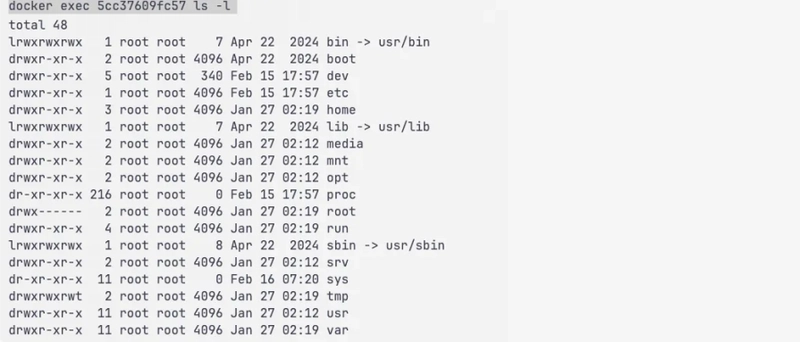
You’ll follow up the specified option with the command and arguments you’re executing in the container. Let’s execute a command to list all the files in the container’s directory:
docker exec my_ubuntu_container ls -l
The command should output the files and directories in long format like this:  In this case, I’ve used the container ID to reference the container; it works like using the container name. You can add the
 -it flag to run an interactive shell inside the container:
docker exec -it my_container /bin/bash
This command opens a Bash shell running in the container. Now, you can run commands directly without the exec command:  You can exit the interactive mode with the
 exit command that ships with the operating system. By default, docker exec executes commands as the root user inside the container. You can specify a different user with the -u option.
First, you need to create a new user in the container’s OS. Execute this command to create a new user named paul:
docker exec my_ubuntu_container useradd -m paul
Now, you can specify the user before the commands to execute commands for a user:
docker exec -u paul my_ubuntu_container whoami
This command should output the username of the user like this:  You can pass environment variables and read existing environment variables with the
 -e option:
docker exec -e MY_VAR=Hello my_ubuntu_container printenv MY_VAR
Executing this command should output “Hello” since it’s the value for the MY_VAR environment variable. You’ll likely need to run commands in detached mode (in the background). That’s where the -d option is handy:
docker exec -d my_ubuntu_container touch /tmp/detached_file
This command creates an empty file inside the /tmp directory without keeping an interactive session open. You can also set a working directory with the -w option like this:
docker exec -w /var/log my_ubuntu_container ls
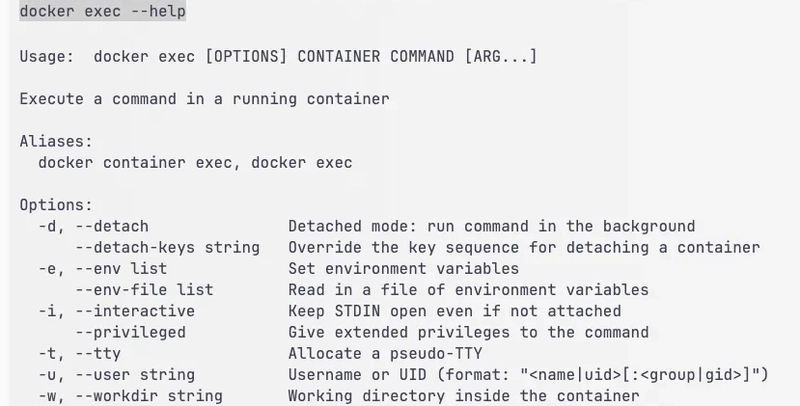
The command sets the working directory to /var/log first before listing all the files in the working directory. If you’re stuck in development, you can always use the --help flag to browse through all the options further: 
Troubleshooting Docker exec errors
You may encounter some errors when using Docker’s exec command to interact with running containers. Let’s overview some of them and how you can fix them.
"No such container" error
You’ll need to make sure you’re referencing an existing container. Run docker ps to view all running containers, copy the reference and execute the command with the right reference.
Permission denied errors
You may experience this when you try executing a command as a non-root user without the neccessary privildges. You can either run the command as root, or use the --privileged flag for extra permissions.
"OCI runtime exec failed" error
In this case, the container probably isn’t running. Execute docker start to start the container if this is the case.
You can always visit the Docker Community Forum if you have different errors or none of these fixes work for you.
docker exec or docker attach?
Docker’s exec and attach commands are handy for interacting with running containers but they’re built for different purposes.
Docker’s attach command helps with attaching local standard input, output, and error streams to running containers:
| Feature | Docker exec | Docker attach |
|---|---|---|
| Starts a new process inside the container | ✅ | ❌ |
| Attaches to an existing running process | ❌ | ✅ |
| Supports multiple sessions at the same time | ✅ | ❌ |
| Can run interactive or non-interactive commands | ✅ | ❌ |
You’ll use docker exec when you need to run a separate command inside a running container and docker attach if you need to interact with the primary process running inside the container.
Conclusion
In this article, you’ve learned how to interact with your running containers using docker exec. The docker exec command allows you to execute commands inside a running container, whether interactively, with environment variables, or as a different user, without restarting the container. You also learned how to troubleshoot common errors and the difference between exec and docker attach, which connects to an already running process.
Get set up with LogRocket's modern error tracking in minutes:
- Visit https://logrocket.com/signup/ to get an app ID.
- Install LogRocket via NPM or script tag.
LogRocket.init()must be called client-side, not server-side.
NPM:
$ npm i --save logrocket

// Code:

import LogRocket from 'logrocket';
LogRocket.init('app/id');
Script Tag:
Add to your HTML:

<script src="https://cdn.lr-ingest.com/LogRocket.min.js"></script>
<script>window.LogRocket && window.LogRocket.init('app/id');</script>
3.(Optional) Install plugins for deeper integrations with your stack:
- Redux middleware
- ngrx middleware
- Vuex plugin


![[FREE EBOOKS] The Kubernetes Bible, The Ultimate Linux Shell Scripting Guide & Four More Best Selling Titles](https://www.javacodegeeks.com/wp-content/uploads/2012/12/jcg-logo.jpg)


