


How to Create a Multilingual Website Using Automad 2
Creating a multilingual website can significantly expand your reach and user engagement by catering to a global audience. Automad 2, a lightweight CMS that prides itself on simplicity and flexibility, makes it easy to create and manage multilingual websites. In this tutorial, I'll walk you through the steps to build a multilingual website using Automad 2. You'll learn how to set up language-specific landing pages, configure slugs, and enable language routing. Let's dive in! Step 1: Create the Site Structure with Language-Specific Landing Pages The first step in creating a multilingual website is to organize your site structure. In Automad 2, you want to create a structure where each language has its own landing page directly under the homepage. This will make it easier to manage the content for each language and keep things organized. Here’s how to do it: Log into your Automad 2 admin panel. Go to the Pages section and add a new page for each language you want to support. For instance, you can create pages called “English,” “Français,” “Deutsch,” etc. These will serve as the landing pages for each language. Give each page any title you like at this stage — since you'll be changing the slugs in the next step, the title here doesn’t affect navigation or URLs. You can focus on whatever naming convention works best for your workflow. Important Note: The order of the pages matters! The first page at the top of the sidebar will serve as the default language for your site. If a visitor accesses your website with an unsupported locale, Automad will use this default language. Make sure to place your preferred default language page at the top of the list. Once you’ve created the pages, you should have a homepage that points to the different language-specific landing pages. Step 2: Change the Slug for Each Language Page By default, Automad will automatically generate slugs based on the titles you gave your language-specific landing pages. However, we need to change the slugs to the corresponding language codes (like en, fr, or de) for proper routing. Here’s how to change the slugs: Open the settings of each language-specific landing page. In the Directory Name field (this field represents the page’s slug), change the automatically generated slug to the matching language code. For example: Make sure each landing page has its unique language code as the slug. By setting these language codes as slugs, you’re telling Automad that these pages represent different languages, which is essential for proper language routing later. Step 3: Enable Language Routing in the System Settings Now that you’ve created your language-specific landing pages and configured the slugs, it’s time to enable language routing. This ensures that Automad will handle the routing for your multilingual content based on the language code in the URL. Here’s how to enable language routing: Navigate to System Settings in the admin panel. Look for the Internationalization section. Find the Language Routing setting and enable it. Enabling this feature ensures that when someone visits your site with a specific language code in the URL (like www.yoursite.com/en), Automad will automatically serve the content for that language. For example, if someone visits www.yoursite.com/fr, they’ll be redirected to the French language version of the site. Step 4: Translate Your Content At this point, your multilingual site structure is set up, but it’s still empty. Now you’ll need to add translated content to each language-specific landing page. To do this: Go to each language-specific page in the admin panel. Add the appropriate content for each language. You can use Automad’s simple block editor to add text, images, and other media that are relevant to each language. Repeat this for all the pages in your site, making sure each language version has its own unique content. Step 5: Test Your Multilingual Website Once you’ve added all your content and completed the setup, it’s time to test your multilingual website. Make sure to check: Whether each language-specific page loads correctly when visiting its respective URL (e.g., /en, /fr, /de). That content is displayed correctly in each language and there are no broken links. Navigation and links between languages are working as expected. Bonus: Add links to Other Languages in the Footer Now, your multilingual site is ready for visitors. But what if you want to give those visitors the chance to change to another language? With language routing enabled, pages in other languages than the currently active one are not visible in the site navigation and can’t be found in the site search. In order to allow visitors to change to another language, we can simply create page for another language that is alias inside the active language. With the three languages used in this tutorial, we can create the page /en/german and forward i
Creating a multilingual website can significantly expand your reach and user engagement by catering to a global audience. Automad 2, a lightweight CMS that prides itself on simplicity and flexibility, makes it easy to create and manage multilingual websites.
In this tutorial, I'll walk you through the steps to build a multilingual website using Automad 2. You'll learn how to set up language-specific landing pages, configure slugs, and enable language routing. Let's dive in!
Step 1: Create the Site Structure with Language-Specific Landing Pages
The first step in creating a multilingual website is to organize your site structure. In Automad 2, you want to create a structure where each language has its own landing page directly under the homepage. This will make it easier to manage the content for each language and keep things organized.
Here’s how to do it:
- Log into your Automad 2 admin panel.
- Go to the Pages section and add a new page for each language you want to support. For instance, you can create pages called “English,” “Français,” “Deutsch,” etc. These will serve as the landing pages for each language.
- Give each page any title you like at this stage — since you'll be changing the slugs in the next step, the title here doesn’t affect navigation or URLs. You can focus on whatever naming convention works best for your workflow.
Important Note: The order of the pages matters! The first page at the top of the sidebar will serve as the default language for your site. If a visitor accesses your website with an unsupported locale, Automad will use this default language. Make sure to place your preferred default language page at the top of the list.
Once you’ve created the pages, you should have a homepage that points to the different language-specific landing pages.
Step 2: Change the Slug for Each Language Page
By default, Automad will automatically generate slugs based on the titles you gave your language-specific landing pages. However, we need to change the slugs to the corresponding language codes (like en, fr, or de) for proper routing.
Here’s how to change the slugs:
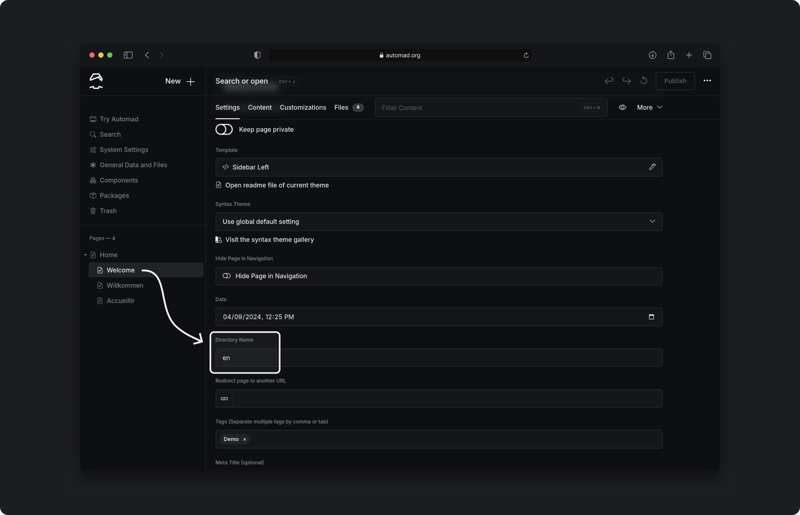
- Open the settings of each language-specific landing page.
- In the Directory Name field (this field represents the page’s slug), change the automatically generated slug to the matching language code. For example:
- Make sure each landing page has its unique language code as the slug.
By setting these language codes as slugs, you’re telling Automad that these pages represent different languages, which is essential for proper language routing later.
Step 3: Enable Language Routing in the System Settings
Now that you’ve created your language-specific landing pages and configured the slugs, it’s time to enable language routing. This ensures that Automad will handle the routing for your multilingual content based on the language code in the URL.
Here’s how to enable language routing:
- Navigate to System Settings in the admin panel.
- Look for the Internationalization section.
- Find the Language Routing setting and enable it.
Enabling this feature ensures that when someone visits your site with a specific language code in the URL (like www.yoursite.com/en), Automad will automatically serve the content for that language. For example, if someone visits www.yoursite.com/fr, they’ll be redirected to the French language version of the site.
Step 4: Translate Your Content
At this point, your multilingual site structure is set up, but it’s still empty. Now you’ll need to add translated content to each language-specific landing page. To do this:
- Go to each language-specific page in the admin panel.
- Add the appropriate content for each language.
- You can use Automad’s simple block editor to add text, images, and other media that are relevant to each language.
Repeat this for all the pages in your site, making sure each language version has its own unique content.
Step 5: Test Your Multilingual Website
Once you’ve added all your content and completed the setup, it’s time to test your multilingual website. Make sure to check:
- Whether each language-specific page loads correctly when visiting its respective URL (e.g.,
/en,/fr,/de). - That content is displayed correctly in each language and there are no broken links.
- Navigation and links between languages are working as expected.
Bonus: Add links to Other Languages in the Footer
Now, your multilingual site is ready for visitors. But what if you want to give those visitors the chance to change to another language? With language routing enabled, pages in other languages than the currently active one are not visible in the site navigation and can’t be found in the site search.
In order to allow visitors to change to another language, we can simply create page for another language that is alias inside the active language. With the three languages used in this tutorial, we can create the page /en/german and forward it to the German landing page by changing the URL field to /de in the page settings. Finally we can check the "Show Page in Footer" checkbox to show the link in the footer. This procedure we can also repeat for the French version as well as all remaining combinations inside the other two languages.
Conclusion
Setting up a multilingual website with Automad 2 is simple and straightforward. By creating language-specific landing pages, modifying slugs to match language codes, and enabling language routing, you can effectively manage and deliver content in multiple languages. With Automad’s clean and intuitive interface, it’s easy to expand your reach to a global audience without overwhelming complexity.
Happy writing, and enjoy building your multilingual website with Automad 2!