


Deploy Next.js on AWS EC2 with PM2, Nginx, and Cloudflare CDN
Deploying a Next.js application on AWS EC2 can be an efficient way to host a scalable web application. This guide will provide a detailed step-by-step approach to setting up and deploying a Next.js application on an EC2 instance, managing the process using PM2, configuring Nginx as a reverse proxy, and optimizing the domain with Cloudflare CDN. Prerequisites AWS EC2 instance running Ubuntu (20.04 or later) A Next.js application ready for deployment Domain registered on Namecheap A Cloudflare account Basic knowledge of Linux commands 1. Setting Up an AWS EC2 Instance Step 1: Launch an EC2 Instance Log in to your AWS Console and navigate to EC2. Click on Launch Instance. Choose Ubuntu 22.04 LTS as the OS. Select an instance type: t2.micro (Free-tier eligible for testing/small apps) t3.medium or higher for production apps Configure security groups: SSH (port 22): Allow only your IP for security. HTTP (port 80): Allow public access. HTTPS (port 443): Allow public access. Custom TCP (port 3000): Allow only if testing Next.js directly. Launch the instance and download the key pair for SSH access. Step 2: Connect to the Instance Use SSH to connect: ssh -i your-key.pem ubuntu@your-ec2-public-ip If got permission error, please run this before: chmod 400 your-key.pem 2. Install Node.js and PM2 Step 1: Install Node.js and npm Update and install Node.js: sudo apt update && sudo apt upgrade -y curl -fsSL https://deb.nodesource.com/setup_20.x | sudo -E bash - sudo apt install -y nodejs Verify installation: node -v npm -v Step 2: Install PM2 for Process Management npm install -g pm2 pm2 startup 3. Deploy the Next.js Application Step 1: Clone Your Repository Navigate to the home directory and clone your Next.js project: cd ~ git clone https://github.com/yourusername/your-nextjs-app.git cd your-nextjs-app Step 2: Install Dependencies npm install Step 3: Build the Next.js Application npm run build Step 4: Start the App with PM2 pm2 start npm --name "nextjs-app" -- start pm2 save Check status: pm2 list 4. Setting Up Nginx as a Reverse Proxy Step 1: Install Nginx sudo apt install nginx -y Step 2: Configure Nginx Open the Nginx configuration file: sudo nano /etc/nginx/sites-available/default Replace its contents with: server { listen 80; server_name yourdomain.com www.yourdomain.com; location / { proxy_pass http://localhost:3000; proxy_http_version 1.1; proxy_set_header Upgrade $http_upgrade; proxy_set_header Connection 'upgrade'; proxy_set_header Host $host; proxy_cache_bypass $http_upgrade; } } Save and exit (CTRL+X, then Y, then ENTER). Step 3: Restart Nginx sudo systemctl restart nginx Check status: sudo systemctl status nginx 5. Configure Namecheap DNS Settings Log in to your Namecheap account. Go to Domain List > Select your domain > Click Manage. Under the Advanced DNS tab, add an A Record: Host: @ Value: Your EC2 public IP address TTL: Automatic Add a CNAME Record: Host: www Value: yourdomain.com TTL: Automatic Save changes and wait for propagation (~30 minutes to a few hours). 6. Optimize with Cloudflare CDN Step 1: Add Your Site to Cloudflare Sign up/log in to Cloudflare. Click Add a Site and enter your domain. Cloudflare will scan your DNS records. Choose Free Plan and continue. Update your Namecheap nameservers with the ones provided by Cloudflare. Wait for DNS propagation. Step 2: Enable CDN and Security Features Enable Automatic HTTPS Rewrites. Enable Always Use HTTPS. Turn on CDN caching for improved performance. Enable DDoS protection and security features. 7. Secure Your Site with SSL Once Cloudflare is active: Go to Cloudflare dashboard > SSL/TLS. Set SSL mode to Full (Strict). Restart Nginx to apply changes: sudo systemctl restart nginx 8. Deploying Updates To deploy updates, SSH into the instance and run: cd ~/your-nextjs-app git pull origin main npm install npm run build pm2 restart nextjs-app 9. Common Errors and Solutions Error 1: PM2 Not Restarting on Reboot Run: pm2 startup pm2 save Error 2: Nginx 502 Bad Gateway Check if the Next.js app is running: pm2 list If not running, restart: pm2 restart nextjs-app Error 3: DNS Propagation Delay Check DNS propagation: www.whatsmydns.net Conclusion Congratulations! Your Next.js application is now live on AWS EC2 with PM2 for process management, Nginx as a reverse proxy, and a custom domain from Namecheap optimized with Cloudflare CDN. This setup ensu
Deploying a Next.js application on AWS EC2 can be an efficient way to host a scalable web application. This guide will provide a detailed step-by-step approach to setting up and deploying a Next.js application on an EC2 instance, managing the process using PM2, configuring Nginx as a reverse proxy, and optimizing the domain with Cloudflare CDN.
Prerequisites
- AWS EC2 instance running Ubuntu (20.04 or later)
- A Next.js application ready for deployment
- Domain registered on Namecheap
- A Cloudflare account
- Basic knowledge of Linux commands
1. Setting Up an AWS EC2 Instance
Step 1: Launch an EC2 Instance
- Log in to your AWS Console and navigate to EC2.
- Click on Launch Instance.
- Choose Ubuntu 22.04 LTS as the OS.
- Select an instance type:
- t2.micro (Free-tier eligible for testing/small apps)
- t3.medium or higher for production apps
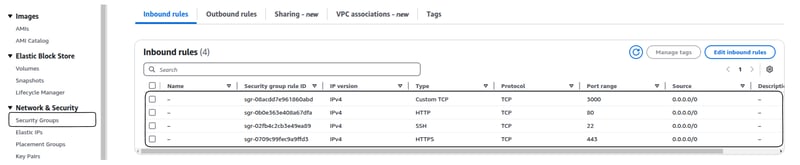
- Configure security groups:
- SSH (port 22): Allow only your IP for security.
- HTTP (port 80): Allow public access.
- HTTPS (port 443): Allow public access.
- Custom TCP (port 3000): Allow only if testing Next.js directly.
- Launch the instance and download the key pair for SSH access.
Step 2: Connect to the Instance
Use SSH to connect:
ssh -i your-key.pem ubuntu@your-ec2-public-ip
If got permission error, please run this before:
chmod 400 your-key.pem
2. Install Node.js and PM2
Step 1: Install Node.js and npm
Update and install Node.js:
sudo apt update && sudo apt upgrade -y
curl -fsSL https://deb.nodesource.com/setup_20.x | sudo -E bash -
sudo apt install -y nodejs
Verify installation:
node -v
npm -v
Step 2: Install PM2 for Process Management
npm install -g pm2
pm2 startup
3. Deploy the Next.js Application
Step 1: Clone Your Repository
Navigate to the home directory and clone your Next.js project:
cd ~
git clone https://github.com/yourusername/your-nextjs-app.git
cd your-nextjs-app
Step 2: Install Dependencies
npm install
Step 3: Build the Next.js Application
npm run build
Step 4: Start the App with PM2
pm2 start npm --name "nextjs-app" -- start
pm2 save
Check status:
pm2 list
4. Setting Up Nginx as a Reverse Proxy
Step 1: Install Nginx
sudo apt install nginx -y
Step 2: Configure Nginx
Open the Nginx configuration file:
sudo nano /etc/nginx/sites-available/default
Replace its contents with:
server {
    listen 80;
    server_name yourdomain.com www.yourdomain.com;

    location / {
        proxy_pass http://localhost:3000;
        proxy_http_version 1.1;
        proxy_set_header Upgrade $http_upgrade;
        proxy_set_header Connection 'upgrade';
        proxy_set_header Host $host;
        proxy_cache_bypass $http_upgrade;
    }
}
Save and exit (CTRL+X, then Y, then ENTER).
Step 3: Restart Nginx
sudo systemctl restart nginx
Check status:
sudo systemctl status nginx
5. Configure Namecheap DNS Settings
- Log in to your Namecheap account.
- Go to Domain List > Select your domain > Click Manage.
- Under the Advanced DNS tab, add an
A Record:-
Host:
@ - Value: Your EC2 public IP address
- TTL: Automatic
-
Host:
- Add a
CNAME Record:-
Host:
www -
Value:
yourdomain.com - TTL: Automatic
-
Host:
- Save changes and wait for propagation (~30 minutes to a few hours).
6. Optimize with Cloudflare CDN
Step 1: Add Your Site to Cloudflare
- Sign up/log in to Cloudflare.
- Click Add a Site and enter your domain.
- Cloudflare will scan your DNS records.
- Choose Free Plan and continue.
- Update your Namecheap nameservers with the ones provided by Cloudflare.
- Wait for DNS propagation.
Step 2: Enable CDN and Security Features
- Enable Automatic HTTPS Rewrites.
- Enable Always Use HTTPS.
- Turn on CDN caching for improved performance.
- Enable DDoS protection and security features.
7. Secure Your Site with SSL
Once Cloudflare is active:
- Go to Cloudflare dashboard > SSL/TLS.
- Set SSL mode to Full (Strict).
- Restart Nginx to apply changes:
sudo systemctl restart nginx
8. Deploying Updates
To deploy updates, SSH into the instance and run:
cd ~/your-nextjs-app
git pull origin main
npm install
npm run build
pm2 restart nextjs-app
9. Common Errors and Solutions
Error 1: PM2 Not Restarting on Reboot
Run:
pm2 startup
pm2 save
Error 2: Nginx 502 Bad Gateway
Check if the Next.js app is running:
pm2 list
If not running, restart:
pm2 restart nextjs-app
Error 3: DNS Propagation Delay
Check DNS propagation:
www.whatsmydns.net
Conclusion
Congratulations! Your Next.js application is now live on AWS EC2 with PM2 for process management, Nginx as a reverse proxy, and a custom domain from Namecheap optimized with Cloudflare CDN. This setup ensures high availability, security, and performance for your web application.
In the next post, I'll show you how to add a GitHub Action to automate CI/CD for your application.