


A Developer's Guide to Kubernetes Components
Kubernetes is the backbone of modern cloud-native applications. It simplifies deploying, scaling, and managing containerized workloads. But for developers, understanding its core concepts—like Pods, Deployments, and Services—is essential to building scalable and resilient apps. In this guide, you learn about Kubernetes components from a developer’s point of view, complete with real-life use cases and visual diagrams. Understanding Kubernetes Objects Kubernetes uses a declarative object model. Each object’s spec defines the desired state. The status reflects the current state. Common fields are: apiVersion: API version (e.g., v1) kind: Object type (e.g., Pod, Service) metadata: Name, namespace, labels spec: Desired configuration status: System-managed status For certain objects like Secrets and ConfigMaps, data and stringData fields are used to store key-value pairs.Kubernetes API Server accepts object definitions in a JSON format, most often such definition manifests in a YAML format which is converted by kubectl in a JSON payload and sent to the API Server. Enable Autocompletion (Optional) Autocompletion enhances your CLI experience. For example, in Bash: source

Kubernetes is the backbone of modern cloud-native applications. It simplifies deploying, scaling, and managing containerized workloads. But for developers, understanding its core concepts—like Pods, Deployments, and Services—is essential to building scalable and resilient apps.
In this guide, you learn about Kubernetes components from a developer’s point of view, complete with real-life use cases and visual diagrams.
Understanding Kubernetes Objects
Kubernetes uses a declarative object model. Each object’s spec defines the desired state. The status reflects the current state. Common fields are:
-
apiVersion: API version (e.g.,v1) -
kind: Object type (e.g., Pod, Service) -
metadata: Name, namespace, labels -
spec: Desired configuration -
status: System-managed status
For certain objects like Secrets and ConfigMaps, data and stringData fields are used to store key-value pairs.Kubernetes API Server accepts object definitions in a JSON format, most often such definition manifests in a YAML format which is converted by kubectl in a JSON payload and sent to the API Server.
Enable Autocompletion (Optional)
Autocompletion enhances your CLI experience. For example, in Bash:
source <(minikube completion bash)
Nodes
A node is a physical or virtual machine in a Kubernetes cluster. Each node runs the following:
- kubelet: Ensures containers in a Pod are running.
- kube-proxy: Manages network rules for communication.
- Container runtime: Runs containers (e.g., Docker, containerd).
In a cloud-native e-commerce app, each node could run pods handling different services—payments, inventory, or recommendations.
There are two types of nodes:
- Control plane nodes: Manage the cluster. They run the API server, scheduler, controller manager, and etcd.
- Worker nodes: Run application workloads.
Image credits : https://trainingportal.linuxfoundation.org
Namespaces
Namespaces partition cluster resources and isolate workloads. They allow teams to share a cluster without interfering with each other.
Default namespaces:
-
default: For user-defined resources. -
kube-system: For system-level components. -
kube-public: Readable by all users. -
kube-node-lease: Used for node heartbeats.
If multiple users and teams use the same Kubernetes cluster you can partition the cluster into virtual sub-clusters using Namespaces. The names of the resources/objects created inside a Namespace are unique, but not across Namespaces in the cluster.
To list all namespaces:
kubectl get namespaces
To create a namespace:
kubectl create namespace \
Namespaces support:
- Unique resource names within each namespace
- Resource isolation by team, project, or environment
- Resource quotas and limits
A good practice, however, is to create additional Namespaces, as desired, to virtualize the cluster and isolate users, developer teams, apps, or tiers.
Pods
A Pod is the smallest deployable unit in Kubernetes. It can contain one or more containers that share:
- The same network namespace
- Storage volumes
Pods are ephemeral and typically managed by higher-level objects like Deployments.
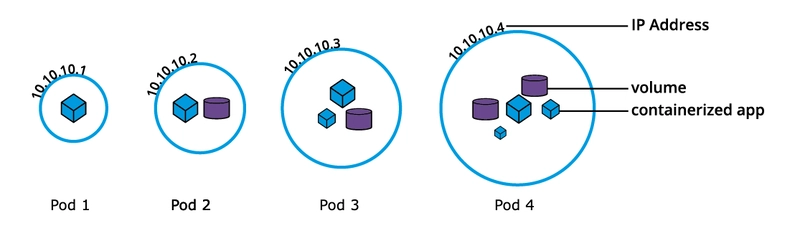
Image credits : https://trainingportal.linuxfoundation.org
Example, nginx-pod.yaml:
apiVersion: v1
kind: Pod
metadata:
  name: nginx-pod
spec:
  containers:
  \- name: nginx
    image: nginx:1.22.1
    ports:
    \- containerPort: 80
Apply the manifest:
kubectl apply \-f nginx-pod.yaml
Generate the manifest without creating the Pod:
kubectl run nginx-pod \--image=nginx:1.22.1
Labels and Selectors
Labels are key-value pairs used to organize, select, and manage Kubernetes objects. They are used by controllers and services to organize and manage resources, hence many objects can have the same Label(s).
Label Selectors:
-
Equality-based: Select resources matching specific key-value pairs.
-
kubectl get pods -l env=dev
-
-
Set-based: Select resources matching a set of values.
kubectl get pods -l 'env in (dev, qa)'

Image credits : https://trainingportal.linuxfoundation.org
Use labels to group resources logically (e.g., by environment, app version).
ReplicaSets
A ReplicaSet ensures a specific number of identical Pods are always running.
Key features:
- Self-healing: Replaces failed Pods
- Scalable: Supports manual and automated scaling
- Uses label selectors to identify Pods
For example, consider a ReplicaSet with a replica count set to 3 for a specific Pod template. Pod-1, Pod-2, and Pod-3 are identical, running the same app container image, being cloned from the same Pod template.
Although the three Pod replicas are said to be identical, they have unique Pod name and IP address. The Pod object ensures that the application can be individually placed on any worker node of the cluster as a result of the scheduling process.
YAML Example
apiVersion: apps/v1
kind: ReplicaSet
metadata:
  name: frontend
  labels:
    app: guestbook
spec:
  replicas: 3
  selector:
    matchLabels:
      app: guestbook
  template:
    metadata:
      labels:
        app: guestbook
    spec:
      containers:
      \- name: php-redis
        image: gcr.io/google\_samples/gb-frontend:v3
To create the ReplicaSet:
kubectl create \-f redis-rs.yaml
Assume that one of the Pods is forced to unexpectedly terminate (due to insufficient resources, timeout, its hosting node has crashed, etc.), causing the current state to no longer match the desired state.
The ReplicaSet detects that the current state is no longer matching the desired state and triggers a request for an additional Pod to be created, thus ensuring that the current state matches the desired state.

Image credits : https://trainingportal.linuxfoundation.org
Deployments
Deployments manage the creation, deletion, and updates of Pods. A Deployment automatically creates a ReplicaSet, which then creates a Pod.
There is no need to manage ReplicaSets and Pods separately, the Deployment will manage them on our behalf.
YAML Example
apiVersion: apps/v1
kind: Deployment
metadata:
  name: nginx-deployment
  labels:
    app: nginx-deployment
spec:
  replicas: 3
  selector:
    matchLabels:
      app: nginx-deployment
  template:
    metadata:
      labels:
        app: nginx-deployment
    spec:
      containers:
      \- name: nginx
        image: nginx:1.20.2
        ports:
        \- containerPort: 80
** Apply the manifest:**
kubectl apply \-f def-deploy.yaml
When you update the Pod template (for example, a container image), Kubernetes performs a rolling update. Each update creates a new ReplicaSet and marks it as a new revision.
Once the rolling update has completed, the Deployment will show both ReplicaSets A and B, where A is scaled to 0 (zero) Pods, and B is scaled to 3 Pods. This is how the Deployment records its prior state configuration settings, as Revisions.

Image credits : https://trainingportal.linuxfoundation.org
When you update the Pod template (for example, a container image), Kubernetes performs a rolling update. Each update creates a new ReplicaSet and marks it as a new revision.
DaemonSets
A DaemonSet ensures a Pod runs on all (or some) Nodes in the cluster. It's ideal for running background agents (e.g., log collectors, monitoring tools).
In contrast, the ReplicaSet and Deployment operators by default have no control over the scheduling and placement of multiple Pod replicas on the same Node.
YAML Example
apiVersion: apps/v1
kind: DaemonSet
metadata:
  name: fluentd-agent
  labels:
    k8s-app: fluentd-agent
spec:
  selector:
    matchLabels:
      k8s-app: fluentd-agent
  template:
    metadata:
      labels:
        k8s-app: fluentd-agent
    spec:
      containers:
      \- name: fluentd
        image: quay.io/fluentd\_elasticsearch/fluentd:v4.5.2
Create the DaemonSet:
kubectl create \-f fluentd-ds.yaml
Whenever a Node is added to the cluster, a Pod from a given DaemonSet is automatically placed on it. When any one Node crashes or it is removed from the cluster, the respective DaemonSet operated Pods are garbage collected. If a DaemonSet is deleted, all Pod replicas it created are deleted as well.
Authentication, Authorization, and Admission Control
To manage Kubernetes resources, all API requests go through three control stages:
- Authentication: Authenticate a user based on credentials provided as part of API requests.
- Authorization: Authorizes the API requests submitted by the authenticated user.
- Admission Control: Software modules that validate and/or modify user requests.

Image credits : https://trainingportal.linuxfoundation.org
Authentication
Authentication verifies the identity of a user or service making a request to the API server. Kubernetes doesn’t store user objects but supports various authentication methods:
Different user types:
- Normal users: Managed externally (e.g., client certificates, static token files, OIDC).
- Service accounts: Used by in-cluster processes. Automatically created per namespace and mount credentials into pods. The Service Accounts are tied to a particular Namespace and mount the respective credentials to communicate with the API server as Secrets.
If properly configured, Kubernetes can also support anonymous requests, along with requests from Normal Users and Service Accounts.
Authorization
Authorization determines whether an authenticated user is allowed to perform an action.
More than one module can be configured for one Kubernetes cluster, and each module is checked in sequence. If any authorizer approves or denies a request, then that decision is returned immediately.
Supported Modes
- Node Authorization: Grants kubelet access to node- and pod-related APIs.
-
Attribute-Based Access Control (ABAC): Policy-based access using user attributes.
- To enable ABAC mode, you must start the API server with the --authorization-mode=ABAC option, while specifying the authorization policy with --authorization-policy-file=PolicyFile.json.
-
Webhook: Sends authorization requests to an external service.
- To enable the Webhook authorizer, we need to start the API server with the --authorization-webhook-config-file=SOME_FILENAME option, where SOME_FILENAME is the configuration of the remote authorization service.
- Role-Based Access Control (RBAC) (Recommended).
Example: Role granting pod read access in lfs158 namespace
apiVersion: rbac.authorization.k8s.io/v1
kind: Role
metadata:
  namespace: lfs158
  name: pod-reader
rules:
\- apiGroups: \[""\]
  resources: \["pods"\]
  verbs: \["get", "watch", "list"\]
In Kubernetes, multiple Roles can be attached to subjects like users, service accounts, etc. In RBAC, you can create two kinds of Roles:
- Role: Grants namespace-scoped permissions.
- ClusterRole: Grants cluster-wide permissions.
Once the role is created, youcan bind it to users with a RoleBinding object. There are two kinds of RoleBindings:
- RoleBinding: Binds a Role or ClusterRole to users/groups/service accounts in a namespace.
- ClusterRoleBinding: Binds a ClusterRole at the cluster scope.
Example: RoleBinding for user bob
apiVersion: rbac.authorization.k8s.io/v1
kind: RoleBinding
metadata:
  name: pod-read-access
  namespace: lfs158
subjects:
\- kind: User
  name: bob
  apiGroup: rbac.authorization.k8s.io
roleRef:
  kind: Role
  name: pod-reader
  apiGroup: rbac.authorization.k8s.io
Admission Control
Admission controllers validate or modify API requests after authentication and authorization but before persistence.
Controller Types
- Validating: Check request validity.
- Mutating: Modify request objects.
Examples
- LimitRanger: Enforces resource limits.
- ResourceQuota: Enforces resource quotas.
- DefaultStorageClass: Sets default storage class.
- AlwaysPullImages: Forces images to always be pulled.
Enable admission controllers with:
\--enable-admission-plugins=NamespaceLifecycle,ResourceQuota,PodSecurity,DefaultStorageClass
Custom controllers can be created as admission webhooks to support dynamic, external validation or mutation.
Accessing Application Pods
Each Pod is assigned a dynamic IP address. If a Pod is restarted, Kubernetes assigns a new IP. If you're connecting directly to a Pod IP, you'll lose access when the Pod is replaced.

Image credits : https://trainingportal.linuxfoundation.org
Example: Accessing Pods by IP
For example, a client accesses Pods using their individual IPs. If one Pod fails, a new Pod is created with a different IP. The client must then detect and update its target IPs, which adds complexity and increases overhead.
To overcome this situation, Kubernetes provides a higher-level abstraction called Service, which logically groups Pods and defines a policy to access them. This grouping is achieved via Labels and Selectors.
**apiVersion: apps/v1**
**kind: Deployment**
**metadata:**
  **labels:**
    **app: frontend**
  **name: frontend**
**spec:**
  **replicas: 3**
  **selector:**
    **matchLabels:**
      **app: frontend**
    **template:**
      **metadata:**
        **labels:**
          **app: frontend**
      **spec:**
        **containers:**
        **\- image: frontend-application**
        **name: frontend-application**
        **ports:**
        **\- containerPort: 5000**
Services
A Kubernetes Service provides a stable network endpoint for a group of Pods. It automatically routes traffic to healthy Pods and load balances requests.
Services use label selectors to identify target Pods.
Create a Service to Expose Pods
First, define a Deployment that runs your application and labels the Pods:
apiVersion: apps/v1
kind: Deployment
metadata:
  name: frontend
spec:
  replicas: 3
  selector:
    matchLabels:
      app: frontend
  template:
    metadata:
      labels:
        app: frontend
    spec:
      containers:
        \- name: frontend-application
          image: frontend-application
          ports:
            \- containerPort: 5000
Then, expose these Pods using a Service:
apiVersion: v1
kind: Service
metadata:
  name: frontend-svc
spec:
  selector:
    app: frontend
  ports:
    \- port: 80
      targetPort: 5000
      protocol: TCP
By default, the Service type is ClusterIP, which exposes the Service only within the cluster.
To apply the Service:
kubectl apply \-f frontend-svc.yaml
Or use kubectl expose:
kubectl expose deployment frontend \--name=frontend-svc \\
  \--port=80 \--target-port=5000`
How Services Group Pods
Services use label selectors to identify groups of Pods. You can define separate Services for each group:
-
frontend-svc— targets Pods withapp=frontend -
db-svc— targets Pods withapp=db

Image credits : https://trainingportal.linuxfoundation.org
When you create a Service, Kubernetes:
- Assigns it a ClusterIP (accessible only inside the cluster)
- Maps that ClusterIP to a list of Pod IPs and ports (called Endpoints)
- Uses kube-proxy to route traffic based on IP rules
To view the Service and its endpoints:
kubectl get service,endpoints frontend-svc
The client connects to the Service via its ClusterIP. The Service forwards traffic to one of the selected Pods and performs load balancing.
The user/client now connects to a Service via its ClusterIP, which forwards traffic to one of the Pods attached to it. A Service provides load balancing by default while selecting the Pods for traffic forwarding.
Load Balancing and Failover
A Service balances traffic across all healthy Pods. When a Pod is replaced, the Service updates its endpoints list and redirects traffic to the new Pod—no changes needed in client configuration.
Note: Each endpoint includes the Pod's IP and its target port.
Kube-proxy
In Kubernetes, each node runs kube-proxy, a network proxy that maintains network rules on nodes. It enables communication to your Pods from network sessions inside or outside of your cluster.
Each node runs kube-proxy, which:
- Service Management: kube-proxy watches the Kubernetes API for changes in Service and Endpoint objects, updating the node's network rules accordingly.
- Traffic Routing: It uses either iptables or IPVS to handle traffic routing. By default, iptables is used, which is simple and well-supported but less efficient than IPVS.
For each new Service, kube-proxy configures iptables rules on each node to capture traffic for the Service's ClusterIP and forward it to one of the Service's endpoints. This enables any node to receive external traffic and route it internally based on the iptables rules. When a Service is removed, kube-proxy deletes the corresponding iptables rules from all nodes.
The kube-proxy agent runs on every node, and iptables rules are redundantly populated across nodes. Each iptables instance stores routing rules for the entire cluster, ensuring that Service objects implement distributed load balancing.

Image credits : https://trainingportal.linuxfoundation.org
Traffic Policies
Kubernetes Services support traffic policies that influence routing decisions:
- Cluster (Default): Routes traffic to all ready endpoints, regardless of their node.
- Local: Routes traffic only to endpoints on the same node as the client. If no local endpoints are available, the traffic is dropped.
You can configure these policies in your Service manifest:
apiVersion: v1
kind: Service
metadata:
  name: frontend-svc
spec:
  selector:
    app: frontend
  ports:
    \- protocol: TCP
      port: 80
      targetPort: 5000
  internalTrafficPolicy: Local
  externalTrafficPolicy: Local
Service Discovery
Kubernetes supports two service discovery mechanisms:
- Environment Variables: For each active Service, Kubernetes injects environment variables into new Pods. For example:
REDIS_MASTER_SERVICE_PORT.- Note: These variables are set only when the Pod starts.
- DNS-Based Discovery: Kubernetes DNS creates names like:
my-svc.my-namespace.svc.cluster.local
This allows Services to be discoverable within the cluster.
ServiceType
Kubernetes Services can be exposed in different ways, defined by the type field:
- Is only accessible within the cluster.
- Is accessible from within the cluster and the external world.
- Maps to an entity which resides either inside or outside the cluster.
Access scope is decided by ServiceType property, defined when creating the Service.
ClusterIP (default)
Exposes the Service on an internal IP, making it accessible only within the cluster.

Image credits : https://trainingportal.linuxfoundation.org
NodePort
Exposes the Service on a static port on each node’s IP. A ClusterIP Service, to which the NodePort Service routes, is automatically created.
LoadBalancer
Exposes the Service externally using a cloud provider's load balancer. NodePort and ClusterIP Services, to which the external load balancer routes, are automatically created.

Image credits : https://trainingportal.linuxfoundation.org
Note: Requires cloud provider support.
ExternalIP
Maps a Service to an external IP address. Traffic that is ingressed into the cluster with the ExternalIP (as destination IP) on the Service port, gets routed to one of the Service endpoints

Image credits : https://trainingportal.linuxfoundation.org
The administrator must configure external routing.
ExternalName
Maps the Service to an external DNS name using a CNAME record. No proxying occurs.
Multi-Port Services
Expose multiple ports in a single Service:
apiVersion: v1
kind: Service
metadata:
  name: my-service
spec:
  selector:
    app: myapp
  type: NodePort
  ports:
    \- name: http
      protocol: TCP
      port: 8080
      targetPort: 80
      nodePort: 31080
    \- name: https
      protocol: TCP
      port: 8443
      targetPort: 443
      nodePort: 31443
This is a helpful feature when exposing Pods with one container listening on more than one port, or when exposing Pods with multiple containers listening on one or more ports.
Port Forwarding for Local Testing
Use kubectl to forward a local port to a Service for testing:
kubectl port-forward svc/frontend-svc 8080:80
This is useful for debugging applications without exposing the Service externally.
Kubernetes Ingress
Kubernetes Services support internal routing, but defining routing logic per Service leads to duplication and limited flexibility. Ingress decouples routing rules from individual Services and acts as a centralized entry point for external traffic.
Ingress defines HTTP and HTTPS routing rules and acts as a single entry point for external traffic into your cluster. It configures a Layer 7 (application layer) load balancer and supports the following capabilities:
- TLS termination: Offload SSL at the edge.
- Name-based virtual hosting: Route traffic by hostname.
- Fanout routing: Route traffic by URL path.
- Custom routing rules: Use annotations to enable advanced behaviors.
- Load balancing: Distribute traffic across Service backends.

Image credits : https://trainingportal.linuxfoundation.org
Instead of accessing a Service directly, clients connect to the Ingress endpoint. The Ingress resource defines routing rules that forward requests to the appropriate Service based on hostnames and URL paths.
Note: The Ingress resource itself does not handle traffic. An Ingress Controller—such as NGINX—interprets the rules and manages request forwarding.
Example: Name-Based Virtual Hosting
Use this pattern to route traffic based on the request hostname.
apiVersion: networking.k8s.io/v1
kind: Ingress
metadata:
  name: virtual-host-ingress
  namespace: default
  annotations:
    nginx.ingress.kubernetes.io/service-upstream: "true"
spec:
  ingressClassName: nginx
  rules:
  - host: blue.example.com
    http:
      paths:
      - path: /
        pathType: ImplementationSpecific
        backend:
          service:
            name: webserver-blue-svc
            port:
              number: 80
  - host: green.example.com
    http:
      paths:
      - path: /
        pathType: ImplementationSpecific
        backend:
          service:
            name: webserver-green-svc
            port:
              number: 80
In this example, requests to blue.example.com and green.example.com are routed to their respective backend Services.

Image credits : https://trainingportal.linuxfoundation.org
Example: Path-Based Fanout Routing
Use this pattern to route traffic based on the URL path.
apiVersion: networking.k8s.io/v1
kind: Ingress
metadata:
  name: fan-out-ingress
  namespace: default
  annotations:
    nginx.ingress.kubernetes.io/service-upstream: "true"
spec:
  ingressClassName: nginx
  rules:
  \- host: example.com
    http:
      paths:
      \- path: /blue
        pathType: ImplementationSpecific
        backend:
          service:
            name: webserver-blue-svc
            port:
              number: 80
      \- path: /green
        pathType: ImplementationSpecific
        backend:
          service:
            name: webserver-green-svc
            port:
              number: 80
Requests to example.com/blue and example.com/green are routed to the corresponding Services.
The ingress is fulfilled by an Ingress Controller, which is a reverse proxy responsible for traffic routing based on rules defined in the Ingress resource.
Ingress Controller
The Ingress resource only defines routing rules. It does not route traffic on its own. An Ingress Controller is responsible for fulfilling these rules.
An Ingress Controller:
- Monitors the Kubernetes API for changes to Ingress resources
- Configures the Layer 7 load balancer
- Acts as a reverse proxy for external traffic
Popular Ingress Controllers
- NGINX Ingress Controller
- AWS Load Balancer Controller
- GCE L7 Load Balancer
- Istio Ingress
Note: Each controller may require specific annotations. Always specify the correct ingressClassName and annotations for compatibility.
Deploy an Ingress Resource
After enabling the Ingress Controller, deploy your Ingress resource using:
kubectl create \-f virtual-host-ingress.yaml
Annotations
Annotations allow you to store non-identifying metadata on Kubernetes objects in key-value pairs. They're not used for selection but provide auxiliary information to tools.
Common use cases:
- Store build/release IDs, Git branch names.
- Reference logging or monitoring tools.
- Annotate ingress controller data.
Example: Add annotations during Deployment creation
apiVersion: apps/v1
kind: Deployment
metadata:
  name: webserver
  annotations:
    description: "Deployment PoC \- 2 Mar 2022"
spec:
  ...
Resource Quotas and Limit Ranges
In multi-tenant Kubernetes clusters, it's essential to prevent any single user or team from consuming excessive resources. Kubernetes provides ResourceQuota and LimitRange objects to enforce such constraints.
Resource Quotas
ResourceQuota objects limit the aggregate resource consumption per namespace. They can restrict:
- Object counts (Pods, Services, ConfigMaps, etc.)
- Compute resources (CPU, memory).
- Storage resources (PersistentVolumeClaims).
Example:
apiVersion: v1
kind: ResourceQuota
metadata:
  name: compute-resources
  namespace: devspace
spec:
  hard:
    requests.cpu: "1"
    limits.cpu: "2"
    requests.memory: 1Gi
    limits.memory: 2Gi
Limit Ranges
LimitRange objects set default request and limit values for Pods or Containers within a namespace. They ensure that containers don't consume excessive resources and help maintain cluster stability.
Example:
apiVersion: v1
kind: LimitRange
metadata:
 name: cpu-limits
 namespace: devspace
spec:
 limits:
 - default:
     cpu: 500m
   defaultRequest:
     cpu: 500m
   max:
     cpu: "1"
   min:
     cpu: 100m
   type: Container
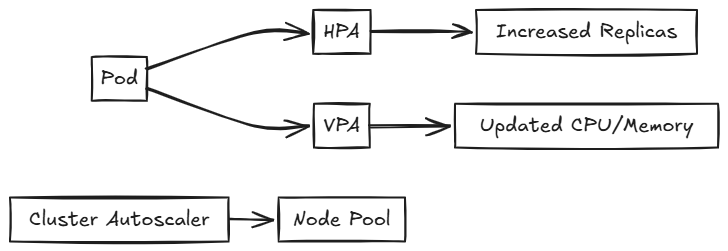
Autoscaling
Autoscaling in Kubernetes adjusts the number of running objects based on resource utilization, availability, and requirements. There are several types of autoscalers:
Horizontal Pod Autoscaler (HPA)
HPA automatically scales the number of pod replicas based on CPU utilization or other select metrics.
kubectl autoscale deploy myapp \--min=2 \--max=10 \--cpu-percent=80
Vertical Pod Autoscaler (VPA)
VPA adjusts the CPU and memory requests and limits for containers based on usage. It helps optimize resource allocation for individual pods.
Cluster Autoscaler
The Cluster Autoscaler adjusts the number of nodes in your cluster when pods fail to launch due to insufficient resources or when nodes in the cluster are underutilized. In Azure Kubernetes Service (AKS), it's recommended to let the Kubernetes Cluster Autoscaler manage the required scale settings.
Job Scheduling
Jobs
A Job creates one or more Pods to perform a specific task and ensures that the specified number of Pods successfully terminate. Jobs are useful for batch processing tasks.
Configuration Options:
- parallelism: Number of Pods to run in parallel.
- completions: Number of successful completions needed.
- activeDeadlineSeconds: Duration in seconds the Job may be active.
- backoffLimit: Number of retries before marking the Job as failed.
- ttlSecondsAfterFinished: Time to retain the Job after completion.
Example:
apiVersion: batch/v1
kind: Job
metadata:
  name: data-cleanup
spec:
  template:
    spec:
      containers:
      \- name: cleaner
        image: busybox
        command: \["sh", "-c", "cleanup.sh"\]
      restartPolicy: Never
  backoffLimit: 4
CronJobs
CronJobs schedule Jobs to run periodically at fixed times, dates, or intervals. They are useful for recurring tasks like backups or report generation .
Configuration Options:
- schedule: Cron format schedule string.
- startingDeadlineSeconds: Deadline in seconds for starting the Job if it misses its scheduled time.
- concurrencyPolicy: Specifies how to treat concurrent executions.
Example:
apiVersion: batch/v1
kind: CronJob
metadata:
  name: db-backup
spec:
  schedule: "0 1 \* \* \*"
  jobTemplate:
    spec:
      template:
        spec:
          containers:
          \- name: backup
            image: backup-tool
          restartPolicy: OnFailure
StatefulSets
StatefulSets manage the deployment and scaling of Pods with unique, persistent identities. Unlike Deployments, StatefulSets guarantee the ordering and uniqueness of Pods, making them ideal for stateful workloads.
Key Features
- Persistent storage: Each Pod in a StatefulSet gets its own PersistentVolume. This volume is retained across Pod restarts or rescheduling.
-
Stable network identity: Each Pod receives a unique and consistent DNS name, allowing predictable network communication (for example,
pod-0.service-name). - Ordered operations: Pods are created, updated, and deleted in a defined order, one at a time. This ensures safe startup, updates, and shutdowns.
Real-World Example
Use StatefulSets to deploy clustered databases or distributed systems where each node must retain its identity and storage.
Use Case: Cassandra or Redis Clusters
In a Cassandra cluster:
- Each node (Pod) requires a stable hostname for cluster gossip protocol.
- Each node needs its own storage volume to persist data across rescheduling.
apiVersion: apps/v1
kind: StatefulSet
metadata:
  name: redis
spec:
  serviceName: "redis"
  replicas: 3
  selector:
    matchLabels:
      app: redis
  template:
    metadata:
      labels:
        app: redis
    spec:
      containers:
        \- name: redis
          image: redis:7.0
          volumeMounts:
            \- name: redis-data
              mountPath: /data
  volumeClaimTemplates:
    \- metadata:
        name: redis-data
      spec:
        accessModes: \[ "ReadWriteOnce" \]
        resources:
          requests:
            storage: 1Gi
Custom Resources
Custom Resources are user-defined API objects that allow you to store and retrieve structured data in Kubernetes. Combined with controllers, they help automate custom workflows or represent external systems inside your cluster.
Custom Resource Definitions (CRDs)
CRDs are the most common way to add custom resources. They allow you to define custom objects without modifying the Kubernetes source code .
apiVersion: apiextensions.k8s.io/v1
kind: CustomResourceDefinition
metadata:
name: databases.example.com
spec:
group: example.com
versions:
\- name: v1
served: true
storage: true
schema:
openAPIV3Schema:
type: object
properties:
spec:
type: object
properties:
engine:
type: string
scope: Namespaced
names:
plural: databases
singular: database
kind: Database
shortNames:
\- db
Once registered, you can create resources like:
apiVersion: example.com/v1
kind: Database
metadata:
name: my-postgres-db
spec:
engine: postgres
Use a CRD to manage custom services like Database, Cache, or Queue, with a controller automating provisioning tasks across your infrastructure.
API Aggregation
API Aggregation is an advanced extension mechanism. It lets you run a separate API server behind the Kubernetes API, delegating requests to custom endpoints.
- Your API server must implement Kubernetes-style authentication, authorization, and admission control.
- You write and deploy your own API server.
This method is more complex but offers greater flexibility.
Security Contexts
Security Contexts define privilege and access controls for Pods and containers. You can use them to enforce non-root execution, set file system permissions, and limit privilege escalation.
Example: Secure Pod Configuration
apiVersion: v1
kind: Pod
metadata:
  name: secure-pod
spec:
  securityContext:
    runAsUser: 1000       \# Runs Pod as non-root user
    fsGroup: 2000         \# Shared file system group
  containers:
  \- name: app
    image: busybox
    securityContext:
      allowPrivilegeEscalation: false  \# Prevents gaining extra privileges
Note: Always run containers as a non-root user unless absolutely necessary.
Pod Security Admission
Pod Security Admission (PSA) is a built-in admission controller in Kubernetes. It enforces security standards at the namespace level by applying predefined policies.
- Restricted: Strictest, enforces non-root and drops capabilities.
- Baseline: Reasonably secure defaults.
- Privileged: Allows full capabilities—use with caution.
Example: Enable Restricted Policy
kubectl label namespace my-namespace \\ pod-security.kubernetes.io/enforce=restricted
Network Policies
Network Policies control traffic flow to and from Pods. By default, all traffic is allowed unless restricted by a policy.
Example: Allow Only Frontend to Access Database
apiVersion: networking.k8s.io/v1
kind: NetworkPolicy
metadata:
  name: allow-frontend
spec:
  podSelector:
    matchLabels:
      role: db
  ingress:
  \- from:
    \- podSelector:
        matchLabels:
          role: frontend
    ports:
    \- port: 5432
Combine multiple policies to fine-tune network security for microservices.

Metrics Server
The Metrics Server is a lightweight resource monitoring component. It provides CPU and memory usage data for Pods and nodes.
Example Commands:
kubectl top pods
kubectl top nodes

Prometheus
Prometheus is a robust monitoring tool that collects and queries time-series metrics.
- Scrapes metrics from applications and Kubernetes components.
- Supports alerting and visualizations via Grafana.
Example Use Case:
Monitor HTTP request rates and latency in a web application. Integrate alerts when request rates spike or response times degrade.
Helm: Kubernetes Package Manager
Helm is the de facto package manager for Kubernetes. It enables developers to deploy and manage complex applications using templated YAML files—called charts—that follow DRY (Don't Repeat Yourself) principles.
Package and deploy complex applications like WordPress, NGINX Ingress, or custom APIs using reusable charts. A chart includes:
- Template files for resource definitions
- Configuration values
- Metadata (e.g., chart name, version)
Charts can be stored in repositories—similar to how .deb or .rpm packages are stored for Linux distributions—or in container registries.
Key Benefits
- Reusable templates: Use Helm charts to define, install, and upgrade Kubernetes applications.
- Version control: Roll back to previous releases with a single command.
- GitOps friendly: Integrates well with tools like Argo CD and Flux for continuous delivery.
How Helm Works
Helm is a command-line tool that runs alongside kubectl and uses your existing kubeconfig file to connect securely to your cluster. It performs the following actions:
- Searches chart repositories based on your criteria.
- Downloads the selected chart to your local system.
- Uses the Kubernetes API to deploy the resources defined in the chart.
You can also use Helm to upgrade or delete deployments.
Benefits:
- DRY deployment configs
- Easy upgrades/rollbacks
- Integrates with GitOps workflows
Service Mesh: Advanced Service Communication
A service mesh abstracts communication between microservices into a dedicated infrastructure layer. It helps manage:
- Secure communication: Enforces mutual TLS (mTLS) between Pods.
- Advanced traffic routing: Supports strategies like canary releases and A/B testing.
- Observability: Collects traffic metrics, latency data, and failure insights without modifying app code.
Architecture Overview
Each Pod includes a sidecar proxy that handles communication and policy enforcement. These proxies form the data plane, while a central control plane manages configuration and telemetry.
- Data Plane: Handles service traffic. This usually includes sidecar proxies injected into each Pod, or node-level proxies in some implementations.
- Control Plane: Manages configuration, service discovery, policy enforcement, and telemetry.
The sidecar proxy intercepts all inbound and outbound traffic to the Pod, enabling consistent policy enforcement and observability without modifying the application code.
Decoupling of networking logic from application code
Popular Service Meshes
| Name | Notable Feature |
|---|---|
| Istio | Full-featured, widely adopted |
| Linkerd | Lightweight and CNCF-supported |
Next steps
For more information, refer to: